If you think a couple of trash bags and a box fan will keep mold spores from touring the rest of your house, I’ve got bad news and a HEPA filter for you. Proper containment is the line between a clean bill of health and a failed clearance test that nukes your schedule and your budget. When we set up negative air containment, we’re not decorating with plastic. We’re building a controlled environment that keeps the dirty air in, the clean air out, and the inspector happy on the first visit.
Why Containment Matters
Mold remediation without containment is just creative redistribution. Disturb a colony and it throws a microscopic party. Those spores land in ducts, closets, and Grandma’s quilt, then you’re cleaning a much bigger mess. The point of containment is simple: prevent cross-contamination, protect occupants and workers, and pass clearance the first time. That means a pressure-controlled work zone with sealed barriers, monitored negative pressure, and smart workflow through airlock entry systems so nothing hitchhikes out on boots, tools, or air currents.
Insurance adjusters, industrial hygienists, and indoor air quality pros all look at the same things: was the space isolated, was pressure maintained, and did the crew actually clean or just put on a plastic show? Do it right and the post-remediation verification is uneventful. Do it sloppy and you’ll be explaining why spores showed up in rooms that were supposed to stay clean.
What Is Negative Air Containment?
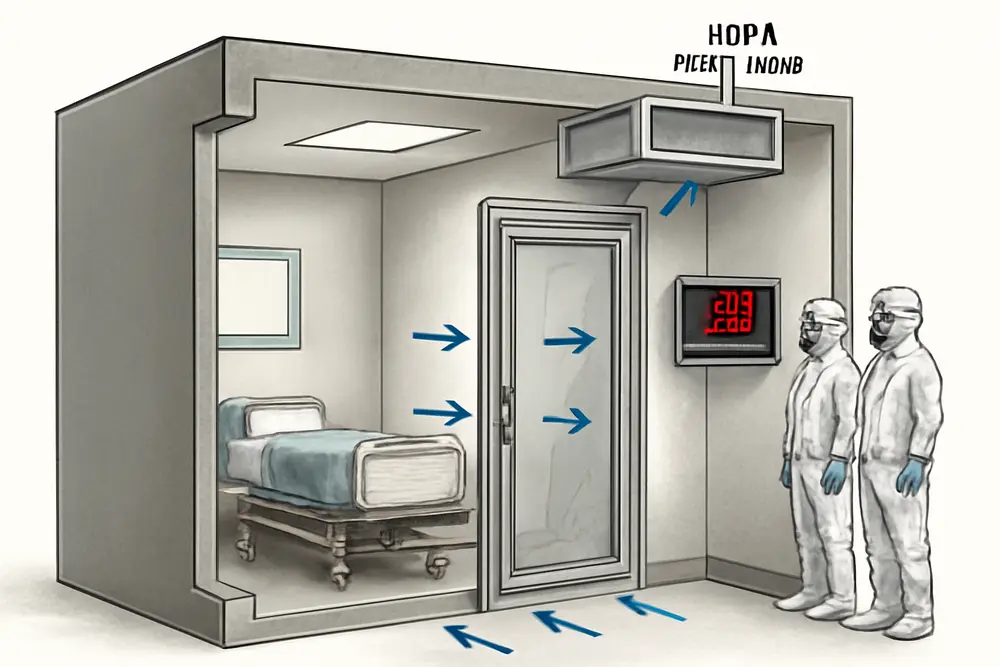
Negative air containment is a sealed work zone kept under lower pressure than surrounding areas. Air always flows from higher pressure to lower pressure, which means clean air moves into the work area while contaminated air never escapes. You maintain this pressure difference with a HEPA-filtered air filtration device (AFD), often called a negative air machine, ducted to exhaust air out of the containment and out of the building or to a safe discharge location. Fresh replacement air, known as makeup air, is allowed in through controlled points so the machine is not starving for airflow and the pressure differential stays steady.
The playbook looks like this: frame and seal the containment with 6-mil poly sheeting and tight seams, install the AFD with ducting that routes exhaust outdoors, set up airlock entry systems for people and waste, and keep a manometer on the wall to watch pressure. Smoke tests at seams confirm airflow is headed in the right direction. During demolition and cleaning, the AFD runs 24-7 until clearance is complete. The end.
If you want a primer that skips the fluff and supports the science, the EPA’s mold course covers the basics of barriers, decontamination chambers, and negative pressure work zones here.
The Airflow Rule: Inward Only
Every decision in containment design comes back to one rule: air moves into the work area, not out. Doors, flaps, and zipper entries should all be arranged so the pressure drop pulls them closed. Exhaust points go as far from entries as possible to set a clear directional flow across the space. If you see plastic bowing outward or feel air puff at your face when you unzip a door, your setup is backwards and spores are window-shopping the rest of the property.
Core Gear You Actually Need
You do not need a truckload of gadgets, but you do need a few workhorses that always perform:
- HEPA AFD/negative air machine with variable speed control
- Ducting that reaches outdoors without kinks or crushed elbows
- Digital manometer for pressure monitoring, ideally datalogging
- 6-mil poly sheeting, quality poly or cloth-backed tape, spray adhesive
- Foam or gasket material for uneven surfaces and trim
- Zipper doors that don’t stall, plus a two- or three-chamber airlock
- HEPA vacuums, microfiber, and cleaning agents approved for remediation
Airlock Entry Systems & Decon Chambers
Think of airlock entry systems as the bouncers at the club. Nothing gets out that isn’t supposed to. A proper airlock is a series of small chambers attached to the primary containment so workers can move from dirty to clean in stages, shedding contamination along the way. The outer chamber faces the clean space, the inner chamber faces the work area, and if you add a third, it becomes a dedicated decon or equipment room. Each chamber is separated by sealed openings with zipper doors or overlapping slits and weighted flaps that self-close in the direction of the negative pressure.
Inside the airlock you stage clean PPE, a small HEPA vac for tools, waste bags, and disinfectant wipes. On exit you vacuum off suits and tools, bag waste, then strip gear in the next chamber. The setup prevents that classic failure where someone walks out for a coffee run and sprinkles spores across the hallway like parmesan.
Two-Chamber vs Three-Chamber
Small projects often run a two-chamber system: clean side and transition side. Medium to large projects benefit from a third chamber as a dedicated decon. The advantage is workflow. Tools can be cleaned and parked without clogging the path, and workers have space to remove PPE without dragging respirators across contaminated gear. Add a small sticky mat on the clean-side exit if the client’s floor can tolerate it.
Zipper Doors That Don’t Betray You
Install zipper doors on flat, taut poly so the teeth line up and the seal bites. Double-tape the perimeter, then roll the zipper flap to create a raised dam so wet floors do not wick up under the seam. For long projects, add a second zipper on the opposite side of the airlock as a backup. Overlapping slit doors with weighted flaps are fine inside airlocks as an extra layer, but for the main entry, a real zipper reduces snagging and lazy closures.
Pressure Differential & Monitoring
Now the part that separates pros from plastic artists: pressure monitoring. A negative pressure differential of around 5 Pascals is widely used as a baseline target for containment, with many jobs operating in the 5 to 12 Pascal range depending on building tightness, door traffic, and weather. That translates to roughly 0.02 to 0.05 inches of water column. The goal is consistency without crushing the poly or stealing air from places you did not plan for. You measure it with a manometer. Mount the sensor tubing with one port in the containment and one in the adjacent clean area so you always see the difference.
Continuous monitoring is not optional if you want to pass clearance the first time. A datalogging manometer or an alarmed unit tells you when doors are left open or when a filter is choking off airflow. We smoke test seams and entries at setup and after any major material removal to catch new leaks. Industry resources break this down plainly, including practical tips like smoke pencil checks and routine inspections like this. General remediation guidelines that many pros follow cite that 5 Pascal mark as a solid starting point here.
How Much Negative Pressure?
Enough that the plastic bows inward and the manometer reads stable. Too little and you do not get inward airflow at entries. Too much and you start pulling air through unplanned cracks, whistling under baseboards, or bending studs with your ego. In older or leaky buildings, a steady 5 to 7 Pascals usually holds even with traffic. In tighter construction, you can operate lower and still maintain safe directionality. Always confirm with your monitor and smoke, not guesswork.
Pro Tips For Real Buildings
When cold-to-hot or humid-to-dry transitions are happening outdoors, stack effect and wind can swing your readings. Counter with a make-up air opening that is predictable, keep your exhaust on the leeward side if possible, and bump the AFD speed slightly during peak demolition. Train one worker to be the “pressure hawk” who glances at the manometer every time they enter or exit. It is amazing how fast people improve door discipline when they know someone is watching the numbers.
Makeup Air & Exhaust
Negative air machines are not magicians. If they exhaust 300 cubic feet per minute, 300 cubic feet per minute must come from somewhere. If you do not provide makeup air, the AFD will steal it from wall cavities, attics, or that weird gap under the kitchen door you forgot to tape. Plan for a controlled makeup air path. We often create a filtered intake at the far end of the containment using a framed opening with a MERV-13 prefilter or a HEPA prefilter panel. Position it so air travels across the work area toward the AFD inlet and out the exhaust. That single move raises cleaning efficiency, captures more aerosolized debris, and keeps pressure stable.
Route exhaust outdoors. Do not blast the next room or the garage because it is convenient. Keep the duct run as straight as possible, support it so it does not collapse, and seal each joint with duct tape or appropriate collars. If local conditions or building layout force you to recirculate, you must still run HEPA on the AFD and confirm the device is sized to keep the pressure differential while filtering. When we recirculate inside a building, we pay even more attention to zipper door discipline, vacuuming, and final cleaning because you are relying entirely on filtration.
Size matters. Many crews target 4 to 6 air changes per hour in containment during active removal and cleaning. To estimate your needed CFM, multiply your target ACH by the containment volume in cubic feet and divide by 60. If your containment is 1,800 cubic feet and you want 6 ACH, you need around 180 CFM. If your AFD minimum is 250 CFM, you may need a bleed or restricted intake to keep pressure steady without ballooning the poly. Use your manometer as the referee, not marketing stats.
Zipper Doors, Sealing & Housekeeping
Containment lives or dies at the edges. Use 6-mil poly for walls and double-layer for floors if moisture or heavy debris is involved. Tension the plastic so it is drum-tight before taping seams. For rough surfaces or textured walls, use a spray adhesive and then tape, or back the seam with foam gasket. Seal HVAC registers and returns with rigid covers under poly, not just a slapped-on square of plastic. Trim work, recessed lights, and outlet plates love to leak, so foam and tape those too. The extra hour sealing saves you days of chasing spores later.
Housekeeping is where clearance tests are won. HEPA vacuum first, top to bottom, then damp wipe or wet clean with appropriate solutions, then HEPA vacuum again after dry. Do it every day on active projects and at every shift change on shorter jobs. Bag waste inside the containment, twist and tape the neck, then transfer through the airlock to staging. Never park a dusty bag in the clean chamber. If your filters or prefilters are browning out, change them before the day is done. Tired filters let particles blow past and they also starve airflow, which makes pressure monitoring bounce like a heart monitor in a movie.
Clean Protocols To Pass Clearance
Passing clearance is not luck, it is paperwork and polish. Inspectors look for a visually clean work area with no dust, debris, or staining, then they sample air or surfaces depending on the project scope. During containment, log your pressure readings at least three times a day or use a datalogger. Photograph your barriers, airlock entry systems, zipper doors, and exhaust routing. If someone asks later, you will have receipts.
Our standard sequence goes like this: finish removal and gross cleanup, run the AFDs and scrubbers while we HEPA vacuum top to bottom, perform a damp wipe on every surface in the containment and airlock, vacuum again after dry, then let the AFD run at least overnight so suspended particles get captured. Before the assessor shows up, we do a flashlight-and-white-wipe inspection and a quick smoke check of entries. If anything twinges our gut, we re-clean. Common clearance killers include PPE tracked through clean areas, exhaust ducts popping loose, running non-HEPA fans next door, and turning off machines too early. Do not be that crew.
If you want a perspective on how contamination controls start and stop at job boundaries, this piece from R&R Magazine is a worthwhile read here. It underscores that containment is a system, not just plastic.
Case File: Passing Clearance In One Shot
We were called to a two-story home with a laundry leak that fed a wall cavity for weeks. The affected area was roughly 225 square feet, but the potential for cross-contamination included a hallway and a return plenum six feet away. We built a primary containment around the laundry and adjacent hall with a three-chamber airlock near the living room entry. Poly walls were 6-mil, floor double-layered, and we gasked tricky trim with foam before taping.
Our AFD was set to around 250 to 300 CFM, ducted 25 feet outdoors through a window panel. The containment volume was about 1,800 cubic feet, so the flow gave us 8 to 10 air changes per hour while holding a 6 to 8 Pascal negative pressure. We created a framed makeup air opening on the far end of the hall with a MERV-13 prefilter so air traveled from the living room, through the hall, and out at the laundry where the AFD inlet sat low. A digital manometer logged pressure every minute. Crews smoked seams at setup and again after drywall removal because freshly cut edges love to leak.
Zipper doors were double-taped and rolled with a raised lip. Inside the airlock, we parked a small HEPA vac, wipes, and clean bags. Outgoing waste was bagged, wiped, and transferred in stages. PPE came off in the middle chamber, not at the living room threshold. We HEPA vacuumed, wiped, HEPA vacuumed again, then let the AFD run overnight. Clearance sampling the next morning passed without a raised eyebrow. The assessor’s comment: “Everything flowed the right direction and it’s clean.” Translation: containment did its job.
Field Checklist For Crews
Planning beats rework every time. Here is the short version we keep on our trucks:
- Assess the airflow path, pick your exhaust route, and plan a controlled makeup air point.
- Frame containment, tension 6-mil poly, gasket irregulars, and double-tape seams.
- Install a two- or three-chamber airlock with zipper doors and inward-closing flaps.
- Set AFD to maintain 5 to 12 Pascals negative pressure; verify with a manometer.
- Smoke test entries and suspect seams at setup, after demolition, and before final clean.
- HEPA vacuum and wet clean daily, bag waste inside, and manage PPE in the airlock.
- Log pressure, photograph setups, and keep filters fresh.
- Run AFDs through final cleaning and until after clearance sampling.
FAQs
How long should the negative air machine run?
From the moment containment is built until after final cleaning and clearance. During active removal, it runs continuously. After the last HEPA vacuum and wipe, we keep it running to capture any aerosolized fine dust before sampling.
What pressure differential should I target?
A stable 5 Pascals is a common baseline. Many jobs sit in the 5 to 12 Pascal range depending on the building and activity. Use a manometer and smoke tests to confirm directionality and adjust as needed. If your plastic is trying to kiss your face, throttle back or add makeup air.
Can I rent airlock entry systems for DIY?
You can buy zipper doors and build a simple two-chamber airlock with lumber and poly, but containment is not just hardware. It is design, pressure monitoring, cleaning protocols, and discipline. For small, non-porous cleanups you might manage. For mold inside walls or near HVAC, bring in a pro so you do not spread the problem.
How do I size the AFD for my containment?
Calculate the containment volume in cubic feet and pick a target of 4 to 6 ACH during remediation. CFM equals ACH times volume divided by 60. Start there, then set the machine to maintain your pressure target. The manometer tells you the truth. Too much CFM without makeup air just finds leaks you did not plan for.
Do I have to exhaust outdoors?
It is best practice to exhaust outdoors when possible. If the layout prevents that, you can recirculate through the HEPA AFD but you must maintain pressure and tighten up your cleaning and entry discipline. Either way, never exhaust into an occupied adjacent space.
What causes clearance to fail?
Dirty surfaces at inspection, pressure not maintained, exhaust leaks, poorly managed airlocks, shutting down machines too early, and walking contamination into clean zones. Zipper doors left open are a classic. Filters clogged and starving airflow is another. A quick pre-inspection by your own team catches most of this.
Gear And Purpose At A Glance
| Component | What It Does | Pro Tip |
|---|---|---|
| HEPA AFD | Creates negative pressure and captures fine particles | Use variable speed and watch the manometer, not just CFM specs |
| Makeup Air Opening | Provides clean, controlled replacement air | Add a MERV-13 or HEPA prefilter and place opposite the exhaust path |
| Airlock Entry Systems | Stops contamination from hitchhiking out | Stage wipes and a HEPA vac inside; manage PPE in the middle chamber |
| Zipper Doors | Self-closing, reliable access | Double-tape perimeters and roll a small lip to block floor wicking |
| Manometer | Verifies pressure differential continuously | Mount where you can see it and log readings or use datalogging |
| 6-mil Poly & Tape | Builds the containment shell | Tension first, then tape; add foam at tricky edges |
If you are staring at a wet wall and wondering if a box fan could fix this, it cannot. Negative air containment with real pressure monitoring, smart makeup air, tight zipper doors, and disciplined airlock entry systems is how you keep mold from turning a single-room problem into a whole-house headache. If you want it set up right the first time, call a crew that treats containment like a system, not a photo op.