If you swing a hammer at mold without proper containment, you are basically turning your home into a spore sprinkler. The fix is not magic, it is physics. Negative pressure, airtight barriers, airlocks, and pressure differential monitoring keep mold where it belongs while you remove it. This is the negative air containment playbook I put in motion on every mold job, from a small bathroom gut to a full-blown attic bio-snow globe. We are talking poly, zipper doors, HEPA, manometers, and worker decon that does not track spores through the rest of the house.
What Is Containment and Why It Matters
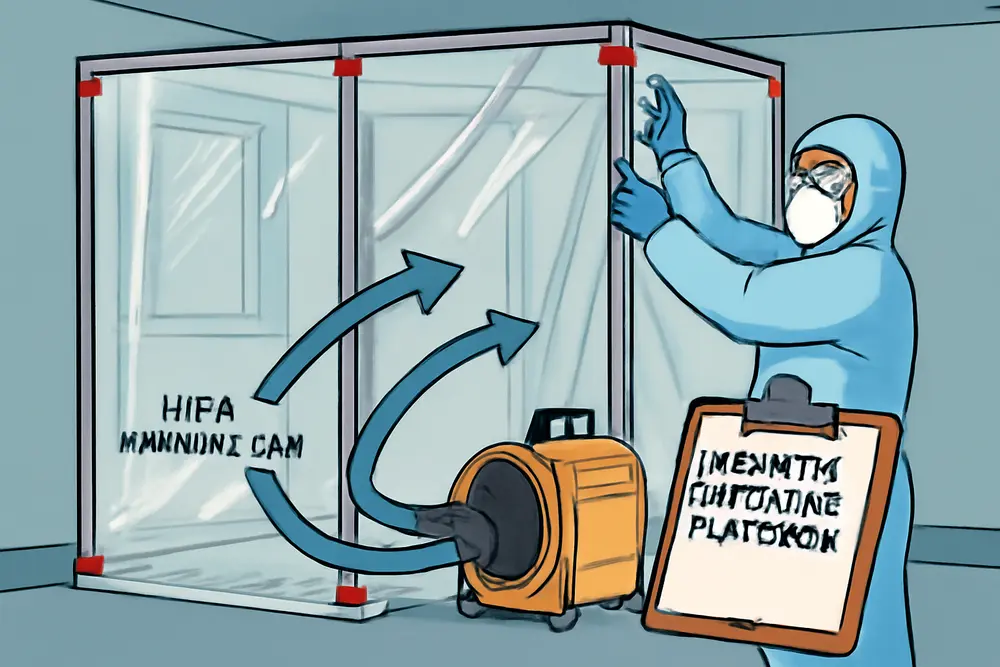
Containment is the controlled environment you build so mold cleanup does not contaminate the clean side of the structure. It is a sealed work zone that uses barriers and negative pressure to pull air into the workspace, not out of it. Mold reproduces with microscopic spores that ride air currents like hitchhikers. Cut drywall, pull carpet, or sand framing without negative air containment, and your return grille, stairwell, and family room couch become unwilling hosts. With a properly built containment, all airflow is directed in, the dirty air is filtered and exhausted out, and the rest of the property stays clean.
In practice, that means 6-mil poly sheeting to create a physical boundary, tight seals at every penetration, a controlled entry system, and a HEPA-filtered negative air machine ducted to the exterior so the work area runs under a steady pressure deficit. Even if you are new to this, the concept is simple: air always takes the easy path. Your job is to make the easy path flow into the containment and through the HEPA exhaust.
Limited or Full Containment?
For smaller jobs, think limited containment. The EPA generally frames it this way: if the affected area is around 10 to 100 square feet, a single-layer poly barrier with sealed vents and a basic flap or zipper door can do the job when paired with a properly sized negative air setup. Once you are above 100 square feet, involve HVAC, or you are touching areas with heavy colonization or difficult materials, step up to full containment. That means double-layer barriers in critical spots, a dedicated airlock or decon chamber at the entry, stricter PPE, and more airflow capacity. If you are unsure, default to the more conservative option. It is easier to scale down than it is to explain to a client why their formerly clean bedrooms now smell like wet basement.
The Gear That Makes It Work
You do not need a semi-truck of equipment to build reliable containment, but you do need the right components working together. Here is what goes into a clean setup that actually holds pressure and withstands daily use.
| Component | Purpose and Key Points |
|---|---|
| Barrier Materials | Fire-retardant 6-mil poly sheeting is the standard. Wrap walls from floor to ceiling, overlap seams at least 12 inches, and tape both sides. Reinforce high-traffic areas and corners. Add zipper doors where you need frequent access. |
| Zipper Doors | Factory-zip panels or stick-on zippers with reinforced flaps. Install on a taut section of poly. Roll the cut seam and tape the edges so it does not tear. Consider a secondary flap inside as a backup. |
| Sealing Penetrations | Outlets, can-lights, plumbing penetrations, and gaps at baseboards are classic leak points. Use tape, foam backer rod, or gasket tape to seal. Seal all supply and return registers inside the work zone and shut off the HVAC serving that area. |
| HEPA Negative Air Machine | Pre-filter, mid-filter, and final HEPA. Duct the discharge outside using smooth or flex duct, keep runs short with gentle bends, and use a window panel to secure the outlet. This creates negative pressure and continuous capture. |
| Airlocks and Decon | A 2- or 3-stage chamber made of poly with flap or zipper entries. It is where workers suit up, wipe down, and bag waste so nothing dirty crosses into clean space. |
| Pressure Monitoring | A manometer or pressure gauge with tubing to the adjacent clean area. You are aiming for a steady negative reading, typically in the -0.02 to -0.05 inch water column range, with up to -0.08 for larger or higher-risk projects. |
How Big and How Many Machines?
Right-sizing airflow is what separates a rock-solid containment from a plastic tent that breathes in and out like a paper bag. There are two concepts to size: air changes per hour, and pressure differential. They are related but not the same.
Air changes per hour, or ACH, is how many times the volume of air in your containment is pulled through the machine in an hour. A practical target for mold work is at least 4 ACH, with 6 to 12 ACH preferred when you are doing heavy demo or you have complex geometry. The formula is straightforward: ACH equals CFM times 60 divided by room volume in cubic feet.
Example: your master bath and closet containment is 12 feet by 16 feet, with an 8-foot ceiling. That is 1,536 cubic feet. A 500 CFM machine will deliver 500 times 60 divided by 1,536 which is about 19.5 ACH if it were running in pure recirculation. But for negative air, you are ducting outside, and filters load up. Plan conservatively. Derate nameplate CFM by 20 to 30 percent for filter resistance and duct losses. That puts a 500 CFM unit at about 350 to 400 real-world CFM. 400 CFM on that space gives about 15.6 ACH, which is excellent.
Pressure differential is the tug pulling air into the work area. Typical targets are -0.02 to -0.05 in. WC relative to the adjacent area, with up to -0.08 for bigger or more sensitive jobs. Hitting the target depends on both airflow and leakiness. Big gaps defeat even a large machine. Tight barriers let a smaller unit hold steady pressure. If you cannot reach -0.02 with the machine you have, find and fix leaks first. If you are tight and still not there, add another machine or upsize.
Pro tips from the field: place the negative air machine intake across the zone from your makeup air path so you sweep through the work area rather than short-circuit near the door. Keep duct runs under 25 feet if you can. Use the largest duct diameter the machine allows. If you cannot exhaust directly outside, some projects use a make-up hallway or garage with a second barrier. If local rules or weather force interior recirculation, understand you will not create effective negative pressure without an exterior exhaust path, so plan accordingly and increase housekeeping and filtration inside the containment.
Pressure Differential Monitoring
Pressure differential monitoring is how you prove your setup is working all day, not just when you first zip it up. A manometer gives you a live reading of the pressure difference between the work zone and the clean side. Without it, you are guessing based on how the plastic looks. With it, you have numbers and a log that stands up to homeowner questions, insurer reviews, and your own quality checks.
Set the reference tube to the clean adjacent area, not outside air, because that is your real risk boundary. Mount the instrument where you can see it easily, about chest height, and out of the traffic line. Zero or calibrate it with doors closed before you start the machine. Start the negative air, let it stabilize, then record your baseline. Hold between -0.02 and -0.05 in. WC for standard work, or push closer to -0.08 if the job is large, high-risk, or you are chasing stubborn leaks. Consistency beats spikes. If you see swings every time someone opens the zipper, your airlock is too small, your barrier is saggy, or you need a second machine to maintain recovery.
Use your eyes too. Poly should gently billow inward. If it balloons outward, you have reversed flow which means a leak, a blocked exhaust, or a machine that is off. I like a quick smoke test at setup using a smoke pencil or theatrical fog to confirm airflow direction at seams, around doors, and near penetrations. If smoke drifts out of the work area anywhere but the exhaust duct, you do not start demo yet.
Airlocks and Worker Flow
Airlocks and decon chambers are the bouncers for your clean areas. Even with perfect negative pressure, workers can track spores on suits, boots, gloves, and tools. A proper entry uses a two-stage minimum: a dirty side where you come off the work zone, and a clean side that faces the unaffected area. On larger or high-risk jobs, a three-stage adds a middle room for gear and extra wipe-down. Build each stage with taut poly, reinforced corners, and double flaps or zipper doors with at least 3 feet of separation between them so they do not open into each other.
Set the workflow so everything moves one direction. Enter through the clean side, suit up fully, then pass into the dirty side and through the inner door into the containment. On exit, pause in the dirty side to HEPA-vac gross dust off your suit, wipe gloves, and bag waste. Remove suits and outer gloves inside the dirty side, then step into the clean side. Respirators stay on until you have fully exited the dirty side and the inner flap is sealed. Any bagged materials get surface wiped in the dirty side before they move out. That one habit eliminates a surprising amount of cross-contamination.
PPE should match the work. At minimum, you are looking at disposable coveralls, gloves, eye protection, and a half- or full-face respirator with P100 filters. Tape glove cuffs to sleeves and seal around ankles if you are working overhead or crawling. Keep a rack for clean suits and a covered bin for used PPE in the clean side of the airlock so nothing migrates into living areas.
Step-By-Step Setup
Start with a plan. Walk the job and decide where you can exhaust to the exterior, where your airlock will live, and how to route around furniture and finishes. Pre-clean the surrounding area to reduce loose dust. Shut down the HVAC to the work zone and tape off registers and returns inside the containment footprint. If a system serves both clean and work zones, isolate the branches or temporarily block supply at diffusers in the work zone and seal the returns.
Frame your barriers using painter’s poles, spring poles, or light furring as needed to get the poly tight. Run 6-mil poly from floor to ceiling and lap your seams generously. Tape both sides of vertical seams and bridge the top edges to the ceiling with continuous strips. Corners and door frames take abuse, so reinforce them with extra poly and tape. Install zipper doors where you need them, then cut the seam carefully and roll back edges with tape to prevent runs. If the layout allows, create a short vestibule instead of a simple single flap. It dramatically smooths traffic and pressure swings.
Place the negative air machine at the far end of the containment relative to the airlock so airflow sweeps through the whole space. Duct the outlet to a window or exterior door with a panel cut to fit, seal the panel to the frame, and minimize sharp bends. Power the machine on a dedicated circuit if possible. Start it on low to check for rattles, then bring it up. As the poly tightens, walk the perimeter and hand seal any fluttering seams or pinhole leaks. Add clean pre-filters and record the starting pressure, machine settings, and time.
Run a quick smoke test along seams, around the zipper, and at penetrations. If smoke wants to leave the containment, stop and fix that point before you create dust. Once you are holding steady negative pressure, begin removal. Keep pre-filters clean by swapping them when pressure starts drifting or the machine tone changes. The HEPA filter should last the project, but monitor it. Clogged filters drop pressure and can trigger failures when someone opens the door or a power blip hits the circuit.
Common Leaks and Fixes
Zip doors are the Achilles heel of many containments. If the zipper track is puckered, you will leak at the corners. Support the panel so the zipper sits flat, then tape the corners inside and out. Electrical boxes and light housings are tiny but deadly. Use gasket tape or painter’s tape to seal plates, and cap can-lights with poly and a rubber band if they are within the work zone. Baseboards often hide gaps that function as pressure relief vents. Run a tape skirt along the floor-wall line and press it tight. For suspended ceilings, each tile is a leak opportunity. Wrap the entire grid, not just a few tiles. Around plumbing penetrations, stuff backer rod or foam in the annular space, then tape over it so vibration does not break the seal.
If you are still chasing leaks, turn the machine off for 30 seconds and listen. You will hear whistling at the bigger gaps. Then restart and patch those areas. When in doubt, add a second interior layer of poly to the most abused faces so falling debris or fast-moving crews do not tear your primary skin.
Monitoring, Logs, and Proof
If you did not record it, in this business it did not happen. Keep a daily log with timestamps of pressure readings, machine settings, filter changes, and any power interruptions. Photograph the setup, including the duct discharge, airlock, manometer location, and barrier seams. If a site supervisor or third-party hygienist is involved, align on targets and documentation on day one. During active demo, check the manometer frequently. If you see a slow drift toward zero, swap the pre-filter and inspect the exhaust duct for kinks. For longer projects, add a battery backup or alarm so a power outage does not go unnoticed for hours. When removal is complete, keep negative air running through cleaning, HEPA vacuuming, and damp wiping. Some specs call for a set dwell period with constant filtration before final inspection. Do not pull the poly until you get a visual pass and, if required, post-remediation verification by an independent pro.
Materials and Settings Quick List
Here is a straightforward loadout and target set that works on most residential mold projects. Adjust for size and risk.
- 6-mil fire-retardant poly sheeting, plenty of high-tack tape, reinforce corners and doors.
- Stick-on zipper doors or prefabricated zip panels, plus an inner flap for backup.
- HEPA negative air machine sized for at least 4 ACH, 6 to 12 preferred. Derate nameplate CFM by 20 to 30 percent for real-world conditions.
- 12-inch or similar flex duct to exterior, window or door panel, minimal bends, tight seals.
- Manometer for pressure differential monitoring, tubing to adjacent clean area, target -0.02 to -0.05 in. WC, up to -0.08 for big or sensitive jobs.
- Two-stage minimum airlock with clear clean side and dirty side, sticky mats optional.
- PPE for all workers: disposable suits, P100 respirators, gloves, eye protection, and tape for cuffs and ankles.
- HEPA vacuums and microfiber cloths for housekeeping, plus clean pre-filters for the machine.
- Contractor bags for debris, double bag, wipe exterior before removal.
FAQ
What pressure should the containment read?
For most mold jobs, hold between -0.02 and -0.05 inches of water column relative to the adjacent clean area. On larger or high-risk projects, push closer to -0.08. What you do not want is a yo-yo. Aim for a steady line, not spikes that only happen when no one is walking through the door.
How many air changes per hour do I need?
Plan for at least 4 ACH and target 6 to 12 ACH during active demo or on complex spaces. Calculate ACH using real-world CFM after accounting for filters and ducting. Higher ACH helps clear airborne particles faster, but it is not a substitute for tight barriers and good housekeeping.
Do I have to vent the machine outside?
To create negative pressure, yes, you need to exhaust outside or to an area that is not part of the occupied clean zone. Recirculating air through a HEPA filter inside the containment can scrub the air, but it will not create a pressure deficit by itself. If exterior venting is truly impossible, upgrade filtration inside the work zone, tighten barriers, and expand your airlock, then understand you are managing risk with extra cleaning rather than true negative air containment.
Should the HVAC stay on or off?
Inside the work zone, keep the system off and seal the registers and returns so you are not pushing or pulling spores beyond the barrier. For the rest of the home, normal conditioning can run, but avoid return grilles right outside the containment door. If supply or return trunks serve both sides, isolate branches or pause the system during the dirtiest work windows.
How do I know the setup is working?
You will see a steady negative number on the manometer and poly that gently pulls inward. Smoke will draw into the containment at any seam or door. Dust levels outside the barrier will be normal housekeeping levels, not gritty drywall snow. Your pressure log will show small, quick dips when the door opens and fast recovery to your baseline.
Can we stay in the house during remediation?
Often yes if the containment is solid, pressure is stable, and access routes keep you out of the work zone. Bedrooms sharing a wall with the containment or areas with shared returns are poor candidates. Kids, seniors, and anyone with respiratory issues deserve extra caution. When in doubt, relocate or phase the work.
Real-World Touches That Pay Off
Humidity and heat can sag poly and load filters fast. If you are working in a warm climate or during a rainy week, expect more frequent pre-filter changes and consider a small dehumidifier inside the work zone to keep RH under control. Mark your zipper path with tape on the floor so everyone uses the same route and does not stress new seams. Label the manometer with a green zone for the target range and a red line alarm point so even a new tech knows when to call it. Cut an extra small access port with a taped flap near the manometer tubing so you can re-zero quickly without dismantling the barrier. Keep a roll of painter’s plastic on hand for quick patches, but always back it with 6-mil for anything permanent.
Finally, set ground rules with the crew. No propping the zip door open for convenience. No dragging demo bags across the clean side. No removing the manometer tubing because it is in the way. That discipline is what turns a pile of materials into real negative air containment. When done right, you will finish the job without sharing spores with the rest of the house, your documentation will be clean, and the only thing leaving the site will be sealed bags and satisfied clients who did not have to learn what pressure differential monitoring means the hard way.