
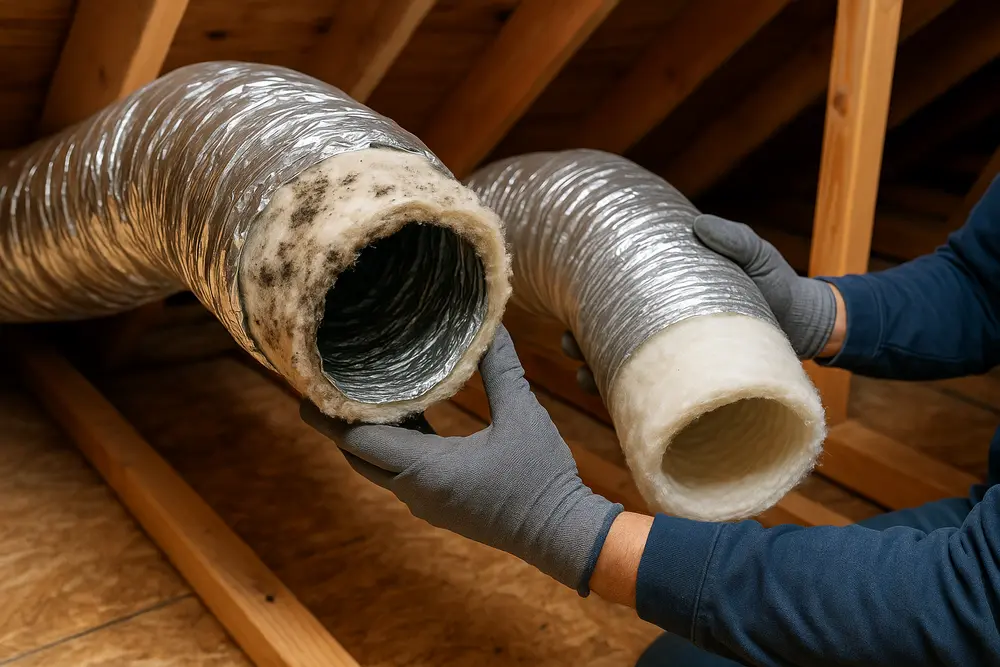
Mold on bare sheet metal can sometimes be physically removed. Mold growing in wet, porous fiberglass duct liner is another animal. According to the U.S. Environmental Protection Agency’s air-duct guidance, wet or moldy insulated duct material cannot be effectively cleaned and should be removed and replaced. That makes fiberglass duct liner replacement only half the job. The leak, condensation, humid-air infiltration, or drainage failure that caused the damage also needs to be corrected, or the new material may wind up looking like the old material.
Is It Really Mold in the Duct Liner?
A dark patch inside a supply register isn’t enough evidence to declare a mold emergency. Dust, soot, rust, adhesive bleed-through, and deterioration of the liner’s surface coating can all resemble microbial growth in a photograph. Color doesn’t identify a mold species, and black discoloration isn’t automatically more hazardous than green, gray, brown, or white growth.
Conditions that deserve closer inspection include irregular spotting, fuzzy or powdery growth, persistent musty odors while the system operates, water stains, wet insulation, matted fibers, torn liner, and contamination attached to damp material. Repeated condensation near the air handler, plenum, takeoffs, or low sections of ductwork is another warning sign.
A moisture meter can identify damp areas, and an infrared camera can reveal temperature patterns that warrant investigation. Neither instrument proves that a substance is mold. Odor doesn’t prove it either. Visible growth combined with damp, deteriorated porous insulation is much more persuasive than color alone.
Testing isn’t always needed. If fiberglass is visibly moldy, water-damaged, and headed for removal, collecting a sample may only confirm what the removal plan already addresses. Sampling can be useful when the material is uncertain, the source is disputed, occupants have special concerns, or a regulated remediation protocol requires it. A bargain test kit that labels every common outdoor spore as a crisis usually creates more questions than answers.
Know Which Duct Material You Have
People often use the phrase “fiberglass duct” for several different assemblies. They aren’t interchangeable, and the correct remediation method depends on which one is installed.
| Duct Assembly | Where the Fiberglass Is Located | Why the Difference Matters |
|---|---|---|
| Internally lined sheet-metal duct | Fiberglass liner is attached to the metal inside the airstream | Exposed porous liner can collect moisture and contamination |
| Fiberglass duct board | Rigid fiberglass panels form the duct itself | Damaged sections may require replacement of the complete duct run |
| Flexible duct | Fiberglass usually surrounds an inner polymer or foil sleeve | Growth on the inner sleeve isn’t automatically embedded in exposed fiberglass |
| Externally insulated metal duct | Fiberglass is outside the metal duct | Exterior insulation can become wet without contaminating the airstream |
A photograph taken through one register shows only a tiny part of the system. That view tells you nothing about the evaporator coil, condensate pan, return plenum, filter rack, inaccessible trunk lines, or ducts running through a humid attic or crawlspace.
A professional inspection may involve access panels, cameras, borescopes, moisture instruments, temperature and relative-humidity readings, and duct-pressure testing. The technician should inspect both sides of the air handler, not just wave a flashlight into the nearest register and deliver a diagnosis worthy of a used-car lot. Any inspection openings made in the ductwork must be properly closed and sealed afterward.
Why Wet Fiberglass Usually Comes Out
Fiberglass liner is porous. Water, dust, dissolved soil, fungal structures, and residue can move below the visible surface. The material may remain damp after nearby sheet metal feels dry, and prolonged saturation can weaken adhesives or mechanical attachments.
Aggressive scrubbing creates another problem. Brushes that work well on sound sheet metal can tear, erode, or shred fiberglass. The cleaning process may release fibers, damage the liner’s protective surface, and still fail to reach contamination beneath that surface. You can end up with cleaner-looking insulation that remains damaged or contaminated.
Replacement is generally the more defensible option when the liner is wet and moldy, contamination appears embedded, growth returns after cleaning, or the material is torn, friable, delaminated, eroded, or no longer securely bonded. The same applies when sewage, floodwater, or another gross contaminant reached the insulation.
Access matters too. If workers can’t physically reach and inspect all contaminated surfaces, they can’t verify that those surfaces were restored. Coating inaccessible mold doesn’t remove it. Spraying it with a product that smells like a hospital doesn’t remove it either.
Fiberglass duct liner replacement doesn’t always mean replacing the entire duct system. A contractor may be able to remove affected lined sections while retaining clean, dry sections. In other situations, replacing a complete plenum, branch, or duct-board run is safer and more practical than trying to strip liner from the inside of installed ductwork.
When Cleaning May Be Reasonable
Replacement isn’t the answer for every dark mark or dusty duct. Professional cleaning may be reasonable when the insulation is dry, firmly bonded, physically intact, and contaminated only with loose surface dust or dry debris. There shouldn’t be evidence that mold has colonized the fiberglass or that water has penetrated it.
The selected procedure must also be allowed by the material’s manufacturer. Fibrous-glass liner needs gentler, material-compatible tools than bare metal. The NAIMA guidance for cleaning fibrous-glass insulated ducts discusses techniques intended to preserve the liner’s surface rather than grind it into the airstream.
Cleaning becomes a poor bet if agitation will damage the material, contaminated areas can’t be reached, or the liner stays damp. Repeatedly cleaning a moldy, failing liner because replacement costs more isn’t thrift. It’s paying several times for an incomplete result.
How Professionals Replace Moldy Liner
The exact work plan depends on the contamination, duct design, occupied areas, material type, and applicable Texas requirements. Inside an HVAC system, careless disturbance can send debris to rooms that weren’t originally affected. Controlled removal matters.
Define and Isolate the Work Area
Before demolition, the contractor identifies the affected sections, adjacent materials, moisture history, removal boundaries, and components that can be retained. If contamination is inside operating equipment, professionals may shut down and isolate an air handler, one zone, selected branches, or the entire system.
That doesn’t mean every homeowner should turn off air conditioning indefinitely during dangerous Texas heat. If significant contamination appears to be inside operating HVAC equipment, ask a qualified professional for system-specific isolation instructions promptly.
Build Containment
Depending on the scope, workers may install polyethylene barriers, seal supply and return openings, establish controlled waste routes, and use HEPA-filtered air machines to maintain negative pressure. Exhaust shouldn’t discharge into occupied spaces or near an outdoor-air intake.
The HVAC system deserves special handling because it’s designed to move air. That’s terrific when it moves conditioned air. It’s less terrific when demolition debris gets loose inside it.
Use Project-Specific Protection
Workers may need gloves, eye protection, protective clothing, and properly selected respiratory protection. An N95 can be minimum protection for some limited mold work, but it isn’t automatically suitable for every duct-remediation project.
When employees must wear respirators, the OSHA respiratory-protection standard addresses selection, medical evaluation, fit testing, training, and written procedures. “Put on a mask” isn’t a professional respiratory-safety program.
Remove the Porous Material
Technicians cut out affected liner or remove contaminated duct sections while limiting unnecessary disturbance. Waste goes directly into sealed bags or containers rather than taking an uncovered tour through the building. In some cases, material may be lightly dampened to control dust, but clean materials shouldn’t be soaked in the process.
If the duct is made from fiberglass duct board, the affected run may need to be replaced. If sheet-metal duct has internal liner, contractors may remove the lined section or strip the liner under controlled conditions when the metal shell can be safely retained.
Clean Salvageable Components
Sound nonporous metal can often be HEPA-vacuumed and cleaned with an appropriate detergent. Surfaces are then dried and inspected before reconstruction. The goal is physical removal of contamination and residue, not merely killing organisms. Dead mold fragments can still be irritating or allergenic.
The inspection should also cover the air-handler cabinet, evaporator coil, drain pan, blower compartment, filter rack, plenums, humidifier, mixing box, and nearby duct connections. Installing new liner downstream from a dirty coil or overflowing pan is an expensive way to schedule the next remediation.
Install Compatible Replacement Material
Replacement insulation must preserve the duct system’s thermal, acoustic, airflow, fire, and smoke performance. Contractors need to match the appropriate insulation type and thickness, use compatible adhesives and mechanical fasteners, seal joints and cut edges, and maintain any required exterior vapor retarder.
Removing internal liner without equivalent replacement or proper duct redesign can change the duct’s effective dimensions, heat gain, sound control, airflow, and resistance to condensation. This is one reason fiberglass duct liner replacement may require both remediation and HVAC expertise.
Fix Moisture Before Rebuilding
Mold doesn’t grow in duct liner because the fiberglass had a bad attitude. It grows when moisture and available nutrients remain together long enough. Effective HVAC moisture source correction identifies why the material became wet and verifies that the repair works before new insulation is installed.
Check Condensate Drainage
A clogged drain, cracked pan, failed pump, improper slope, or incorrectly configured trap can overflow into a cabinet or plenum. Negative air pressure can also interfere with drainage when a trap is missing or poorly designed.
The repair shouldn’t stop at clearing the visible blockage. The drain pan, primary line, secondary line, trap, cleanout, overflow protection, and condensate pump should be inspected and tested under operating conditions. Water stains beneath the unit may point to a one-time overflow, but recurring stains suggest the system still has a problem.
Investigate Duct Condensation
Condensation forms when a duct or HVAC surface falls below the surrounding air’s dew point. A cold supply plenum in a humid attic can collect water even when no plumbing pipe is leaking.
Common causes include missing or compressed insulation, a torn exterior jacket, unsealed insulation seams, exposed metal at connections, and ducts passing through hot, humid spaces. The EPA’s moisture-control guidance explains why temperature, humidity, airflow, pressure, and material conditions must be considered together.
Simply wrapping a wet assembly in more insulation can trap moisture. Damaged material should be removed as needed, the underlying surfaces dried, and the insulation and vapor barrier restored with sealed continuity.
Test for Air Leakage
A return leak can pull hot, humid attic or crawlspace air into the system. Supply leaks can create building-pressure imbalances that draw outdoor moisture through cracks elsewhere. Filter-rack gaps, leaky access panels, disconnected ducts, and poorly sealed plenums can all contribute.
Pressure testing and targeted sealing are more reliable than smearing mastic on whatever joint happens to be visible. The contractor should use materials approved for the duct application and avoid blocking access panels or serviceable components.
Evaluate Cooling and Airflow
Oversized equipment may cool a building quickly but run too briefly to remove enough humidity. Dirty coils, restrictive filters, closed registers, low blower airflow, incorrect fan settings, or equipment faults can also create unusually cold surfaces or poor dehumidification.
These conditions require diagnosis by a qualified HVAC technician. A remediation contractor shouldn’t guess at refrigerant levels, blower settings, or equipment sizing. Likewise, an HVAC technician shouldn’t treat visibly contaminated porous insulation as an ordinary tune-up item.
Look Beyond the HVAC System
The water may originate from a roof leak, plumbing failure, wall intrusion, wet crawlspace, poorly controlled humidifier, or recent flooding. Ducts can be the victim rather than the original source.
Indoor relative humidity should generally remain below 60 percent, with roughly 30 to 50 percent preferred where practical, according to EPA homeowner mold guidance. Achievable levels vary with the season, climate, occupancy, and building operation. In Austin, outdoor humidity doesn’t take suggestions, so HVAC operation and air sealing have to do real work.
Why Fogging Isn’t a Shortcut
Antimicrobial fogging doesn’t remove wet fiberglass, fungal fragments, dust, or residue. Killing organisms isn’t the same as cleaning the system, and introducing more liquid to porous duct liner can worsen the original moisture damage.
A pesticide used in HVAC equipment must be EPA-registered and applied strictly according to its label. Registration alone doesn’t mean the product is approved for every duct material, occupied building, or application method. Products may also affect adhesives, coatings, fire performance, warranties, or indoor-air quality.
Encapsulants and sealants shouldn’t be used to hide active growth or wet material. If a coating is appropriate for a specific restoration, the surface first needs to be physically cleaned and dried. The product must be compatible with the exact HVAC material and applied according to its label, manufacturer instructions, and applicable codes.
Ozone generators aren’t a substitute either. Ozone doesn’t physically remove contaminated fiberglass, and it can irritate the respiratory system or react with indoor chemicals to create other pollutants. A machine that makes the building smell unusual isn’t proof that remediation occurred.
How the Work Gets Verified
Before the HVAC system returns to normal operation, the contractor should confirm that affected porous material has been removed, retained surfaces are visibly clean, adjacent materials are dry, and replacement insulation is properly secured and sealed. Access panels, duct joints, and cabinet openings should be closed so the repair doesn’t create new air leakage.
The condensate system should drain correctly while the equipment operates. Filters should fit without bypass gaps, and repaired ducts should show no renewed condensation. Temperature, relative humidity, and dew point may need monitoring after startup, especially when the original damage involved chronic sweating rather than a single leak.
Post-remediation air sampling isn’t always necessary. Visible cleanliness, dry materials, corrected moisture conditions, and compliance with the written protocol are often more useful than one air sample collected under one set of conditions. Regulated Texas projects may have separate post-remediation assessment and documentation requirements.
No contractor can honestly guarantee that a building will contain zero mold spores. Mold exists outdoors and enters buildings during normal use. A defensible completion standard is a clean, dry, functional system without visible growth, debris, unresolved water damage, or abnormal moisture.
Texas Rules May Affect the Project
Texas regulates mold assessment and remediation. Depending on the affected area, project details, and applicable exemptions, a licensed mold assessment consultant may need to prepare a remediation protocol, and a licensed remediation contractor may need to perform the work. Assessment and remediation roles may also need to remain independent.
Some small projects may qualify for an exemption often associated with less than 25 contiguous square feet. Duct systems can complicate how the affected area is evaluated, so a rough estimate through a register shouldn’t be treated as a legal determination.
Property owners can review the current Texas Department of Licensing and Regulation Mold Assessors and Remediators program and Texas Occupations Code Chapter 1958. Requirements can change, and project-specific questions should be checked before work begins.
When Should You Call a Professional?
Professional evaluation makes sense when growth is inside the air handler or multiple ducts, fiberglass is visibly wet, contamination may be spreading through an operating system, or the source of moisture isn’t obvious. Sewage, floodwater, significant demolition, inaccessible contamination, and repeated growth after prior cleaning are also strong reasons not to improvise.
Occupants with asthma, mold allergies, chronic lung disease, or compromised immune systems may need added precautions. Dampness and mold can be associated with respiratory and irritation symptoms, but those symptoms don’t diagnose an HVAC problem. Anyone with persistent or serious health concerns should contact a healthcare professional.
A qualified team should be able to explain what material is affected, why cleaning or replacement is recommended, how occupied areas will be protected, and what HVAC moisture source correction is included. If the proposal consists primarily of spraying something mysterious into the returns and promising a permanently mold-free building, keep shopping.
FAQs About Moldy Fiberglass Ducts
Can Mold Be Cleaned From Fiberglass Liner?
Dry surface dust may sometimes be removed from sound, dry, intact liner with material-compatible professional methods. Wet fiberglass with embedded mold, deterioration, or inaccessible contamination generally needs to be removed and replaced.
Can I Spray Bleach Into Moldy Air Ducts?
No. Bleach isn’t a substitute for removing contaminated porous insulation, and spraying liquid into duct liner can add moisture. Any antimicrobial used in HVAC equipment must be labeled for that exact use and applied according to its directions.
Does Black Discoloration Mean Toxic Mold?
No. Mold species and health risk can’t be determined by color. Dust, soot, adhesive, and material deterioration can also produce dark staining. Inspection should focus on moisture, growth characteristics, material condition, and the extent of contamination.
Must the Whole Duct System Be Replaced?
Not necessarily. The required scope depends on contamination boundaries, access, duct construction, and liner condition. Some projects involve selected sections. Others are more reliably handled by replacing complete runs, plenums, or damaged duct-board assemblies.
Will Duct Cleaning Stop Mold From Returning?
Not if the moisture remains. Drainage failures, humid-air leaks, damaged insulation, sweating ducts, roof leaks, and poor dehumidification must be corrected. Removal without HVAC moisture source correction is a repair with an expiration date.
Is Mold Testing Always Required?
No. Sampling may add little when visible mold and water-damaged porous insulation clearly require removal. It may be useful when the substance is uncertain, the source is disputed, a regulated protocol requires it, or the findings will change the scope of work.
Who Can Inspect Moldy Ductwork in Austin?
The right team may include a Texas-licensed mold professional and a qualified HVAC contractor, depending on the project’s size and cause. Restoration and mechanical work often overlap, but each contractor should stay within the work they’re qualified and legally permitted to perform. Austin-area property owners can contact Austin Hi-Tech Restoration to discuss visible duct contamination, related water damage, and the next appropriate inspection step.