If your ceiling near the chimney looks like a coffee-stained T-shirt, your roof is trying to tell you something. Chimney leaks rarely start with dramatic waterfalls. They sneak in around tired flashing, saturate insulation, darken roof sheathing, rot framing, and then hit your drywall with a bullseye. As a restoration contractor who gets called after the damage is done, I’d rather help you catch leaks early than tear out moldy ceilings later. Here’s how to nail chimney leak diagnosis, understand step flashing vs counterflashing, and decide when a cricket could save your roof from a slow, soggy demise.
Why Chimneys Leak Around The Flashing
Chimneys punch straight through a sloped surface that’s designed to shed water. That makes the joint between roofing and masonry a hot spot for leaks. Flashing bridges that gap, but the install has to be layered correctly. Step flashing moves water down the shingles along the sides. Counterflashing covers the top of the step flashing and ties into the masonry so wind-driven rain can’t sneak behind. At the uphill side, a back pan and, ideally, a cricket redirect water that would otherwise pool and stress the flashing. If any of these parts are missing, short, overlapped wrong, caulk-only, or rusted out, water finds the path of least resistance. After that, gravity does the rest.
Diagnosing Stains And Leaks
Start inside. Yellow-brown ceiling stains near the chimney line are the classic smoke signal. Paint that blisters or peels around that area tells you moisture has been hanging around longer than a one-off storm. If you can check the attic, follow your nose. Musty odors, damp insulation around the chimney framing, darkened roof sheathing, or rusty nail tips are all early warnings. Active drips might only appear during wind-driven rain that hits the chimney just right, so don’t dismiss “sometimes it leaks” as a non-issue.
Outside, put eyes on the flashing after a good storm. From a safe ladder position, scan for lifted metal, gaps at mortar joints, missing pieces, or heavy rust. Look at the uphill side. If your chimney is wide and there’s no raised saddle behind it, water can stall there. That loads the back pan and side flashing until tiny defects become wet drywall. Homeowners often blame the chimney crown or cap, and sometimes they are guilty, but nine times out of ten the flashing details are the real culprits.
Step Flashing vs Counterflashing
Think of step flashing and counterflashing as a tag team. They do different jobs but rely on each other to keep your roof dry. Here’s the quick breakdown.
| Component | What It Does | Materials & Placement | Common Failures |
|---|---|---|---|
| Step flashing | Channels water along the shingle courses down the slope and away from the chimney-to-roof joint. | Individual L-shaped pieces, each laced with a shingle course. Typically galvanized steel, aluminum, or copper. | Pieces skipped, cut too short, not overlapped correctly, or not tucked under shingles. Corrosion or nail-through issues. |
| Counterflashing | Shields the top edge of the step flashing and ties into the chimney so wind and capillary action can’t drive water behind the base flashing. | Embedded into a mortar joint cut, called a reglet, then overlapped onto step flashing. Materials match or exceed step flashing. | Surface-mounted with only caulk, loose fasteners, failed sealant, or not embedded. Water wicks behind and the whole system unravels. |
On the downslope face, an apron flashing directs water onto shingles. At the upslope face, a back pan collects and diverts flow around the chimney, and that back pan is far happier when a cricket pushes water around it instead of letting it pile up.
Where Things Usually Fail
Counterflashing installed with a smear of sealant against the brick instead of being cut into the mortar is a slow-motion roof crime. Caulk shrinks and cracks, water finds the gap, then rides behind the flashing until you’re replacing sheetrock on a Sunday. We also see step flashing skipped like a fad diet. Each shingle course needs its own piece. If a contractor tries to use one long strip or trims them too short, you lose the shingle-to-flashing overlap that keeps water moving down and out.
At the uphill side, a missing cricket on a wide chimney sets off a chain reaction. Water and snow sit there, ice refreezes, and the back pan gets overwhelmed. Even perfect metalwork will fail early if water constantly stalls at the joint. And for bonus points, add debris. Leaves packed behind the chimney act like a dam and guarantee water goes sideways under the flashing instead of down the roof.
What Is A Chimney Cricket?
A cricket, also called a saddle, is a small peaked mini-roof built on the uphill side of your chimney. Its job is gloriously simple: split water and snow so it does not park itself behind the chimney. If your chimney is 30 inches or wider measured across the roof slope, many building codes require a cricket because the backwater zone is too big to ignore. Good crickets are flashed like a tiny valley, often with metal at the center and step flashing along the sides that tie into the counterflashing. They should be steep enough to shed water quickly and tall enough to clear snow in cold climates. If your roof has a shallow pitch, the cricket’s job is even more critical because slow-moving water loves to explore gaps.
DIY Checks You Can Do Safely
Twice a year and after a real gulley-washer, give your chimney area a once-over. From the ground with binoculars or from a sturdy ladder with proper fall protection, look for daylight at flashing edges, lifted shingle tabs beside the chimney, rust streaks, or seams that have pulled away. If there’s no cricket behind a decent-sized chimney, note it. Gutter guards will not save you from leaf piles that collect behind a chimney, so clear debris that traps water where it shouldn’t be.
Inside the attic, move insulation carefully and check the framing that boxes out the chimney. Darkened wood, rusty nails, and damp batts tell you water is making a regular appearance. If you’re doing a hose test, go slow. Start at the low side and move upward in small sections. Keep the spray gentle and targeted. If you soak the whole area, you won’t know which detail is leaking, and you might force water where it normally would not go. If the leak triggers when you wet the uphill side, you’re likely looking at a back pan or missing cricket problem. If it shows up when you wet a side, step flashing or counterflashing is to blame.
Check the masonry, too. Mortar joints that are cracked or missing will admit water and sabotage the best flashing in the world. Repointing that joint and redoing the counterflashing is the permanent fix. Slapping a bead of caulk on brick is a short-term bandage at best.
Repairs You Can Tackle vs Skip
Homeowners can safely clear debris, touch up minor sealant on a surface-mounted counterflashing as a temporary stopgap, and replace a shingle or two that lifted beside the chimney. You can also seal hairline mortar cracks with a masonry-compatible patch while you plan a proper flashing upgrade. What you should not do is coat the area in roof cement or smear tar over step flashing. That traps moisture, bakes in the sun, cracks in winter, and sets you up for a bigger repair later.
Skip anything that requires cutting into masonry or opening up the roof to the deck. Proper counterflashing needs a reglet cut and a clean bend into the joint with a secure return. Step flashing needs to be woven with shingles, which means lifting or replacing courses. A back pan and cricket build is carpentry plus sheet metal. If your roof is steep, tall, or your chimney is more than one story up, this is professional territory for both safety and quality.
When To Call A Pro
If water intrusion is active or recurring, get a pro on site. If your attic shows signs of rot in rafters or the chimney trimmers, you’re already in the danger zone. If your counterflashing is surface-mounted and caulked, it needs to be redone right. If you suspect you need a cricket, let a licensed roofer build it to local code. The same goes if your chimney is leaning, the crown is cracked, or you have spalling brick. Roofing, masonry, and waterproofing intersect around a chimney. You want someone who handles all three details correctly, not just the shiny metal on the outside.
What A Proper Repair Looks Like
The best repairs start with controlled demolition. The contractor removes shingles around the chimney, pulls old flashing, and inspects the sheathing and framing for darkening or softness. Damaged wood gets replaced. Ice-and-water underlayment is installed around the joint. New step flashing pieces are woven with new shingles on both sides, each piece overlapping the one below and extending far enough under the shingle above to shed water. On the downslope face, an apron flashing directs water onto the field of shingles.
On the uphill face, a back pan is installed that reaches under the shingles above and laps over the side step flashing. If the chimney is wide enough, a cricket is framed with studs, sheathed, underlayment applied, and then flashed like a miniature roof valley, with metal at the ridge of the cricket and step flashing tying into the chimney. Once the base flashing is sound, the mason or roofer cuts a clean reglet into the mortar joint, bends the counterflashing into that joint, and mechanically fastens it. The top of the reglet is sealed with a quality masonry-grade sealant. Copper can be soldered at seams, aluminum and steel are lapped correctly and riveted where needed. The counterflashing covers the top edge of the base flashing with room for movement, so thermal expansion does not pop it loose.
Materials And Lifespan
Galvanized steel is common and budget-friendly, but it will rust where it is cut or scratched. Aluminum resists corrosion but must be isolated from copper gutters or dissimilar metals to avoid galvanic corrosion. Copper costs more but lasts decades and can be soldered for watertight corners that laugh at freeze-thaw cycles. Whatever you choose, the installation details matter more than the brochure. Proper overlaps, fasteners placed where they stay dry, and a counterflashing embedded in mortar will outlast a fancy metal that was installed with shortcuts.
If you live near salt air, bump up the metal quality. If you get heavy snow, ask about steeper cricket geometry and longer back pans. If your shingles are nearing end of life, it is smart to coordinate flashing work with re-roofing so you do not pay to open the same area twice.
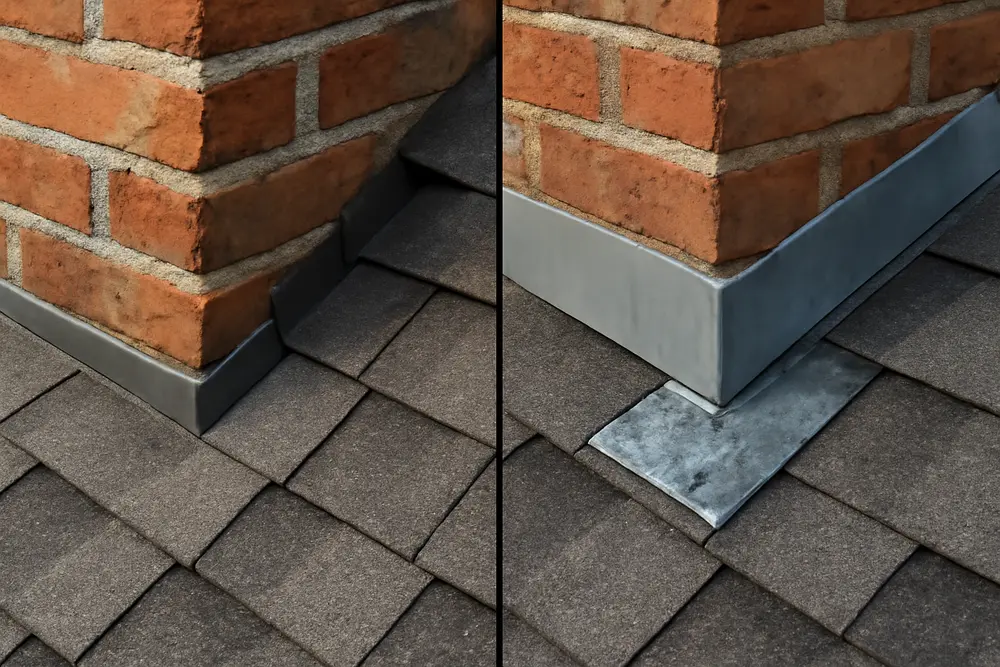
How To Spot Flashing That Lied To You
Look for bead-only counterflashing. If there is no cut line in the mortar and you see a strip of metal simply glued to the brick, it is not a permanent solution. Check for nails through the vertical leg of step flashing. Fasteners should be in the shingles, not through the part of the flashing that is supposed to float behind them. Scan for short lengths of step flashing. Each piece should be a uniform size that matches the shingle exposure. Random bits or a single long strip are a red flag. At the back, if you see a flat sheet just tucked under shingles with no raised cricket and your chimney is wide, the installer punted.
Cricket Mistakes That Cause Leaks
A flat or shallow cricket that does not actually split water is decoration, not protection. Crickets that are too narrow let flow wrap around the chimney corners and drive into the side flashing. Improper valley flashing at the cricket ridge invites ice to creep under metal and lift it. And then there is the classic debris trap. If leaves pile in the pocket behind the chimney and nobody clears them, water will find a side path no matter how shiny the metal is. Good design, proper slope, and routine cleaning are the answer.
Is That Stain From The Crown Or The Flashing?
Chimney crowns and caps fail too, and water can migrate through brick. But a consistent stain line directly adjacent to the chimney wall on the ceiling below is more often a flashing or cricket problem than a crown issue. Crown leaks typically show as staining that tracks along the flue or down interior chimney chases. Flashing leaks usually stain ceilings and wall planes that align with the roof surface. If your attic shows wet sheathing just where the roof meets the chimney, bet on step flashing and counterflashing first. If the bricks themselves are damp down the face, then the crown or mortar joints may be contributing.
What To Ask A Contractor
Start with: will you cut a reglet and embed the counterflashing or just surface-mount it? If they say surface-mount, keep shopping. Ask how many step flashing pieces they plan to use per side and how they will weave them with the shingles. Ask if your chimney’s width requires a cricket by local code and, if it does, how they will frame and flash it. Request the metal type and thickness. If they are using copper, ask if they solder corners. With aluminum or steel, ask about overlaps and fasteners. Clarify whether they will remove shingles to inspect sheathing, and whether damaged wood is included in the estimate or handled as a line item. Finally, ask for photos of similar repairs they have completed and what warranty they offer on flashing work.
FAQ: Quick Answers
Can I just caulk around my chimney and stop the leak?
You might slow it down for a season, but caulk-only fixes fail. Proper counterflashing needs to be cut into the mortar joint, and step flashing has to be layered under the shingles.
Do I really need a cricket?
If your chimney is 30 inches or wider, many codes say yes. Even when it is not required, a cricket dramatically reduces pooling and extends the life of your flashing.
How do I know if the step flashing is right?
Each shingle course along the chimney should have its own L-shaped piece that overlaps the piece below. If you see long continuous strips, or random tiny scraps, that is wrong.
Is copper worth it?
For long-term durability, yes. Copper can be soldered, resists corrosion, and can outlast asphalt shingles by a wide margin. Installation quality still matters more than the metal.
Why do leaks show up only in wind-driven rain?
Wind pushes water sideways and uphill. That exposes any gap behind counterflashing or at the back pan that a normal shower might not find.
How often should I inspect chimney flashing?
Check it twice a year and after major storms. If you are in a tree-heavy area, add a fall cleanup to clear debris behind the chimney.
Stop Rot Before It Starts
You do not have to be a roofer to spot trouble. Stains, musty attic air, lifted metal, and a chimney with no cricket are all early warning lights. Fixing the details is cheaper than fixing drywall, framing, and mold damage after a slow leak has chewed through your roof system. If your chimney leak diagnosis points to step flashing vs counterflashing mistakes, get them rebuilt correctly and add a cricket if your chimney earns it. It is a clean, code-friendly way to keep weather out and your roof sheathing dry. Catch it early, fix it right, and your chimney will go back to doing what it does best: looking charming while not flooding your living room.