
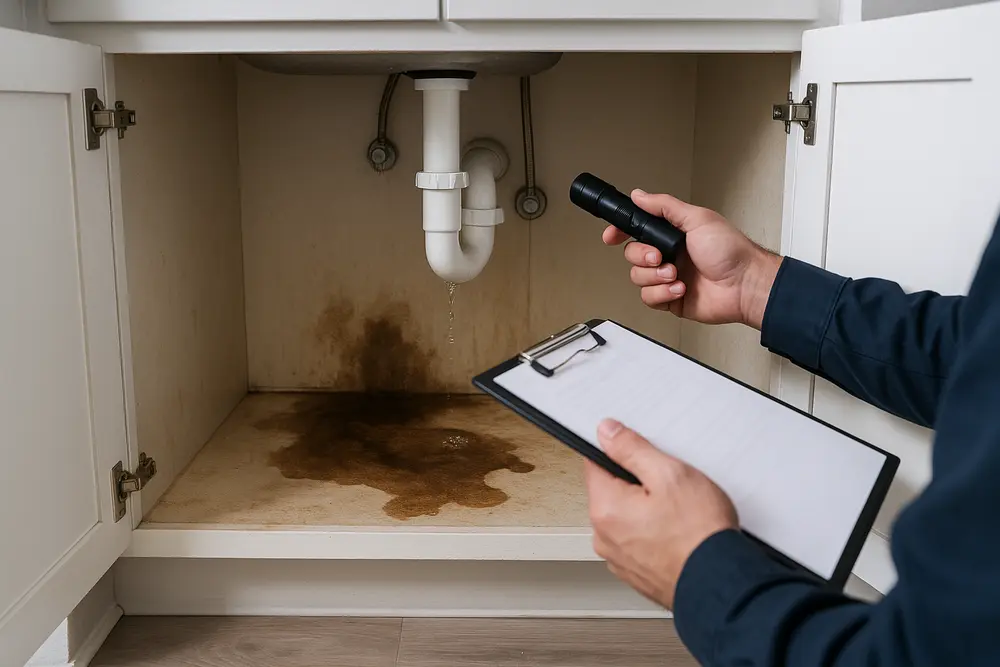
A concealed plumbing leak can saturate unfinished cabinet backs, drywall, toe-kick cavities, flooring, and subfloor long before water reaches the middle of your kitchen. The cabinet doors may still close, and the finished face may look respectable, while particleboard around a pipe opening quietly swells like a cheap sponge. A professional cabinet salvage assessment determines what can be cleaned and dried, what needs selective disassembly, and what has deteriorated beyond a defensible repair.
Mold remediation doesn’t automatically mean tearing out every cabinet from the sink to the refrigerator. It also doesn’t mean spraying whatever’s growing, closing the doors, and hoping nobody opens them until Thanksgiving. The correct verdict depends on the leak source, cabinet construction, structural condition, contamination, accessibility, and whether the entire assembly can be dried.
How a Concealed Plumbing Leak Hides
Kitchen plumbing offers plenty of opportunities for a slow leak. Common sources include sink supply-line connections, shutoff valves, drain slip joints, P-traps, garbage-disposal connections, dishwasher hoses, ice-maker lines, and plumbing penetrations inside the wall. A failed sink seal can also let water enter the cabinet deck whenever someone washes dishes.
A small recurring leak may never create a dramatic puddle. Water can follow a pipe, collect beneath a sink liner, or drain into the toe-kick cavity. Built-in cabinet backs hide the wall, while toe kicks create enclosed spaces with almost no airflow. Water can also enter from pipes shared with an adjacent bathroom or laundry area, making the apparent leak location misleading.
Composite cabinet materials make the problem worse. Particleboard and medium-density fiberboard, commonly called MDF, absorb water through cut edges, fastener holes, seams, and plumbing openings. A melamine surface may look dry while its composite core remains wet. Drywall paper, wood fibers, dust, and unfinished cabinet surfaces provide organic material that mold can grow on when moisture remains available.
The EPA’s guidance on mold and moisture gets to the point. Moisture control is the key to mold control. If the leak isn’t repaired and affected materials aren’t dried, cleaning the visible patch won’t solve the actual problem.
Warning Signs Behind the Finished Face
A musty odor that’s strongest when you open the sink cabinet deserves investigation. So do dark stains around pipe penetrations, bubbling paint, loose veneer, swollen shelf edges, rusted fasteners, warped doors, and drawers that suddenly bind. Discoloration at the toe kick can indicate water below the cabinet rather than inside the visible storage area.
Changes outside the cabinet matter too. Flooring that cups, lifts, or darkens may point to water traveling beneath the cabinet base. Soft drywall beside the cabinet, recurring dampness beneath a sink liner, and unexplained increases in water use are other reasons to check for a concealed plumbing leak.
These signs don’t prove the type or extent of mold. They do show that inspecting only the cabinet door is a lousy strategy. The unfinished back, underside, wall-facing surfaces, and floor beneath the cabinet can be in much worse condition than the finished face.
What a Cabinet Salvage Assessment Checks
A cabinet salvage assessment starts with the water, not the stain. The evaluator needs to determine whether the leak is active, what released the water, how long wetting may have occurred, and how far moisture traveled. A leaking cold-water supply connection and a leaking kitchen drain aren’t treated as identical events because the water’s potential contamination differs.
The inspection should extend beyond the cabinet where someone first noticed damage. Adjoining boxes, drywall, insulation, flooring, subfloor, countertop supports, and plumbing penetrations may all be affected. Water doesn’t respect cabinet boundaries or stop because the next door looks clean.
Cabinet Materials and Condition
Material identification helps predict whether a component can withstand cleaning and controlled drying. Solid wood and sound plywood may remain serviceable after limited wetting. Particleboard and MDF are less forgiving, especially when water enters unfinished edges. Veneer or laminate can hide swelling and failed adhesive underneath an otherwise ordinary-looking surface.
The evaluator looks for swelling, warping, delamination, crumbling edges, loose fasteners, failed adhesives, sagging cabinet bottoms, and weakened countertop support. A moisture meter reading can be normal on inspection day even though an earlier saturation permanently damaged the cabinet. Dry doesn’t automatically mean structurally sound.
Moisture and Cavity Inspection
Professionals may use pin or pinless moisture meters, relative humidity readings, thermal imaging, borescopes, and small inspection openings. Readings should be compared with similar known-dry materials and monitored for a stable drying trend. There isn’t one universal moisture number that applies to every cabinet material, meter, and indoor condition.
An infrared camera doesn’t see mold through a cabinet. It detects surface-temperature patterns that may be associated with evaporation, air movement, missing insulation, or other conditions. Any suspicious pattern needs confirmation with direct inspection or moisture-measuring equipment.
Sometimes removing a toe kick or detachable back panel provides enough access. Other times, the cabinet blocks moldy drywall or a wet wall cavity. If nobody can inspect, clean, remove, and dry the concealed materials, the cabinet may need to be detached even when the box itself is salvageable.
Clean, Dry, or Remove
The cabinet verdict isn’t based on mold color or one air sample. Black, green, white, and brown growth don’t reveal how deeply contamination extends or whether the material remains structurally usable. The practical decision comes from the cabinet’s construction, physical damage, accessibility, water source, and drying results.
| Inspection Finding | Likely Verdict | Why |
|---|---|---|
| Recent leak on a sealed surface with no swelling | Clean and dry in place may be possible | The contamination is superficial, accessible, and physically removable. |
| Sound solid wood or plywood with limited surface growth | Potentially salvageable | The material may tolerate professional cleaning and controlled drying if all affected sides are accessible. |
| Damaged shelf, toe kick, skin, or removable back | Replace selected components | Selective disassembly can preserve the sound cabinet box while exposing the cavity. |
| Cabinet blocks wet drywall or insulation | Temporarily detach or remove the cabinet | Hidden building materials can’t be remediated while they’re enclosed. |
| Swollen, soft, distorted, or crumbling MDF or particleboard | Remove the affected component or cabinet | Structural recovery is unlikely, and contamination may remain within the composite core. |
| Growth extends into joints, laminate layers, or inaccessible voids | Removal is often warranted | Cleaning the exposed face would leave concealed contamination behind. |
| Cabinet remains wet despite controlled drying | Open the assembly further or remove it | Closing a damp cavity invites renewed growth. |
| Fasteners, cabinet base, or countertop support are compromised | Remove or reconstruct | Structural safety takes priority over cosmetic appearance. |
| Water came from a drain or sewage-related release | Use a more conservative removal plan | The work must address contamination in addition to moisture and mold. |
| Only cosmetic staining remains after cleaning and drying | Refinishing may be possible | Staining alone doesn’t establish active growth or structural failure. |
This table provides general guidance rather than an automatic rule. Even solid wood can require removal if contamination is inaccessible or the cabinet prevents wall remediation. Likewise, one swollen particleboard shelf doesn’t always condemn an entire cabinet run.
When Cleaning and Drying Can Work
Cleaning and drying in place may be reasonable when the leak has been repaired, the cabinet remains structurally sound, and contamination is limited to accessible surfaces. The crew must be able to reach the visible and concealed affected areas, physically remove residue, and dry the cabinet without trapping moisture against the wall or floor.
Factory-finished wood, metal hardware, and some laminate surfaces are generally easier to clean than unfinished composite edges. Sound plywood or solid wood may also be salvageable when growth is superficial and the material hasn’t delaminated, warped, or lost strength. The decision still depends on access to the cabinet back, joints, underside, and surrounding building materials.
Successful cleaning means more than making a stain disappear. The finished area should be free of visible growth, dust, and remediation debris. The wall, cabinet, floor, and subfloor should be checked separately because they don’t dry at the same rate.
When Selective Removal Makes Sense
Selective removal often gives homeowners a better option than choosing between untouched cabinets and total demolition. A technician may remove the doors, drawers, sink-base shelf, toe kick, decorative skin, trim, or back panel while preserving the sound cabinet box.
For example, consider a plywood sink cabinet with a particleboard bottom. A leaking shutoff valve saturates the particleboard, which swells around the plumbing opening, but the plywood sides remain flat and structurally sound. Replacing the damaged bottom and back may provide access to clean and dry the wall without discarding the entire cabinet.
A cabinet may also be temporarily detached to reach moldy drywall or inspect the subfloor. Whether it can be reinstalled depends on cabinet fastening, countertop construction, plumbing connections, and the chance of damage during removal. Stone countertops and connected cabinet runs can make detachment more involved, so coordination with plumbers, countertop installers, or cabinet contractors may be necessary.
When Full Removal Is Defensible
Full removal becomes more likely when the cabinet box has lost strength, composite wood is swollen or delaminated, or contamination extends into inaccessible layers. A laminate-covered panel with mold inside its seams can’t be reliably restored by wiping the outer surface. The same concern applies when unfinished backs and wall-facing surfaces can’t be reached.
Removal may also be necessary when cabinets prevent plumbing repairs, block mold-contaminated drywall, or conceal damaged flooring and subfloor. If the base or fasteners no longer support the cabinet and countertop safely, preserving the box for cosmetic reasons isn’t a smart trade.
Persistent odor after appropriate cleaning and drying can signal a remaining concealed condition. It isn’t proof by itself, but it warrants another inspection before reconstruction. Reinstalling cabinets over a questionable cavity only makes the next inspection more expensive.
Why Surface Sprays Don’t Fix It
Spraying bleach behind a cabinet isn’t a substitute for remediation. A surface application doesn’t repair a leaking drain, reach growth inside MDF, remove swollen material, or expose wet drywall. It can also create irritating fumes and add more liquid to an enclosed space that already has a moisture problem.
The goal is physical removal of contamination, removal of materials that can’t be restored, and complete drying. The EPA advises against painting or caulking over mold. Covering a cabinet back with primer may change its appearance, but it doesn’t make hidden residue or moisture disappear.
Killing mold isn’t the same as removing it either. Dead mold and residual fragments can still cause allergic reactions in some people. Remediation focuses on removing contamination rather than merely changing its color.
How Professional Remediation Proceeds
The first job is stopping the water. The affected fixture or plumbing line may need to be shut off until a permanent repair is completed. Cleaning while a connection continues dripping behind the wall is busywork with an invoice attached.
Next, the restoration crew maps the affected area and plans access. If opening a toe kick or cabinet back may disturb substantial growth, the work area should be prepared before demolition begins. Depending on the size and conditions, that can involve isolating the work zone, protecting counters and appliances, using HEPA-filtered air filtration, and placing removed materials into bags before carrying them through occupied areas.
Technicians then detach obstructing components and remove materials that can’t be restored. Swollen composite panels, mold-contaminated drywall, wet insulation, damaged underlayment, and delaminated cabinet parts are common examples. Salvageable surfaces are physically cleaned using methods appropriate for the material.
Drying begins after contaminated materials have been controlled. Dehumidification, directed air movement, and access to exposed cavities help remove remaining moisture. High-powered fans shouldn’t be aimed into an open, moldy cavity before controls are in place because airflow can spread particles into clean areas.
The crew should document repeated moisture readings rather than relying on touch. A surface can feel dry while the cabinet base or subfloor remains damp. Reconstruction shouldn’t begin until each affected part of the assembly has reached an acceptable, stable condition compared with similar known-dry materials.
Testing and Health Concerns
Mold testing isn’t automatically required when visible mold is present and the remediation scope is clear. According to the EPA’s mold sampling guidance, sampling is usually unnecessary when growth is already visible. An air test also can’t determine whether swollen particleboard has regained strength or whether the wall-facing side of a cabinet is clean.
Testing may be useful if the substance is uncertain, the source is disputed, or legal, medical, insurance, or project-clearance requirements call for documentation. When sampling is justified, it should be performed and interpreted by someone familiar with proper methods and limitations.
Damp and moldy conditions may cause allergic reactions, irritation, or asthma symptoms in susceptible people. Those with immune suppression or chronic lung conditions may need additional medical guidance and should avoid the work area. A restoration inspection can evaluate the building, but it can’t diagnose the cause of someone’s symptoms.
Older homes can add another concern. Removing cabinets, flooring, adhesives, or painted drywall may disturb lead-based paint, asbestos-containing material, or other hazards. Those materials should be evaluated before demolition when the property’s age and construction suggest a risk.
What Gets Checked Before Reinstallation
Before cabinets, trim, drywall, or flooring go back, the leak should be repaired and tested. The exposed cavity should be dry and free of visible growth, dust, and remediation debris. The remaining cabinet components must still be structurally serviceable, including fasteners, bases, shelves, and countertop supports.
The wall and floor should receive their own moisture checks. A dry cabinet isn’t enough if damp insulation or subfloor remains below it. Odor should also be investigated rather than concealed with fragrance, primer, or new cabinet skins.
Documentation may include the original moisture map, photographs of hidden conditions, records of removed materials, drying measurements, and post-cleaning observations. That record helps explain why one component was saved while another was replaced.
Cabinet Mold Questions
Does Every Moldy Cabinet Need Replacement?
No. A structurally sound cabinet with limited, accessible surface contamination may be cleaned and dried. Replacement becomes more likely when the cabinet is swollen, delaminated, crumbling, structurally compromised, or blocking access to wet walls and flooring.
Can Cabinets Be Removed and Reinstalled?
Sometimes. Cabinets can be detached to expose a wall or floor and reinstalled if they remain sound and can be cleaned and dried on all affected sides. Countertops, plumbing, fastening methods, and the risk of damaging connected cabinets affect whether this approach is practical.
Can Mold Be Cleaned From Particleboard?
Limited surface contamination may sometimes be addressed, but wet particleboard commonly swells and loses strength. If it’s distorted, soft, crumbling, delaminated, or contaminated below the surface, replacement is generally the more reliable option.
Can Thermal Imaging Find Mold?
No. A thermal camera identifies temperature differences, not mold. Those patterns may help locate areas that deserve further investigation, but direct inspection and moisture measurements are needed to confirm conditions.
Can Drywall Be Cleaned Behind a Cabinet?
Only when the entire affected area is accessible. If the cabinet prevents inspection, removal, cleaning, or drying of the drywall, the cabinet may need to be detached. Mold-contaminated drywall that’s deteriorated or can’t be effectively cleaned will usually need removal.
How Quickly Should Wet Cabinets Be Addressed?
Wet materials should be addressed promptly. The EPA commonly recommends drying water-damaged materials within roughly 24 to 48 hours when possible to help prevent mold growth. That isn’t an exact mold timer. Growth and damage depend on the material, temperature, humidity, contamination, and previous moisture conditions.
Get the Cabinet Verdict Before Demolition
If you smell mold or suspect hidden water damage behind built-in kitchen cabinets, arrange an inspection before tearing out a cabinet run or sealing the cavity. The assessment should locate the moisture source, map the affected materials, inspect the wall and floor, and document which components can be cleaned, dried, detached, or replaced. That evidence produces a cabinet verdict grounded in actual conditions rather than fear, guesswork, or a heroic amount of bleach.