If you’ve got water spots creeping across your ceiling like a slow-motion horror flick and no one can find the roof leak, I’ve got a prime suspect for you. The cracked vent boot. It’s small, it’s often ignored, and it will absolutely wreck your attic insulation, drywall, and flooring if you let it keep dripping. As a restoration company that sees the aftermath, we’re big fans of stopping leaks at the source before the ceiling caves. Here’s how to spot a vent boot leak fast, slap on a temporary seal that actually works, handle a proper pipe boot replacement, and when to skip the heroics and call a pro before the damage gets messy.
What Is a Vent Boot and Why Cracks Matter
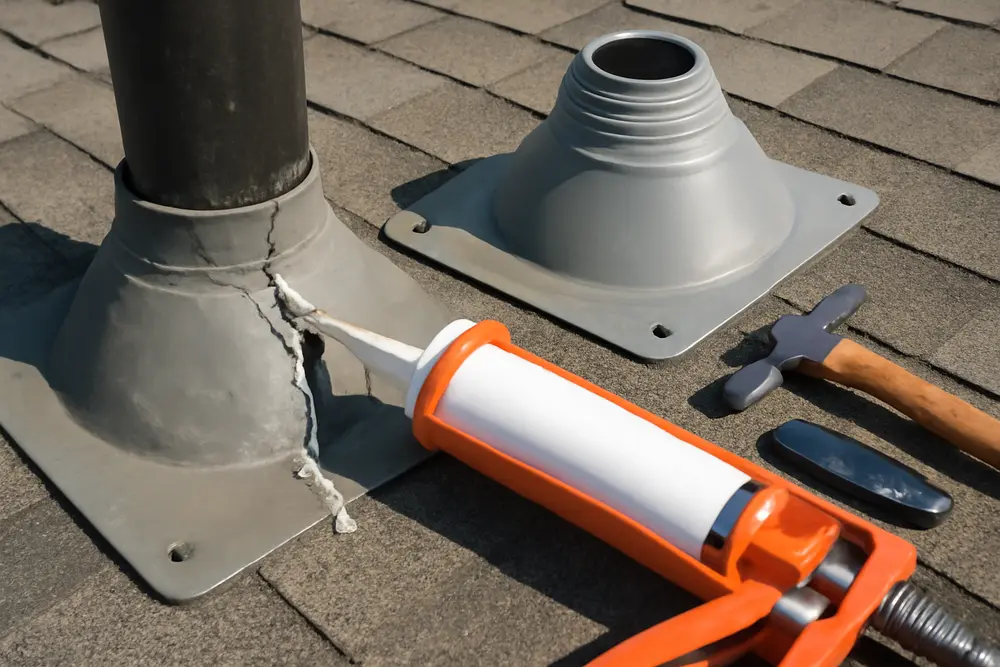
The vent boot is the weatherproof seal around your plumbing vent pipe where it exits the roof. Think of it as a mini umbrella plus gasket around a pipe that punches through shingles. The base, often metal or plastic, is the flashing. The collar is typically rubber or silicone and hugs the pipe to keep water out. When that collar cracks, splits, or pulls back from the pipe, rain sneaks under shingles and runs along the pipe into your attic. From there, gravity does its thing and you end up with ceiling stains, sagging drywall, and a musty attic that sets the stage for mold.
Cracking happens because sun and heat cook standard rubber collars until they go brittle. Nails around the flashing can loosen. Shingles can lift around the boot. Any of those issues turns the quiet little vent into a leak factory. Roofing pros point to visible cracks, splits, and brittle collars as classic failure signs, along with lifted or rusted flashing components near the boot. See examples of those telltales from roofing sources like Davis Roofing Solutions and Viking Contractors.
Signs Your Vent Boot Is Leaking
Vent boots are sneaky. The leak might not show up directly under the pipe penetration. Water can travel along the pipe or rafters before it finally drops onto drywall. Outside, you can spot failing boots with a quick binocular check from the ground or a careful ladder inspection if you’re comfortable and the roof pitch is friendly.
Here’s what you’re looking for on the roof. A collar that’s cracked, split, or shriveled. A collar that has pulled away from the pipe. Rusted nails or fasteners around the boot base. A base that looks warped or lifted at the uphill side. Discoloration or chalky, brittle rubber. If the boot looks chewed up or the rubber feels stiff like old licorice, it’s done.
Inside, the signs are just as loud. Brown or yellow stains on ceilings near bathrooms or laundry rooms. Fresh moisture in the attic around the pipe penetration or on the sheathing. Dark trails down the pipe. Musty odor even when the weather has been dry. Blistered paint and warped drywall near the leak. If you’re seeing interior symptoms, check your attic as soon as you can, especially after a storm. If you need a quick refresher on interior red flags, here’s a handy guide on signs of water damage.
Quick Fixes To Stop the Drip Tonight
If the forecast says rain and your cracked vent boot is already leaking, you can buy yourself time with a temporary fix. These are not permanent, but they can absolutely keep water out while you arrange a proper pipe boot replacement.
One fast option is a rain collar. Also called a slide-over cover, it slips down over the existing vent boot and seals against the pipe. A correctly sized collar often seals surprisingly well and is a common stopgap recommended by repair sources like FixUrge. Choose the right diameter, slide it down, and add a bead of roofing sealant at the top edge for extra protection.
Another short-term move is roofing sealant or roofing cement around the cracked collar. Clean and dry the area, then apply sealant to the split. You can also use butyl or silicone-based roof repair tape to bridge a small crack. It is a bandage, not a cure, but it can keep water out for a stretch. Again, FixUrge covers these emergency patch methods as acceptable interim solutions.
For an active storm and a bigger failure, a secured tarp that covers the penetration area can limit interior damage. The key word is secured. If you are not confident working on a roof, skip this one and call a roofer. There are plenty of homeowner threads that cover temporary tarping tactics during severe weather, including discussions on Reddit. Be safe and never work on a wet or steep roof.
Pipe Boot Replacement Steps That Last
The right fix is to replace the failed boot and make sure the flashing integrates correctly with shingles and underlayment. The job is straightforward on a healthy roof, but there are details that matter if you want a leak-free, long-term repair. Multiple roofing sources outline essentially the same approach, including HowStuffWorks and a best-practices breakdown from Fine Homebuilding.
Start by inspecting the area around the vent. If the shingles are brittle, cracked, or curling, or if the sheathing feels soft underfoot, consider a professional. If things look sound, gently loosen the shingles that overlap the boot flashing. A flat bar helps lift nails without shredding shingles. Remove the old boot by sliding it up and off the pipe. Clean the deck and the pipe area so the new flashing sits flat.
Dry fit the new boot. The collar should snugly grip the pipe without gaps. Many pros prefer a metal-base boot with a UV-resistant rubber or silicone collar. Slide the new boot down until the base sits flat and the uphill side tucks under the upslope shingles. This overlap is what sheds water. The downslope and sides usually sit on top of the shingles. That shingle-to-flashing layering is key to stop wind-driven rain.
Back up the boot with flashing tape where appropriate. Fine Homebuilding recommends using high-quality flashing tape, such as EPDM or similar with a butyl adhesive, especially on the upslope side. Apply tape to the deck at the head of the boot, then reinstall the shingle courses so water flows over layers in the right order.
Fasten the flashing base at the top corners under the shingles, not through the exposed downslope edge. Where nails are exposed, cover heads with compatible roofing sealant. Avoid driving nails so close to the pipe that they deform the boot. Reseat the shingles you lifted and add any missing nails in their original stagger so the roof lays flat. If you disturbed underlayment, patch it before resetting shingles.
Seal the top edge of the collar with a bead of roofing sealant if the manufacturer recommends it, especially on older pipes with minor surface irregularities. Do not go crazy with sealant. The assembly should shed water by design, not by caulk.
Finish with an inspection and a controlled water test when the sealant has skinned over and the roof is dry. Run a hose on the upslope side of the boot for a few minutes while a spotter checks the attic around the pipe penetration. If you see no moisture trails, you did it right. If you do, reassess the shingle overlaps and the upslope flashing integration.
DIY or Call a Pro?
Plenty of homeowners handle a basic pipe boot replacement on a roof that is in good shape. That said, some setups scream for an expert. A steep roof slope, tall two-story access, brittle shingles that shatter when lifted, a rotted or rusted flashing base, or any signs of soft decking around the pipe are solid reasons to call a roofer. Industry sources flag these conditions as both safety issues and complexity triggers that can turn a quick fix into a weekend regret. You can read similar guidance from Viking Contractors.
Also consider the scope of interior damage. If water has been leaking long enough to stain ceilings, soak insulation, or stain framing, the vent boot repair is only half the job. You’ll need to dry the attic, replace wet materials, and check for microbial growth. When sheathing, insulation, or framing looks compromised, bring in a pro and possibly loop in insurance. Reimagine Roofing notes that hidden damage is common with flashing and vent leaks after heavy rain.
One more thing. If your roof is under warranty, DIY work can void it. A certified roofer can match materials, preserve coverage, and document the fix if you ever need a claim.
Preventing Future Vent Boot Issues
Prevention is cheaper than replacing drywall and repainting a ceiling the size of your living room. Add these quick checks to your spring and fall home routine. Look at every vent boot from the ground with binoculars. You’re checking for cracked collars, lifted bases, or missing shingles around the flashing. After big storms, peek in the attic around vent pipes for damp decking or dark trails.
When you replace a boot, choose materials that give you a longer runway. Boots with a metal base and a silicone or UV-resistant rubber collar handle sun exposure better than budget options. Ensure the upslope edge of the flashing tucks under shingles correctly, and avoid exposed nails where water runs. If exposed fasteners are unavoidable, seal the heads with a compatible sealant. The collar should hug the pipe so tightly that you can’t see daylight. If the pipe is slightly out of round or painted rough, a thin line of sealant at the top of the collar can help, within manufacturer guidance.
Consider a secondary layer of flashing tape under the upslope edge during installation. When used correctly, this invisible belt-and-suspenders trick gives you extra protection under the shingle courses, which Fine Homebuilding highlights as a best practice.
If you’ve added solar, satellite mounts, or new attic fans, keep an eye on the nearby boots and flashing. Disturbing shingles can ripple across to neighboring penetrations. While you’re at it, brush up on smart flashing practice for rooftop add-ons with guides like our piece on solar panel roof leaks and flashing tips.
Material Choices That Keep You Dry
Different boots tolerate weather differently. Standard neoprene rubber can harden from UV and heat. Silicone and EPDM blends generally handle temperature swings and sun better, though quality varies by brand. A durable metal base helps the flashing lay flat and resist warping. If you live in a high-sun, high-heat region, upgrading the collar material is money well spent. If critters love your roof, consider boots with a protective guard or add a metal storm collar above the rubber to keep pecking and chewing from starting a new leak.
Common Mistakes That Trigger Repeat Leaks
Most repeat vent leaks come from rushed installs. The biggest offenders are a collar that is too loose for the pipe, a flashing base that sits on top of upslope shingles instead of tucked under them, nails through the exposed bottom edge without sealant, and skipping flashing tape at the head of the boot where wind-driven rain tries to sneak uphill. Another classic mistake is burying a problem under gobs of caulk. Caulk is a helper, not the hero. The hero is gravity plus correct overlap.
FAQ On Vent Boot Leaks
What causes a vent boot to crack?
Sun, heat, and time. UV exposure dries out the collar, especially standard rubber. Seasonal expansion and contraction around the pipe opens small splits into bigger gaps. Loose fasteners or lifted shingles around the flashing base let wind flex the assembly until it fails. Birds, squirrels, and pressure washing can rough up collars too.
Can you caulk a cracked vent boot?
Yes, as a short-term patch. Clean and dry the collar, then use roofing sealant or a roof repair tape to bridge the crack. For a longer stopgap, slide on a rain collar sized to the pipe. These temporary fixes are recommended by repair guides like FixUrge. Replace the boot as soon as the weather gives you a window.
How long do vent boots last?
It depends on the material, sun exposure, and roof temperature. Standard rubber collars can fail in as little as several years on hot, sunny roofs. Upgraded silicone or UV-resistant collars tend to last longer. If your roof is past mid-life, plan on inspecting boots every season and replacing at the first sign of cracking.
Do you need to replace shingles during pipe boot replacement?
Usually you can lift existing shingles, extract nails, and reset them after the new boot is installed. If the shingles are brittle, cracked, or tear during removal, plan to replace a few. The priority is correct overlap. The upslope edge of the flashing must tuck under intact shingles to shed water properly, as shown in guides like HowStuffWorks.
How do you find the leak if the ceiling stain is far from the pipe?
Start in the attic. Look for water trails on the pipe, stains on the sheathing, or damp insulation near the penetration. Water often runs along the pipe or rafters before dropping. A controlled hose test on a dry day can confirm the source. Work methodically, upslope to downslope, with a spotter in the attic.
Will insurance cover a vent boot leak?
Policies vary. Sudden damage from a storm is often treated differently than wear and tear on old flashing. If the leak caused interior damage, document everything and talk to your insurer. Either way, fix the boot now so you do not end up with secondary issues like mold.
Is a rain collar a permanent fix?
It’s a clever patch, not a long-term solution. Rain collars can ride out a season, but they do not replace a deteriorated collar or fix bad flashing overlap. Use them when you need a fast seal, then schedule a proper pipe boot replacement.
Safety Notes Before You Climb
Roof work is risky. If you are not sure-footed on a ladder, if the roof is steep, or if weather is sketchy, skip the DIY. Wear soft-soled shoes for traction, use fall protection on steeper pitches, and never work a roof that is wet or iced. Keep tools organized, and do not pry shingles in freezing temps, since they crack easily. One more pro tip. Photograph the shingle layout before you lift anything so you can put the puzzle back exactly how it was.
When Leaks Hit Attics and Ceilings
Even a tiny vent boot leak can saturate attic insulation and stain drywall. If you catch it quickly, pull the wet insulation so the deck can dry, run controlled airflow, and disinfect surfaces that got wet. If the ceiling is already bowed or you see streaking and odors, you might be dealing with a longer leak. That is where we come in. Our team fixes the source of moisture with trusted roof partners, then handles drying, cleanup, and repairs so your attic and rooms do not become a science project. If you suspect hidden wet spots from a cracked vent boot, do not wait for the next storm to test your patch. Track down the source, seal it right, and clean up the damage before it spreads.