If your shower pan is secretly leaking, it’s not just a few drips having a party. It’s a slow, ugly takedown of your subfloor, framing, drywall, and anyone’s faith in grout. As a restoration pro who sees the aftermath weekly, I’ll show you how to spot early warning signs, run a safe shower pan flood test without flooding your life, decide between a patch or a full shower pan replacement, and keep the whole mess from happening again. Grab a flashlight. Leave the sledgehammer for later.
What A Shower Pan Actually Does
Think of the shower pan as the unsung bodyguard under your feet. It’s the sloped, waterproof layer that collects water and funnels it to the drain. It might be a prefabricated acrylic or fiberglass base, or a custom mud bed with a liner or sheet membrane under tile. Good pans have a proper slope, a fully sealed drain connection, and working weep holes so water that sneaks through tile and grout can still reach the drain instead of camping out in your subfloor.
When a pan fails, water takes the path of least resistance. That path usually goes straight into wood framing, gypsum, or insulation. If you’re on a slab, the water finds the perimeter, baseboards, and adjacent rooms. If you’re upstairs, it finds the ceiling below and turns it into modern art you didn’t ask for.
Early Warnings You Should Not Ignore
Shower pans rarely explode overnight. They whisper first. Here’s what they’re saying.
Movement underfoot is a red flag. If the base flexes when you step in, something isn’t supported or it’s already water-damaged. Acrylic and fiberglass pans should feel solid. If they squish or creak, the subfloor might be compromised or the pan was never seated correctly.
Cracks, chips, or hairlines in the base or tile are trouble. Acrylic and fiberglass cracks can start tiny and spread. In a tiled shower, cracked grout or missing caulk along the perimeter and curb invites water to bypass everything you paid for. If you see spidering around the drain or corners, it’s time to investigate.
Stains or sagging below an upstairs shower are classic signs. Yellow-brown ceiling stains, bubbling paint, or a warping baseboard is your house telling you to stop pretending. In crawlspaces or basements, look for darkened or soft subfloor, mineral deposits that look like chalky stalactites, and damp joists. On slab houses, watch for widening dark grout lines at the perimeter, damp carpet in an adjacent closet, or swelling baseboards.
Persistent musty odors, even when the shower hasn’t been used, often mean hidden moisture. Mold loves warm bathrooms. If you’re getting that eau de locker room smell, don’t mask it with candles. Find the source.
How To Do A Safe Flood Test
A shower pan flood test isolates the pan and drain assembly from the rest of the plumbing. You’re not turning on the shower. You’re filling the base and watching what happens. Do it right and you’ll know if the pan is sound or if it’s basically a pasta strainer.
Prep The Drain
Use a proper test plug that seals inside the drain and blocks the weep holes. A wing-nut style or inflatable plug sized to your drain does the job. Hand-tight is usually enough. Don’t jam random rags down there. You need a tight, reliable seal.
Fill To The Right Level
Fill the pan with cool water to about 2 inches deep, or just below the top of the curb. Do not fill over the curb height or you’re testing your bathroom floor, not your shower pan. Mark the waterline with a piece of painter’s tape or a pencil tick on the tile.
Let It Sit Long Enough
Leave the water in place for at least 24 hours. That time frame is common because it evens out minor evaporation and gives slow leaks a chance to show up. If you’re testing a brand-new install, make sure any liquid-applied or thinset-bonded membranes have fully cured according to the manufacturer before you flood the pan. Rushing a test can ruin a good job.
Watch For Clues
During the test, check the waterline periodically. A noticeable drop is a problem. Walk the space below and around the shower. Look for damp spots on ceilings, stained drywall, or water at baseboards and door casings. In crawlspaces, check the subfloor under the shower. If nothing shows up below but the waterline drops, shine a light around the drain, corners, and curb to look for seepage. You can cover the pan with plastic wrap to reduce evaporation noise in arid conditions, but a 24-hour drop of more than a tiny fraction usually means a leak.
Drain And Inspect
When you’re done, remove the plug slowly so you don’t surge water past the weep holes. After the water is gone, inspect the drain flange area, corners, curb, and seams. If you see residual moisture wicking out of grout lines or hairline cracks, note exactly where. That detail helps you decide whether you can repair or you need to replace.
Repair Or Replace?
Every homeowner wants a five-dollar fix. Sometimes you can have it. Sometimes that five-dollar fix just buys you five more days before the ceiling falls on your kitchen island. Here’s how to tell which path you’re on.
When A Repair Actually Works
Surface sealing is failing but the pan is solid. If your flood test holds water yet you get leaks when the shower is running, the issue might be higher up: cracked grout, failed silicone at the wall-to-floor joint, or gaps around the glass enclosure. Carefully remove failing caulk, clean with an alcohol wipe, and apply a quality 100 percent silicone. Regrout cracked joints with the right product for your tile. Let it cure fully before testing with the shower running.
The leak is at the drain-to-pan seal. If the only wet area is around the drain flange, the gasket or clamping ring may be the culprit. You can sometimes reset this assembly, replace a gasket, or reseal with the appropriate sealant. This is easiest on pans with accessible drains and can be tough on some tiled setups.
The pan is still structurally sound, but the waterproofing needs help. Some systems allow a liquid waterproof coating to be applied over tile or under new tile if the existing substrate is intact. This is less common as a retrofit on a failed shower but can be part of a targeted repair when damage is minimal and isolated.
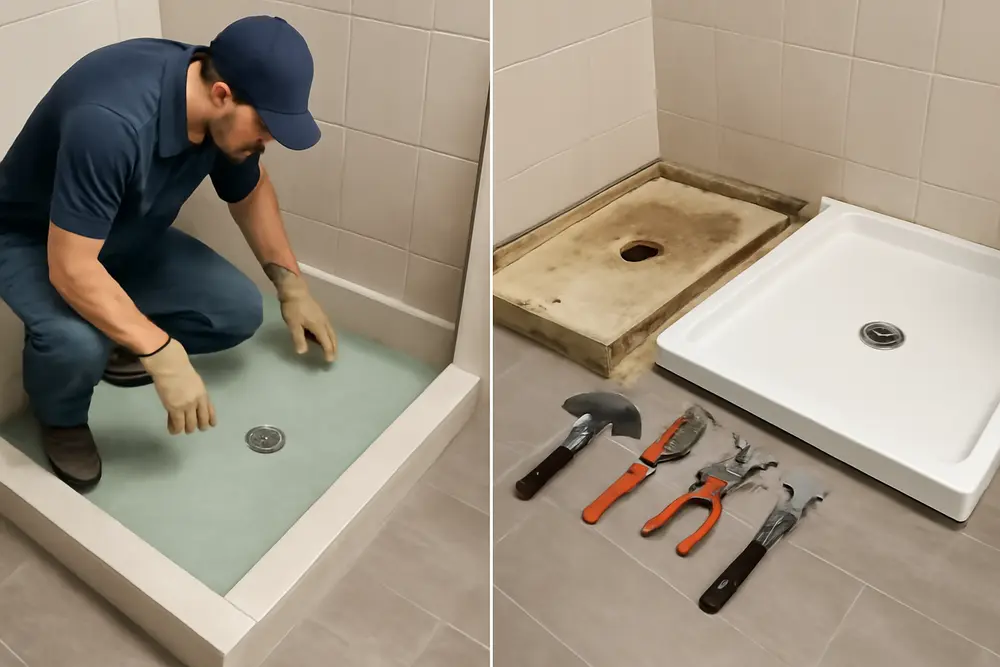
When You Need Shower Pan Replacement
Cracked or spongy acrylic or fiberglass bases are done. Once a prefabricated pan has structural cracks or flexes due to subfloor damage, patching is lipstick on a leak. You replace it.
Recurring leaks after multiple repairs are waving a white flag. If you’ve sealed, resealed, and chased drips three times, the pan or drain assembly is likely compromised below the surface. Water might be trapped in the mud bed. Replacement is cheaper than endless repairs that soak your framing.
Moderate to severe subfloor damage is a deal-breaker. If the subfloor is soft, rotted, moldy, or sagging, you must open it up, dry it, and replace damaged sections. That generally pairs with a new pan installation. Keep using a leaking shower and you’ll be sponsoring mold growth and structural rot.
Old age matters. Many pans live about 10 to 15 years depending on installation quality and use. Combine age with cracks or leaks and it makes sense to choose a proper shower pan replacement rather than patching the Titanic.
What Replacement Involves And Costs
Replacing a shower pan is not a five-minute TikTok project. It’s controlled demolition, rebuild, and waterproofing that has to be dialed in. Here’s the reality check.
Costs vary by material, size, and how much damage is hiding behind that pretty tile. A basic acrylic or fiberglass pan swap can land in the 500 to 900 range for the pan itself, with installation pushing the project higher. Custom tile or stone bases with mud beds and premium membranes often run 2,500 to 4,000 and up. Many homeowners end up in the middle with totals around 1,600, but if your subfloor and framing are damaged, expect additional costs for removal, drying, mold remediation, and carpentry.
Timeline depends on scope. A prefabricated base can sometimes be done in a day or two if everything else cooperates. A custom tile shower with proper waterproofing, cure times, and re-tiling will take several days. Add more time if we’re chasing hidden water in the structure. Anyone promising you a full custom rebuild in half a day is selling fairy tales.
The process goes like this: protect the surrounding room, remove tile or the old base, open the substrate, assess and replace damaged subfloor or studs, install or reset the drain properly, build the slope, install a quality liner or sheet membrane with properly sealed corners and seams, flood test the new pan after the membrane cures, then tile or set the new base and finish with the right sealants. It is dusty. It’s loud. It should be done right once, not twice.
Hidden Damage And Why Your Subfloor Matters
Water that escapes the shower pan rarely stays put. Wood subflooring soaks it up like a sponge. After repeated wetting, the glue lines in plywood let go, the wood softens, and fasteners lose their grip. That’s when floors start to bounce, tiles crack, and doors go out of square. If the leak is above a living space, the damp ceiling below becomes a mold and gravity experiment. Given enough time, light fixtures can collect water and short out. That is not the spa lighting you wanted.
In homes on slab, the risk shifts to finishes and walls at the perimeters. You may see puffed baseboards, lifted vinyl plank, stained carpet tack strips, and wicking up drywall. Water can migrate along control joints and reappear across the room like a bad magic trick. Don’t underestimate how far it can travel.
Prevention That Actually Works
To avoid repeat leaks, build and maintain with intention. Correct slope is non-negotiable. Water needs a continuous path to the drain. Birdbaths in the shower floor lead to standing water and grout discoloration, and they push moisture toward corners and curbs where failures love to start.
Use real waterproofing, not wishful thinking. A proper liner or a bonded sheet membrane system is worth every penny when it is installed correctly. Corners should be factory pieces or perfectly folded without cuts. Seams must be overlapped and sealed per the product, and the curb needs special attention because it sees the most splash and movement.
Respect the drain. The clamping ring, liner, and weep holes need to be clean and open so the system can breathe. If you bury the weep holes in thinset or gunk, water gets stuck in the bed and finds a new exit that you won’t like.
Maintain your seals. Caulk and grout are not permanent. Inspect the wall-to-floor joint and the corners every few months. Re-caulk with 100 percent silicone when you see gaps. Regrout cracks so water does not get a free pass behind the tile.
Ventilate like you mean it. Run the bath fan during the shower and for 20 to 30 minutes afterward. In humid climates, that fan is not a suggestion. Keep the shower door or curtain open after use so surfaces dry out. Less moisture equals less mold and less degradation of sealants.
Treat your shower like a wet zone, not a storage locker. Don’t leave sopping bath mats draped over the curb. Don’t let bottles collect in corners where they block drainage and trap water. Clean soap scum that can hold moisture against grout and caulk.
Myth Busting
Myth: If I don’t see water, it isn’t leaking. Reality: Water can travel along framing and pop out far from the source. Trust testing and inspection, not wishful thinking.
Myth: Tile and grout make the shower waterproof. Reality: The waterproofing layer is underneath. Tile is decorative. Treat it like the skin, not the raincoat.
Myth: A little flex in the base is normal. Reality: Movement breaks seals over time. Fix the support or you’ll be fixing the whole thing later.
Myth: Food coloring in the flood test is harmless. Reality: It can stain grout and silicone. You don’t need it to confirm a drop in water level.
Austin And Central Texas Notes
In Austin and the Hill Country, a lot of homes sit on slab foundations. Leaks tend to telegraph as damp baseboards or dark grout along the shower perimeter instead of classic ceiling stains. Our humidity also means moisture lingers longer, so minor leaks cause mold faster. If you’re in a pier-and-beam home, check the crawlspace for damp subfloor or mineral deposits under the bathroom. Either way, quick testing beats waiting for July heat to turn a slow leak into a musty mess.
DIY Or Call A Pro?
If you can handle a test plug and a bucket, you can do a shower pan flood test. If the pan fails or you see signs of structural damage, bring in a restoration and tile pro. You may need moisture mapping, controlled demo, structural drying, and rebuild. If there is visible mold or that funky smell has gone from “maybe” to “wow,” skip the YouTube rabbit hole and call someone who shows up with meters, air movers, and a plan.
FAQ
How long should a shower pan flood test take?
Plan on a full 24 hours. That window helps detect slow leaks and reduces evaporation noise. Leave it longer if you want extra confirmation. New installations must follow membrane cure times before testing.
Will a flood test damage my shower?
Not if you do it correctly. Plug the drain properly, do not fill past the top of the curb, and avoid stepping in so you don’t slosh water over the edge. If your pan is already failing badly, the test will reveal that faster, which is the point.
Can I just re-caulk and skip testing?
You can, but you might be guessing. Re-caulking helps surface leaks. A shower pan flood test proves whether the waterproof layer is sound. Testing first saves you from painting lipstick on a leak.
How do I know if I need shower pan replacement?
If the pan fails a flood test, you see structural cracks, the base flexes, or you have recurring leaks after repairs, replacement is usually the smarter move. Add in subfloor damage or a pan older than 10 to 15 years and the case for replacement gets stronger.
What does shower pan replacement usually cost?
Basic prefabricated pans often fall in the hundreds for materials, with total projects commonly around 1,600. Custom tile or stone bases can land in the multi-thousand range. Add more if drying, mold remediation, or structural repairs are needed.
Is grout supposed to be waterproof?
No. Cementitious grout is porous. Even sealed grout is not a waterproofing system. Water needs a functioning membrane and drain assembly below the tile to stay where it belongs.
Can a leak come from the shower valve instead of the pan?
Absolutely. That’s another reason flood tests are helpful. They isolate the pan without running the plumbing. If the flood test passes but the shower leaks while running, you may be dealing with a valve, body spray, or supply line issue.
Pro Tips You’ll Actually Use
Snap a photo of your waterline at the start and finish of the flood test to document any drop. If you’re in a dry climate or running the heater, lay plastic wrap loosely over the water to minimize evaporation. If you have access below, tape a paper towel to the ceiling under the drain area during the test so faint moisture shows up clearly. When re-caulking, cut the nozzle small and keep a steady bead. Wipe with a damp fingertip and a clean rag for a clean line. If you end up replacing the pan, insist on a flood test before tile goes back in. Good installers expect it. Great ones insist on it.
When You Want It Fixed Right
If your flood test flunks, don’t keep showering and hope for the best. Stop using the shower, document what you saw, and get a restoration and tile team out. We test, we find the true source, we dry what’s wet, and we rebuild with systems that pass a flood test every time. Your house deserves a shower that holds water where it should and nowhere else.