If your home smells like a gym bag every time the AC kicks on, your ducts might be serving mold hors d’oeuvres to every room. Mold inside supply and return ducts does more than look gross at the register grilles. It rides the airstream and turns your HVAC into a spore cannon. The fix is not a quick vacuum-and-go. Real remediation means negative air containment, HEPA duct cleaning, and the kind of moisture control that keeps mold from staging a comeback tour. Here’s what that looks like when it’s done right, and how to stop feeding mold the three things it loves most: water, dust, and complacency.
How Mold Hijacks Your HVAC
Mold needs a damp surface and something snackable. In HVAC systems, that buffet looks like condensate in drip pans, sweating ducts in hot attics, dust buildup on coil fins, and soggy-lined return boxes. Once mold colonizes a liner or the inside of a supply run, every start-up lifts spores and fragments and launches them through the supply network. That’s why musty odors spike when the blower starts, why allergy symptoms mysteriously get worse at home, and why black fuzzy crescents grow along the edges of register grilles.
Contaminated ductwork can be obvious at the vents, or totally hidden inside the air handler and trunk lines. The big mistake is running the system like nothing’s wrong. If the HVAC is contaminated, the EPA recommends keeping it off during remediation so you’re not distributing spores into clean rooms while you work. Powering through without containment just means you’ll be cleaning the same rooms again later.
How Do You Spot Mold In Ducts?
Start with your senses and a flashlight. Look for dark or patchy growth on supply registers, fuzzy or slimy buildup at the boot-to-drywall joint, and streaks around return grilles where dust and moisture have held hands for a while. Peek inside the air handler: check the evaporator coil housing, the condensate pan, and the insulation inside the blower compartment. Rust at seams, wet insulation, and water marks around the return plenum are red flags. You might also see condensation beading at poorly insulated duct joints or on uninsulated metal in attics and crawl spaces.
Your nose is a decent meter. A musty puff when the system starts is a classic sign that the odor source is in the HVAC. If you’re unsure how deep it goes, or what you’re seeing on a duct board liner, a professional inspection and, if appropriate, testing can confirm contamination and help you plan the right scope. The point is simple: find the growth and the moisture that’s feeding it before you talk about cleaning anything.
Why Bad Cleaning Makes It Worse
Here’s what doesn’t work: taking a shop vac to open registers with the air handler still running, blasting biocide fog through the returns, or sweeping visible mold off duct board like you’re dusting a bookshelf. Without containment and negative pressure, you’re turning a localized problem into a whole-house event. Spores and fragments go airborne, ride pressure differentials, and end up on every horizontal surface you own. Then you’ll be chasing musty rooms one by one while the source keeps reloading. Real remediation is a system, not a single tool. You contain, depressurize, remove contamination, and fix the moisture. Miss a step and you’re back where you started.
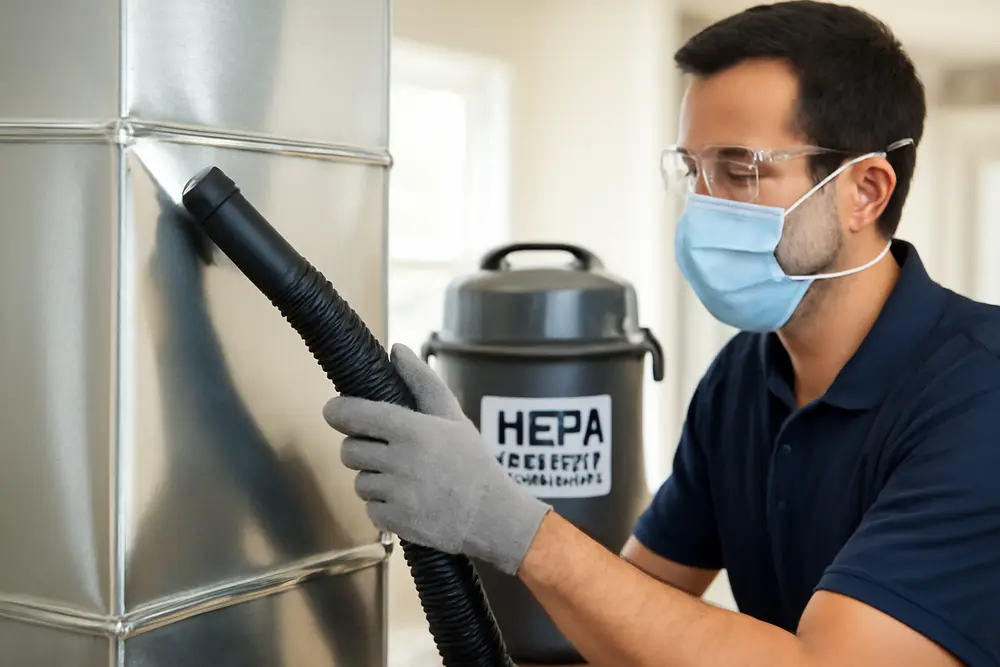
What Real HEPA Duct Cleaning Requires
There’s a reason this isn’t a five-minute chore. HVAC mold remediation has moving parts, and each one matters. Here’s what the process looks like when it’s built to win for the long haul.
Containment And Negative Air Pressure
First, set the stage so you’re not blasting spores into clean rooms. Create a work zone with 6-mil poly sheeting, zipper doors, and sealed supply and return openings. Then establish negative air containment with a HEPA-filtered air scrubber exhausting outdoors. You want a measurable pressure differential that pulls clean air into the work area and pushes contaminated air out through the scrubber discharge, not into the house. A typical target is roughly 0.02 to 0.05 inches water column negative relative to adjacent spaces, with 4 to 6 air changes per hour during active cleaning. Keep the HVAC off until the ducts and air handler components are cleaned and reassembled. If you can’t exhaust to the exterior, use sufficient HEPA filtration and pressure management so you’re not recirculating contaminants.
Cleaning The Ducts And Air Handler
Method matters, and so does duct type. For bare metal ducts, mechanical agitation paired with a true HEPA vacuum is the backbone. That means brushing, compressed-air whips, or contact agitation to dislodge debris while a high-powered negative machine pulls dust and spores into HEPA filtration. For lined or duct board systems, go gentler. Aggressive brushing can shred fibers and make a mess you’ll never fully recapture. Instead, vacuum with soft-brush tools rated for fibrous materials, then assess whether antimicrobial treatment or an industry-grade encapsulant is appropriate to lock down residual staining on sound, dry material. If the liner is deteriorated or waterlogged, replacement beats coating a bad substrate.
The air handler is just as important as the ducts. Dirty evaporator coils, moldy drain pans, and soggy internal insulation will re-seed the clean ductwork in a week. Detach access panels to reach both sides of the coil, clean fins with coil-safe chemistry, and flush the condensate pan and trap until they run clear. Replace contaminated internal insulation with closed-cell or foil-faced liner where appropriate. Always collect debris with a HEPA vacuum and bag waste inside the containment before moving it through the home.
PPE And Safe Work Practices
This is not a shorts-and-sandals project. Technicians should suit up with disposable coveralls, gloves, eye protection, and a properly fitted respirator. Set containment first, run negative air before you start disturbing material, and keep the HVAC off until cleaning is complete. Tools and hoses cross-contaminate fast, so stage them either inside containment or in a decon area and clean them before teardown. The EPA’s guidance for mold remediation calls for HEPA vacuuming during and after cleaning, and for shutting down contaminated HVAC systems until they’re addressed. That’s the safe way to work and the only way to prevent the mold from getting a free ride into clean areas.
Verification And Clearance
When the hands-on work is done, keep HEPA air scrubbers running for 24 to 48 hours to capture lingering particles. Verification starts with your eyes and finishes with data. Visually, there should be no dust, no debris, and no visible growth on any accessible surface. White-glove checks inside registers and the air handler should come up clean. Depending on project size and goals, clearance may include air sampling that compares indoor areas to outdoor baselines, particle counts, or surface sampling at key locations. You’re not aiming for sterile. You’re aiming for a clean, dry system with indoor levels that look like normal occupied spaces without a mold source.
Prevent Mold From Coming Back
Cleaning without fixing the cause is just expensive procrastination. Mold is relentless where there’s water and dust. Target the usual suspects and you’ll stay ahead of it.
Keep Condensate Drains Moving
Clogged condensate lines and grimy drip pans are mold’s favorite swimming pools. Clear the drain, clean the pan, confirm the line is properly trapped and sloped, and treat seasonally as needed so slime doesn’t regrow. If you see standing water or rust trails, you’ve got a maintenance problem, not just a cleaning problem. For more on routine HVAC upkeep that prevents water damage, check our guide to maintenance essentials at Austin Hi-Tech’s maintenance tips.
Insulate Ducts And Seal Leaks
Sweaty ducts in attics, crawl spaces, and garages are condensation factories. Insulate supply runs with adequate R-value, seal joints and seams, and make sure the vapor barrier faces the right way. Air handlers in humid zones may need additional insulation or relocation. If you can see missing insulation or feel cold air bleeding at a joint, you’re feeding moisture to the system. Fix it and you cut off mold’s water supply.
Upgrade Filtration The Right Way
Filters don’t just protect your blower. They starve mold. Upgrade from cheap fiberglass to quality pleated filters, typically MERV 8 to 13 depending on your system’s fan and coil drop. Not every air handler can handle HEPA media in-line, but you can add dedicated HEPA bypass units or portable HEPA air cleaners to reduce particle load. Replace filters immediately after cleaning and then on schedule. Dirty filters saturate and slump, letting dust sail right by to coat your coils and ducts. That dust is what mold eats. Cut the calories and the colony loses steam.
Control Humidity Like You Mean It
Keep indoor relative humidity around 30 to 50 percent. In muggy climates or tight homes with lots of moisture generation, use whole-home dehumidification or a smart thermostat with humidity control. Bathrooms, laundry rooms, and basements should vent properly and dry quickly after use. If you ever have a water intrusion, start drying within 24 to 48 hours or mold will happily move in. We explain early drying tactics here: How To Dry Out Your Home After A Flood.
A Simple Plan That Actually Works
Start with a focused inspection and moisture hunt. If you confirm growth inside the ducts or air handler, switch from “clean the grills” to “remediate the system.” Build containment around the air handler and any affected trunk lines, set negative pressure, and shut down the HVAC. Clean methodically: ducts first by material-appropriate methods with HEPA capture, then the air handler coil, pan, blower, and internal insulation. Address the drain and verify it runs clear. After the physical clean, let HEPA filtration run while you tidy up. Replace filters, re-insulate and seal what needs love, and fix the humidity or temperature swings that caused condensation in the first place. Finish with verification that shows the system is clean and dry. Then enjoy air that smells like nothing at all, which is how you know you won.
How To Hire The Right Pro
Not every “duct cleaning” ad is talking about remediation. You want a contractor who treats this like mold work, not a coupon special. Ask how they’re going to set up negative air containment, where they’ll exhaust the scrubber, and how they’ll measure pressure differential. Confirm that HEPA duct cleaning means mechanical agitation with HEPA capture, not just waving a vacuum hose at registers. If you’ve got duct board or lined returns, ask how they’ll protect the fibers and whether they replace or encapsulate compromised material. Make sure they’ll clean the air handler, coil, and pan, not just the ducts. Ask what their verification looks like, how long they run HEPA scrubbers after, and whether they provide photo documentation. If their plan is “spray something and see,” keep shopping.
Straight Answers To Real Questions
Is Negative Air Containment really necessary?
Yes. Without it, you’re pressurizing the workspace and pushing spores into clean rooms. A HEPA air scrubber exhausting outdoors with a measurable negative pressure inside containment keeps contaminants flowing the right way. Think of it as building a wind that always blows into the work zone, never out of it.
Can I just fog the ducts with a disinfectant?
Fogging alone doesn’t remove the debris and growth that keep feeding spores. It can also push moisture into fibrous duct liners and make a sticky mess that dust loves. Physical removal with HEPA capture comes first. Targeted antimicrobial treatments or encapsulants can be part of the plan after surfaces are clean and dry, especially on sound duct board, but they’re not a substitute for real cleaning.
How do I know if my ducts are metal or duct board?
Pull a register and look. Bare galvanized metal looks like, well, metal. Duct board and lined ducts have a fibrous interior with a mat-like texture, often tan or dark. If you’re unsure, a tech can identify it fast and pick methods that won’t damage it.
What pressure and air change rates should I expect?
For most residential containment zones, aim for roughly 0.02 to 0.05 inches water column negative pressure relative to adjacent areas and 4 to 6 air changes per hour during active cleaning. The exact setup depends on the size and leakage of the space, but those ranges are a solid target used across the industry.
Do I have to replace contaminated duct insulation?
If liner or duct board is water damaged, delaminated, or crumbling, replacement is smarter than trying to coat it. If it’s structurally sound and dry after cleaning, a suitable encapsulant may be used to lock down residual staining. The goal is a clean, durable surface that won’t shed fibers or harbor moisture.
When can I turn my system back on?
After the ducts and air handler components are cleaned, filters replaced, and containment is cleared. Many projects run HEPA scrubbers for 24 to 48 hours after physical cleaning to polish the air. Running the HVAC before that can re-distribute dust from areas you haven’t finished yet.
What does the EPA say about HVAC mold cleanup?
The EPA’s guidance emphasizes shutting down contaminated HVAC systems during remediation, using HEPA vacuums for fine particle capture, and avoiding practices that spread contamination. It’s a practical blueprint that lines up with professional standards. You can read more in the EPA’s mold remediation guide for buildings.
The Difference Between Clean And “Looks Clean”
“Looks clean” fools a lot of people. Registers can sparkle while the coil drips slime and the return box grows a chia pet behind closed panels. True success shows up in three places: a clean air handler, clean ducts, and a moisture plan that sticks. That’s why we insist on containment, negative air, and HEPA duct cleaning, and why we don’t stop at the grills. If you address the dirt and the damp together, your HVAC goes back to pushing comfort instead of fungal confetti.
What We Bring To The Table
We treat HVAC mold like the system problem it is. Our crews set up hard containment with 6-mil poly, establish negative pressure with HEPA scrubbers, clean ducts with material-appropriate agitation and HEPA capture, and rebuild the air handler to a clean, dry state. We flush condensate lines, correct slopes, and replace compromised insulation. Post-clean, we keep HEPA filtration running, replace filters, and verify results with eyes and data. Then we help you lock in prevention with drain maintenance, insulation and sealing, filtration upgrades, and humidity control that actually holds. That’s how you stop spores from hitching a ride through your home.
If you want real results instead of a perfume-and-pray job, ask for the plan that includes negative air containment, HEPA duct cleaning, and fixes that outlast the next cooling season. Your nose will thank you, and so will everyone who breathes your air.
Sources and standards worth knowing: EPA Mold Remediation in Schools and Commercial Buildings Guide, IICRC S520 and S500, and industry guidance on air scrubbers and negative pressure. For a plain-English primer on negative air and pressure control, see National Mold Authority’s overview, and for containment best practices, Renovett’s notes on mold containment.