Vinyl wallpaper looks pretty and cleans up easy, but it can turn your walls into a mold Airbnb fast. If there’s moisture sneaking around behind that shiny sheet, you could be hosting vinyl wallpaper mold without a single visible spot on the surface. It happens in bathrooms, hotel corridors, and plenty of modern homes. Here’s how moisture gets trapped, how to sniff out growth without ripping your house apart, and how to remove it the right way so it doesn’t come roaring back.
Why Vinyl Traps Moisture
Most vinyl wallcoverings barely let water vapor pass. That low-perm layer is great for stains and scuffs, not so great for drying. When a wall needs to release moisture, vinyl blocks the escape route. The wet stays wet and mold decides to unpack.
How does the moisture show up to begin with? It has options. A tiny plumbing drip in a bathroom vanity chase, a window flashing leak a few storms ago, steam from daily showers with a sleepy exhaust fan, or a humid summer pushing outdoor moisture toward your cold air conditioned walls. Even the adhesive behind the vinyl can slow drying. Vinyl on the interior face acts like a vapor barrier, and in the wrong spot that sets up a trap.
Vapor Drive And Barrier Failure
Moisture moves from where there’s more of it to where there’s less. In real buildings that usually means from warm and humid zones to cooler zones. In cooling climates the exterior air is humid and your air conditioning keeps interior surfaces cool. That combo can drive moisture inward. If your interior finish is vinyl, you’ve basically parked a plastic lid on a cold drink. Cue condensation at the face of your drywall or plaster.
Vapor barrier failure means you placed an impermeable layer where it blocks a needed drying path. Interior vinyl over exterior walls is a frequent offender, especially when paired with cold AC and a bath fan that hasn’t been cleaned since streaming video came on DVDs. In winter heating climates the direction can reverse, but the rule is the same. If you trap moisture between two low-perm layers, you create a petri dish. Hotels learned this the hard way. So did a lot of office buildings and plenty of homes.
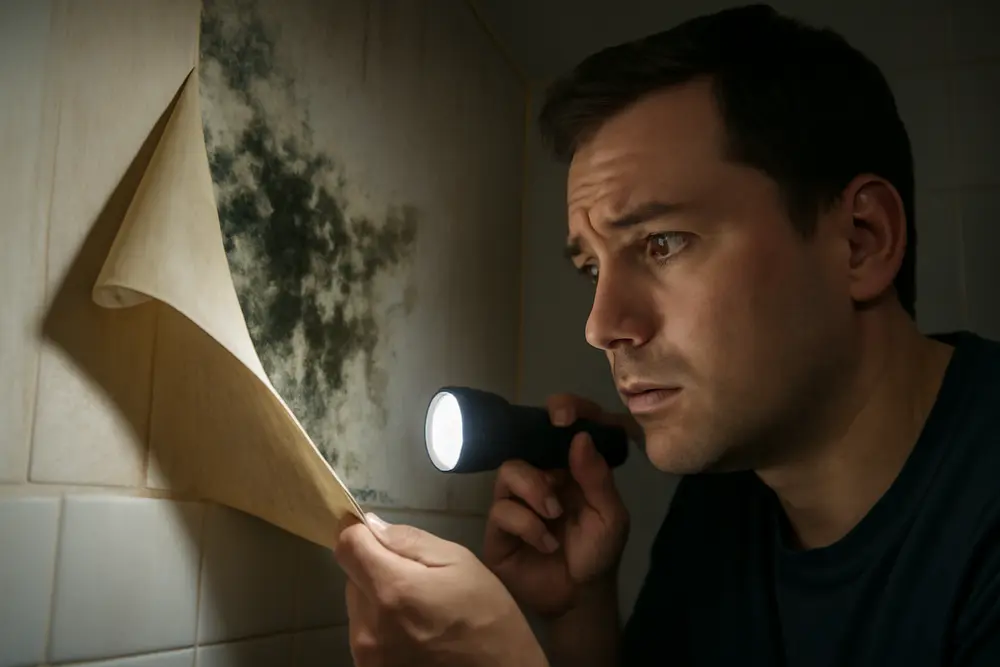
Clues You Can Spot Without Teardown
You do not have to demolish a wall to build a case against hidden mold. Use your eyes, nose, and a little tech.
Start with surface clues. Look for slight discoloration that shadows studs, yellow or brown stains, edge lifting or curling seams, blistering, or soft spots where the wallpaper releases from the substrate. Those are pressure points for trapped moisture. Run your hand along suspicious areas. If the wall feels cool and clammy while the room is warm, that is a hint you have wet materials behind the vinyl.
Next up is odor. A musty smell with no visible staining often means growth in a hidden layer. If your nose says old basement and the room is a bathroom with vinyl, do not gaslight yourself. You may notice allergy irritation only in that room, or a cough that shows up after showers. People are not moisture meters, but patterns matter.
Now borrow a page from pros. A pin or pinless moisture meter can often read through thin wallpaper at seams, door casings, and baseboards. Check a few spots you think are dry to set a baseline, then compare suspicious areas. An infrared camera can flag thermal patterns that hint at dampness. Cool patches that match stud bays, especially on exterior walls, tend to be red flags.
If you want a simple check without a full tearout, peel back a 2 to 3 inch strip in a discreet corner or behind a switch plate. Take a look, take a whiff, then temporarily re-adhere with painter’s tape if you are not ready to remediate yet. If the paper backing is dark, slimy, or smells like a wet log pile, you have your answer.
How To Confirm Growth Safely
Visual evidence plus moisture is usually enough to justify action. Testing is useful in a few cases, but it is not mandatory before removal. If you do choose to sample, avoid DIY petri-dish kits. A tape-lift or swab sent to a lab can confirm growth types, but remediation steps still hinge on the same fundamentals. Bigger picture testing like air samples makes sense after cleanup to confirm you returned to normal indoor mold ecology, not to chase a number before you start.
For a minimally invasive confirmation, pop the cover off a wall plate and gently lift a tiny flap of the vinyl. Wear basic PPE while you check. If the backside of the vinyl or the drywall paper looks spotted, matted, or black and you can scrape it off with a fingernail, that is growth. If material crumbles or is wet, plan for removal. You do not need to pull the whole room yet to confirm.
Removal And Cleaning That Actually Work
Once you confirm, treat the job with the same respect you would give a glitter-bomb trap. Control the mess or it spreads everywhere. Containment and sequencing are everything.
| Phase | What You Do | Pro Tips |
|---|---|---|
| Prep and Containment | Isolate the room with plastic sheeting and zipper access. Seal supply and return vents. Run a HEPA air scrubber to create negative pressure that exhausts out of the space. | Do not start fans before containment. Control the air first, then work. |
| PPE | At minimum use an N95, gloves, and goggles for small areas. For larger areas add a tight fitting respirator with P100 filters, disposable suit, and booties. | Leave PPE inside containment until bagged for trash. Do not spread dust through the house. |
| Wallpaper Removal | Score lightly if needed and peel the vinyl back slowly. Roll it inward so contamination stays toward the roll. Bag it as you go. | Do not soak moldy drywall to chase glue. Over-wetting can drive spores deeper into cavities. |
| Demo of Porous Materials | Cut out moldy drywall, paper facing, and any wet insulation. Remove 12 to 24 inches beyond visible growth to clean edges. | Watch for utilities. If the building is pre-1990, test for lead and asbestos before cutting. |
| Cleaning and HEPA Vacuuming | HEPA vacuum all exposed framing and surfaces. Wet clean with a detergent solution and scrub. Repeat HEPA vacuuming after it dries. | Staining in wood can remain after proper cleaning. Texture plus color does not equal active growth. |
| Disinfection | Use an EPA registered product as labeled after physical removal and cleaning. It is not a substitute for proper demo. | Never fog mystery chemicals to “seal it.” You are not marinating a brisket. |
| Drying | Set dehumidification and directed airflow to dry studs and cavities. Keep containment closed and under negative pressure while drying. | Target wood under 15 percent moisture and drywall back to normal compared to unaffected areas. |
| Verification | Re-check with a moisture meter. Consider third-party post-clearance inspection for bigger jobs. | Only rebuild when the numbers and the smell say ready. |
A few more ground rules. Do not paint or seal over mold. That is a Band-Aid on a geyser. Bleach is not your hero on porous materials because it does not penetrate well and it adds water. Keep the HVAC in the work area off or sealed during removal so you do not send spores to every room. Bag debris in the containment before it leaves the space. If the area of visible growth is more than about 10 square feet, it is time for professional remediation.
When To Call A Pro
There is a sweet spot for DIY and it is smaller than social media makes it look. Call a certified mold remediation company if any of these are true. The affected area looks bigger than a door. The wall feels wet across several stud bays. You see growth returning after you cleaned. Someone in the home is pregnant, elderly, has asthma, or is immunocompromised. The building is older and could have lead paint or asbestos in joint compound. You suspect the cause is in a wall cavity, roof leak, or foundation issue you cannot easily see. Or the problem is in a rental, commercial space, or school where documentation and standards apply.
Stopping The Problem For Good
If you do not fix the source and the science, the mold will come back with a smirk. Prevention is not fancy, but it is specific.
Start with ventilation. Bathrooms need a properly sized exhaust fan that actually vents outside, not into an attic. Use a timer switch and let it run for 30 to 60 minutes after showers. Kitchens need a range hood that vents outdoors. Whole-house solutions like ERVs or HRVs can stabilize humidity while saving energy, which lowers the risk of condensation on those cool wall surfaces. If your AC keeps the house cool but sticky, you need either service, better fan settings, or a dedicated dehumidifier. We break down humidity control here Humidity’s Role In Water Damage And How To Manage It.
Choose finishes that let your walls breathe. Skip solid vinyl panels on exterior walls in humid climates. If you love a pattern, look for breathable or perforated wallcoverings and adhesives with higher permeability. Paint is usually more forgiving. Use primers and topcoats with decent perm ratings, not waterproof coatings indoors. Your walls need to dry to at least one side. Putting vinyl back where you just removed vinyl is how sequels get made.
Correct vapor barrier placement for your climate. In cooling dominated regions you generally do not want a true interior vapor barrier. You want assemblies that can dry inward or outward. Smart vapor retarders that change permeability with humidity can be useful during rebuilds on the warm-in-winter side of the wall in mixed climates. The big mistake is creating a moisture sandwich where a low-perm interior finish like vinyl traps humidity against an exterior sheathing that is also low-perm. That is a fast track to vapor barrier failure.
Do the easy water stuff outside. Gutters need to be clean. Downspouts should kick water 5 to 10 feet away. The grade around the foundation should slope away. Windows and doors should have working flashing and caulking. Sloppy exterior water management puts constant pressure on your walls. Here are quick outdoor fixes that pay off Grading Your Yard To Prevent Water Damage.
Control indoor habits. Keep relative humidity between 35 and 50 percent. Use the AC on auto, not constant fan, so coils can drain and the system can dehumidify. Avoid pushing furniture tight to exterior walls where it can trap condensation. Leave a small gap so air moves.
Smart Rebuild After Remediation
Rebuilding is where you lock in the win. Do not rush it. Moisture meter readings should be back to normal and the wall should not feel cool and clammy. If you are not sure, let it run another day on the dehumidifier. Install fiberglass-faced or mold-resistant drywall in high-moisture areas, though it is not a force field. The fan still has to do its job. Prime with a vapor-open primer. Pick paints designed for bathrooms that resist mildew on the surface but still allow drying. If you must have wallpaper, choose a breathable option and a permeable adhesive, and do not put it on an exterior wall in a humid climate. Test a small area, then check it a week later for any sign of moisture or odor.
On exterior walls, consider a rainscreen gap during larger renovations so exterior sheathing can dry outward. Make sure your weather-resistive barrier is intact and window flashings are correct. Inside, avoid layering impermeable products like rigid vinyl over foam with foil. That stack-up begs for trapped moisture. Good walls are like good teams. Everyone has a role and the ball needs a path out.
Health And Safety You Should Not Ignore
Do not start swinging a scraper on pre-1990 walls without testing for asbestos in old joint compound or lead paint on trim. Both can be present even if your home is newer due to renovations with recycled materials or old stock. Disturbing those without proper controls is more dangerous than the mold you set out to remove. If testing confirms hazards, fold that into a professional remediation plan that handles both issues at once.
Protect HVAC during work. Tape plastic over returns and supplies in the affected area. Replace filters after the job. Clean the room with HEPA filtration and damp wiping before you reopen vents. Keep kids and pets out of the work zone. Mold and pets equals itchy vet bills.
Real-World Scenarios That Scream Mold
Bathroom with vinyl walls and a fan that barely hums, where the ceiling shows faint yellow rings above the shower. Exterior wall in a bedroom that always feels cool on humid days and smells like old books when you move the dresser. Corridor with vinyl where seams keep opening and refastening fails within weeks. If any of that rings a bell, move vinyl to the suspect list.
One more that hides in plain sight. A room cooled hard to 68 on summer afternoons with west-facing brick. Brick stores solar heat and drives moisture inward later in the day. The drywall behind vinyl is the cold stopper where vapor piles up. Night after night, you just wrote a mold growth timeline.
FAQ
Can I use bleach to kill mold on vinyl wallpaper?
Bleach on porous or semi-porous materials does not solve the problem. It can lighten the stain while leaving the root structure in the paper backing or drywall, and it adds water. Physical removal of contaminated paper and drywall, then cleaning with detergent and a labeled disinfectant after, is the right order.
Do I need to test for mold before I remove it?
Usually not. If you have visible growth and a moisture source, the fix is to remove and dry. Testing becomes useful when you need documentation for a landlord, insurance, or post-clearance verification on larger projects.
Can I just cut slits in the vinyl to let the wall dry?
That is like poking holes in a raincoat and calling it a poncho. You still have growth and contaminated paper behind it. You can do small exploratory cuts to confirm the problem, but the solution is proper removal, cleaning, and drying, followed by a better finish choice.
Why does mold keep coming back on my exterior wall?
Because the cause is still there. Inward vapor drive, cool interior surfaces, and a low-perm interior finish trap moisture. Fix the source with ventilation, humidity control, and finishes that allow drying. Check for exterior leaks and drainage problems too.
How long will drying take after removal?
Most small jobs dry in 2 to 5 days with dehumidification and airflow, but your mileage varies with climate, materials, and how wet the wall was. Trust moisture meter readings, not the calendar. Wood should be under about 15 percent and drywall should match readings from unaffected areas.
What You Can Do Today
Give suspect rooms a quick check. Sniff, scan the seams, and look for those subtle stains. If you are in a humid climate with vinyl on an exterior wall, odds are not in your favor. Pick up a basic moisture meter to get real numbers. Run the bath fan longer or upgrade it, and keep indoor RH near 40 to 50 percent. If you confirm growth, set containment, gear up, and follow the steps above or bring in a crew that lives and breathes this work. If you want a refresher on moisture basics and smart upkeep, this guide is a solid start Prevent Water Damage With These Essential Maintenance Tips. Your walls can be clean, dry, and boring again, which is exactly what you want.