If homes had a tiny unsung hero that saves walls from a slow, soggy demise, it would be kickout flashing. It is small, often ignored, and when it is missing, your wall cavity turns into a secret science experiment growing mold and rot. If you have ever noticed stains inside near a roof-to-wall intersection or mysterious peeling paint under a roofline, there is a good chance a missing or mangled kickout is the troublemaker. Let’s go straight at it: what kickout flashing is, why it gets skipped, how to spot problems before they spread, and how to fix it the right way so water ends up in the gutter instead of your drywall.
What Is Kickout Flashing
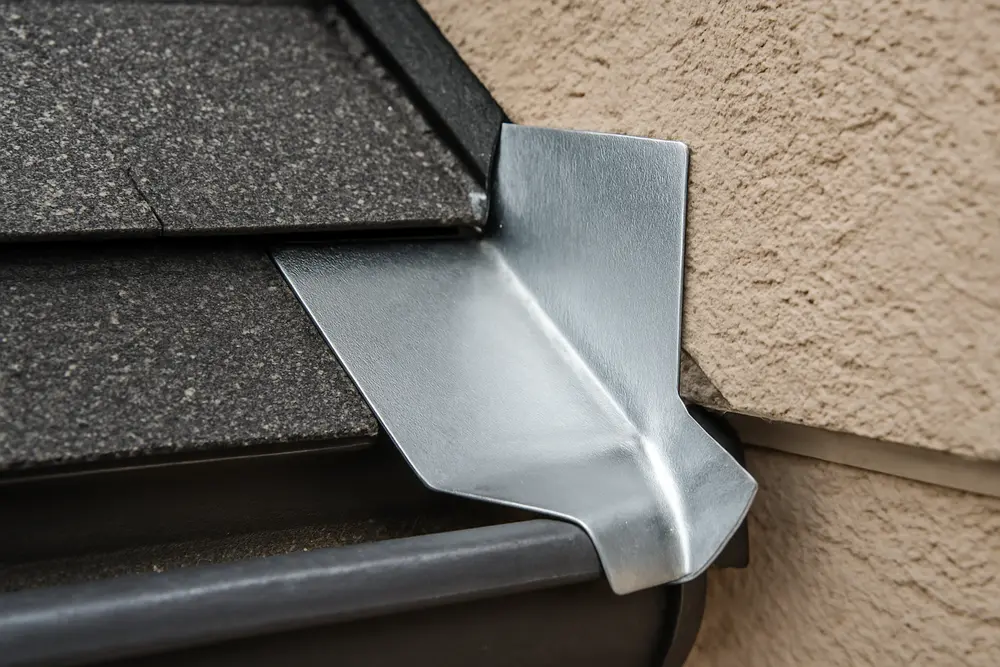
Kickout flashing is a shaped piece of flashing that sits where a roof edge runs into a vertical wall, typically right above the end of a gutter. Its job is brutally simple: catch roof runoff zipping down the step flashing and shove it into the gutter before it can run behind the siding. When there is no kickout, water often overshoots the gutter, sneaks behind cladding, and soaks the sheathing. InterNACHI has a straightforward definition and inspection notes that are worth a read if you want the nitty-gritty details: InterNACHI: Inspecting Step and Kickout Flashing.
How It Works With Roof-to-Wall Flashing
Kickout flashing is the opening act for step flashing. Roof-to-wall intersections are typically protected by step flashing that is woven under shingles and lapped up the wall. Water follows gravity, hits each step, and exits near the lower end. Without a kickout at that lower end, water can run down the siding or behind it. The kickout is shaped like a little diverter that projects outward to push water into the gutter. When these two pieces dance together correctly, you get a dry wall and a happy gutter. Fine Homebuilding has a clear explainer on this pairing: Kickout Flashing: How To Flash Troublesome Roof-To-Wall Intersections.
Why It Gets Skipped or Botched
Kickout flashing has a reputation for going missing for three reasons. First, it may not be explicitly called out in older plans, even though modern best practice expects it. Second, some installers try to fake it with sealant or undersized metal that is not shaped correctly. Third, integrating it with the wall’s weather-resistant barrier takes more care, and rushing the job is an easy way to guarantee a future leak. Common sins include undersized kickouts that do not project far enough, incorrect angles that splash water back at the wall, corrosion from mismatched metals, fasteners through the wrong spots, and zero integration with housewrap. For a reality check on common installation mistakes, see New England Metal Roof: Kick Out Flashing.
For code context, the International Residential Code requires corrosion-resistant flashing at roof-to-wall intersections, and many inspectors expect kickouts specifically at those gutter ends because it is the proven way to direct water into the gutter. InterNACHI covers this code landscape here: InterNACHI: Step and Kickout Flashing.
When Kickouts Are Missing, Bad Things Happen
Water does not knock on the front door when it enters at a roof-wall joint. It slips behind the siding, rides the sheathing, and soaks what it can. You might not see a drop inside until the damage is advanced. Typical early clues include damp sheathing, stained or swollen siding, peeling paint below the intersection, musty smells, and gutter-end drip marks on the wall. The Building America Solution Center outlines the hidden pathways for moisture and the right flashing sequence to stop them: BASC: Step and Kickout Flashing.
Ignore these signs long enough, and you get rot in the sheathing and studs, spoiled insulation, mold growth, and sometimes structural repairs that make your wallet cry. A quick primer on the risks and bigger-picture damage is here: T-MHI: Is Kickout Flashing Important.
How to Spot Trouble Fast
You can often detect kickout flashing problems from the ground without climbing a ladder. Look where a roof slope dies into a wall near a gutter end. If you cannot see a small diverter that kicks water into the gutter, that is a red flag. Also, look for water staining or streaks on the siding directly below that intersection. Paint that sags or siding that looks swollen or crumbly at the edges is another giveaway. InterNACHI has a clear visual checklist of what should be there and what failures look like: InterNACHI Guide.
Inside, inspect the ceiling and wall corners beneath those roof-to-wall points. Light brown water stains, bubbling paint, or a faint musty odor are your cue to dig deeper. In an attic, look for darkened sheathing, rusty nails, damp insulation, or tracks where water has been running. The BASC guide shows good photo sequences to help you understand the water pathway: BASC: Roof-Wall Intersections.
If you are measuring an existing kickout, size matters. You want enough projection and wall height so water cannot backslide. General industry guidance favors a diverter angle around 110 degrees with adequate projection into the gutter and a leg that runs up the wall under the cladding. A practical overview with measurements is here: KickoutFlashing.com: Installing Kickout Flashing.
Smart Repair and Retrofit Steps
Here is the clean, proven sequence pros use when retrofitting kickout flashing at a roof-to-wall intersection. Note that safe access, fall protection, and integration with the wall’s weather barrier are critical. If any of that sounds like a weekend risk you do not want to take, bring in a qualified roofer or restoration tech.
Start by carefully removing the siding or cladding at and above the intersection so you can see the sheathing and the weather-resistant barrier. Probe the sheathing for rot. If the wood is soft or crumbly, cut it out and replace it, then install a peel-and-stick membrane that bridges the joint between the roof and the wall. Next, place the kickout at the gutter end. The diverter should tuck under the step flashing above, extend into the gutter, and climb the wall sufficiently to be lapped by the WRB and cladding. Then, weave or reset step flashing correctly under each shingle course so water flows down and into the kickout. The siding should lap over the flashing, not the other way around. BASC’s step-by-step approach shows proper sequencing and WRB lapping: BASC Retrofit Steps.
Fasteners should be placed where they will not create leaks. That usually means fastening the vertical leg that will be covered by siding. Avoid puncturing the horizontal leg that sits on the shingles. If you need sealant, use it sparingly and only as a supplemental measure, not as the main water control. Caulk is not a substitute for the right metal shapes and shingle laps. Pro Remodeler has practical notes on angles, fastening, and shingle integration: Pro Remodeler: Leakproof Kickout Flashing Tips.
Materials That Actually Last
Kickout flashing can be fabricated from corrosion-resistant metals like aluminum, galvanized steel, or coated steel, and there are also molded plastic versions designed for easy retrofits. Prefabricated kickouts are nice because they have the right bend and projection baked in. Custom metal kickouts can work well if a skilled sheet metal worker forms the correct angles and returns. Key points: use metals compatible with your roof and fasteners, size the projection to land water inside the gutter, and avoid dissimilar metal contact that could accelerate corrosion. Pro Remodeler’s guide breaks down material choices with practical installation tips: Prefab vs Custom Kickouts.
Maintenance That Pays Off
Kickout flashing is not a high-maintenance part, but it deserves a look when you clean gutters or after big storm events. Confirm the diverter still projects into the gutter and is not bent or loose. Check that the gutter beneath it is not clogged. Look for chipped paint, corrosion, or sealant that has parted company with the wall. Inspect the siding and paint just below for fresh staining or swelling. Routine checks twice a year and after heavy wind-driven rain are enough to stop small problems from becoming repair bills that require a second mortgage. A practical walkthrough of inspection basics is here: Kickout Flashing: Signs and Maintenance.
DIY checks from the ground or a ladder are usually safe if you know your limits and use proper safety gear. Anything involving the removal of shingles, step flashing, or wall claddings is best left to a pro who can reassemble the system correctly and document the repair for insurance if needed.
Real Costs and Real-World Lessons
Let’s talk reality. Adding a kickout during a roof replacement is inexpensive compared to what it protects. Retrofitting one later can cost more because it involves removing and reinstalling siding and step flashing. If you discover rot behind the siding, you are looking at additional sheathing and framing repairs, insulation replacement, and interior restoration for any stained drywall or mold remediation. Case studies from inspectors often show missing kickouts as one of the most common exterior defects. Here is one such example that lines up with what we see in the field: Missing Kickout Flashing: A Common Defect.
Expect an affordable bump to include proper kickouts during a reroof. Retrofits without damage are still manageable. The budget takes a leap if water has been getting in for a while and the walls need surgery. Some regional breakdowns and ranges are discussed here: Cost and Repair Considerations.
Why Austin Homes Need Kickouts
Austin’s weather loves to test roof details. We get wind-driven rain, fast-moving storms, and long humid stretches that load walls with moisture. Add mixed cladding types and the occasional enthusiastic gutter overflow, and you have a recipe for sneaky wall leaks at roof-to-wall intersections. Proper kickout flashing is especially important on two-story gables that die into lower roofs, on chimney sidewalls, and anywhere a roofline chops into a vertical wall above a gutter end. For additional context on preventing attic leaks and keeping water out of your home in Central Texas, see our notes on attic leak risks and prevention here: Attic Water Damage Risks and Prevention Tips. If you have solar or plan to add it, clean flashing details around PV roof penetrations are equally critical. We cover those principles here: Solar Panel Roof Leaks Prevention and Flashing Tips.
Local code inspectors in our area expect roof-to-wall flashing to be corrosion-resistant and installed per manufacturer instructions. Many will specifically look for a kickout at the gutter end, because they know exactly what happens without it. If you are selling or buying a home, this is a classic pre-listing and pre-purchase inspection item that can prevent a post-closing argument with your drywall.
Pro Tips That Save You Headaches
Make the kickout big enough. Undersized kickouts might look tidy, but they splash water down the siding. Aim for a shape that places water deep into the gutter, not on its edge. Tie it into the housewrap or WRB with the right laps. Water always needs a shingle-style lap that sends it outward, not inward. Do not rely on caulk as a structural or waterproofing crutch. Caulk ages and cracks. Metal shape and proper overlap are what matter most. Finally, do not drive fasteners through the horizontal leg where water sits. Keep penetrations to the vertical leg that gets covered by siding.
Red Flags That Call for a Pro
If you see persistent staining below a roof-to-wall intersection, if your gutter constantly overflows at a roof-wall joint, if you smell mustiness near those areas inside, or if your siding is swelling or rotting beneath a gutter end, get a professional assessment. Our team opens up the cladding only where needed, maps the moisture, repairs damaged framing and sheathing, installs proper kickout and step flashing, then puts your siding back together with the right WRB lapping. We can also address any interior water damage or mold growth that developed while the leak was playing hide-and-seek.
FAQ: Kickout Flashing Basics
What does kickout flashing actually do?
It diverts water from the roof-wall intersection into the gutter so runoff cannot run behind the siding. Simple job, huge impact.
Do all roof-to-wall intersections need a kickout?
If there is a gutter at the end of that roof-wall run, yes. Without it, water commonly spills behind siding. The IRC requires flashing at roof-wall intersections, and many jurisdictions interpret that to include a kickout for proper drainage. See InterNACHI’s code overview here: InterNACHI Code Context.
Can I just add a piece of bent metal and call it good?
Only if it is sized, angled, and integrated properly with step flashing and the wall’s WRB. Undersized or badly angled kickouts can make splashback worse. See installation tips here: Leakproof Kickout Tips.
How do I know if mine is failing?
Streaks on siding below the joint, peeling paint, soft or swollen trim, and indoor stains or musty odors near that location are telltale signs. The BASC and InterNACHI guides show what to look for: BASC Guide, InterNACHI.
Metal or plastic kickout flashing?
Both can work. Use corrosion-resistant materials that play nice with your roof and fasteners, and ensure the shape gets water into the gutter without splashback. Prefab parts are great for consistent angles and projection.
My home already has step flashing. Why add a kickout?
Step flashing handles the vertical run. The kickout handles the final turn into the gutter. Without it, you create a perfect spot for water to dump behind the wall cladding.
Is this a DIY project?
Inspection, cleaning gutters, and visual checks are DIY friendly for many folks. Cutting into siding, resetting step flashing, and tying into the WRB is where a small mistake can create a big leak. When in doubt, call a pro.
Ready for a Leak-Free Roof-Wall Joint
If you suspect your roof-to-wall flashing is missing the all-important kickout, do not wait for stains to autograph your living room wall. Our team can inspect, document what we find, coordinate with your roofer if needed, and handle any interior restoration if water got in. We keep the tone fun, but we are deadly serious about sending stormwater to the gutter instead of into your home. Reach out and we’ll kick that water out where it belongs.