
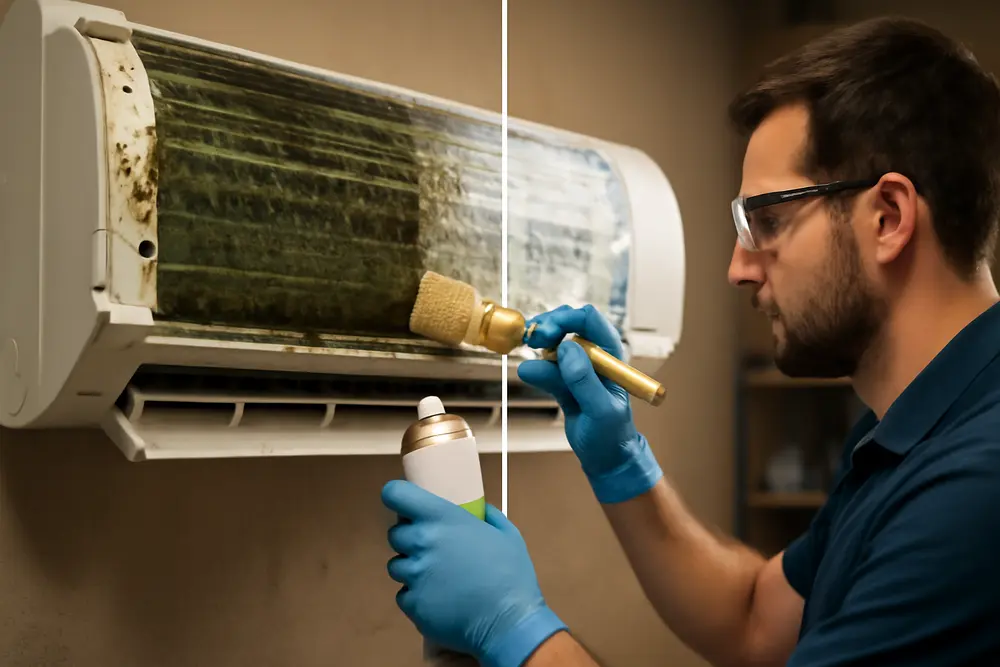
If your ductless head smells like a wet gym bag every time it kicks on, you’re not imagining it. That funk is biofilm living it up on your evaporator coil, blower wheel, and drain pan. Mini-splits are comfort machines and moisture machines at the same time, which makes them prime real estate for mold and bacterial slime. This playbook breaks down why it grows, how to do a proper deep clean without trashing your electronics, and how to keep it from coming back with humidity control, smarter cleaning cadence, and a couple of strategic add-ons.
Why Ductless Heads Grow Biofilm
Biofilm is the sticky, often invisible layer of mold, bacteria, and residue that clings to wet surfaces. In a mini-split, the evaporator coil is wet any time the unit cools. Air blows across that cold, wet coil, the blower wheel scoops up the condensed moisture, and the drain pan collects the runoff. Add a little dust, skin flakes, pollen, cooking aerosols, and pet dander and you just fed a microbial buffet.
Restricted airflow is the accelerant. Dirty filters and blower wheels choke air, which keeps the coil wet longer and makes the unit run harder and longer. That longer wet time equals more biofilm. Heavy buildup on the blower wheel itself can snowball into even worse airflow and higher run times, which is why a light film can turn into a gummy mess fast. For a solid breakdown of the conditions that let biofilm thrive, see the practical guidance from Howard Environmental, and airflow notes from Engineer Fix.
What You Need For A Safe Deep Clean
You do not need a fire hose or a cocktail of harsh chemicals. You need the right cleaner, a light touch, and splash protection for the electronics. A coil-safe no-rinse or light rinse cleaner is ideal for evaporator coil surfaces and blower wheels. A soft brush or fin comb knocks loose lint without folding fins. A low-pressure sprayer lays on cleaner and rinse water evenly. Plastic sheeting or a cleaning bib keeps the PCB and wiring dry. For the drain line, a wet and dry vacuum at the outdoor termination is the least messy way to clear clogs, and mild acid-free cleaners like diluted HVAC coil cleaners or white vinegar are safer than bleach for pans and plastic lines.
Evaporator Coil Cleaning That Works
Start with the power off at the breaker. Do not rely on the handheld remote. Remove the filters and the front cover so the coil is fully exposed. If there is loose lint on the fins, dry-brush or vacuum it gently with a soft brush attachment. Think whisking crumbs, not sanding wood. The goal is not to bend the fins. If you do fold any, a fin comb can straighten them later.
Apply a coil-safe cleaner evenly across the coil face. Many techs like no-rinse formulations for indoor heads because they foam, loosen debris, and then drain into the pan during normal operation. If you use a cleaner that needs a rinse, give it a 5 to 10 minute dwell and then rinse from the top down with low pressure so gravity carries runoff into the drain pan. Keep water off the electronics and out of the blower motor housing. A light rinse is plenty. High pressure can fold fins, drive water into the motor, and turn a cleaning into a repair. For technique, BOLDR’s coil cleaning notes are a good reference.
Once rinsed, let the coil drip and dry. If your mini-split has a built-in coil dry or self clean function, you can use it after reassembly. If not, allow air drying time with the unit off before powering it back up. Running the unit while components are still wet can backfire and spread cleaner mist or water where it does not belong. As a reminder, Engineer Fix underscores avoiding harsh acids and high pressure on these sensitive coils.
Blower Wheel Biofilm Removal
The blower wheel or barrel fan is the unsung hero that quietly launches all your cool air. It is also the first place biofilm settles because the wheel edges ride inches from the constantly wet coil. When the edges turn glossy black, airflow drops and the unit works overtime. You need access, dwell time, and a careful rinse to get it clean.
Power off completely. Remove the front cover and filters. Some heads let you angle down or loosen the drain pan to expose more of the wheel. Protect the electronics and floor with plastic or a cleaning bib. Hand-rotate the wheel to apply coil-safe cleaner along every vane. Let it sit long enough to loosen slime. Then, with low-pressure water, rinse while rotating the wheel by hand. Work slowly so the runoff lands in the drain pan, not on the board or the wall. Stubborn spots respond well to soft detailing brushes or foam swabs. Do not gouge the plastic or you will throw the wheel out of balance and create a new rattle you will hate forever.
When the wheel looks satin gray rather than glossy black, you are winning. Let the wheel dry fully before reassembly. Running the fan wet will sling droplets and can redeposit the same junk you just removed. For more blower access tips and pitfalls to avoid, cross-check Howard Environmental and Engineer Fix.
Drain Pan And Condensate Line Care
If the pan stays wet or the line partially clogs, biofilm grows faster and water can back up into the head. Use a flashlight to check for standing water or slime in the pan. Wipe what you can reach with a cloth and a mild non-bleach cleaner. For the condensate line, the cleanest method is to attach a wet and dry vacuum to the outdoor termination and pull the clog outward. If you prefer flushing from the indoor side, move gently and do not force water backwards toward the pan. A periodic vinegar flush can help dissolve organic film without attacking the plastics that bleach can weaken. Make sure the drain line runs downhill with no sags where water can pool. A lazy belly in the line is basically a petri dish.
Quick Reference Gear And Gotchas
| Component | Good Tools | Top Mistakes |
|---|---|---|
| Evaporator coil | Coil-safe cleaner, soft brush, fin comb, low-pressure sprayer, plastic sheeting | High pressure, harsh acid, wetting electronics, bending fins |
| Blower wheel | No-rinse cleaner, soft detailing brush, cleaning bib, gentle rinse | Running while wet, over-spraying PCB, scratching vanes |
| Drain pan and line | Flashlight, mild cleaner, wet and dry vac at outlet, vinegar flush | Bleach in plastic pans, forcing water backward, ignoring line slope |
Prevention That Actually Sticks
Control moisture and you control biofilm. Indoors, aim for relative humidity in the 40 to 60 percent band, with a sweet spot around 45 to 50 percent. Above 60, coil and wheel surfaces stay damp too long. Use Dry mode after heavy cooling days to wring out extra moisture. If your home lives in the sticky zone most of the year, add a standalone dehumidifier or a whole-home unit depending on square footage. After long cooling runs, many modern mini-splits offer a coil dry or self clean function. Use it. If yours does not, a short fan run can help evaporate residual water, but do not run fan-only for hours in a humid room or you will just move moisture around.
Airflow matters for prevention too. Use the filters that fit the head properly so air does not leak around the edges. Avoid slapping on dense aftermarket media that jacks up static pressure. Your evaporator needs a steady stream of air to shed moisture. Too much restriction equals a perma-wet coil. Howard Environmental’s guidance on filtration and airflow is worth a look here.
Cleaning Cadence You Can Live With
Set a schedule and stick to it. Rinse or vacuum your mini-split filters every 2 to 4 weeks during heavy season and monthly the rest of the year. The job takes five minutes and can stop most airflow drama before it starts. Plan evaporator coil cleaning and blower wheel cleaning once a year if you are in a mild climate and the unit runs lightly. Double that to twice a year in humid or dusty environments, homes with pets, or rooms that see heavy cooking aerosol. If you catch a musty hit when the unit starts, that smell is your calendar reminder. BOLDR shares similar timing and technique guidance for coils here, and their filter cleaning reminder is spot on here. Give the drain line a check every season and after any water incident.
Filtration And UV Add-Ons
Good filtration helps as long as it does not choke airflow. Use OEM-grade washable screens or well-fitting disposable inserts that match what your unit is built to handle. If your filter is so restrictive that your fan ramps up and still cannot hit setpoint, you just extended coil wet time and fed biofilm. Skip thick aftermarket pads that were never meant for ductless heads.
UV and UV-LED modules designed for mini-splits can be a legit helper in high-humidity spaces. Positioning near the blower wheel and coil can suppress growth on surfaces that stay damp and are hard to reach with brushes. They are not a substitute for cleaning, but they slow the comeback. Follow the manufacturer’s placement instructions, shield plastics if required, and wire them to the service switch so they do not cook 24/7 when the unit is off. For an example of purpose-built gear, see the DiversiTech mini UV-LED system overview here.
Red Flags That Say Clean Me
If any of these show up, plan a cleaning. A musty or earthy whiff when the head starts. Dark specks marching across the coil face or glossy black edges on the blower wheel. Airflow drops even though you just washed the filter. Drips or staining on the wall under the head. A quiet unit that suddenly runs marathon cycles while your bill climbs. One or two of these is a tap on the shoulder. All of them is a siren.
When To Call A Pro
Plenty of owners can handle filter care and light coil rinse work. Call a pro if the blower wheel is caked and you need to drop the drain pan or partially remove the wheel. Also call in help if there is standing water inside the head, a condensate pump alarm, or visible growth beyond the head like inside wall cavities. Sensitive occupants and water losses deserve professional containment and cleaning. If fins are already bent from a past overzealous spray, a tech with fin tools can often recover airflow. And if you are not keen on getting any cleaner near a circuit board, you are not alone. A seasoned tech will protect electronics, bag the head properly, and clean fast without splash drama.
Aftercare And Dry Down Tips
Once you finish cleaning, keep the power off long enough for components to fully dry. Use absorbent towels on the cabinet edges and around the pan. If your unit has a coil dry cycle, run it after reassembly. If it does not, allow a short fan-only run to move air across the coil, then stop. Confirm the condensate line is flowing by watching the outdoor termination. If there is an odor, it should fade quickly after the first few cooling cycles. Lingering smell means you missed a section of the blower wheel or the drain pan still has film. Touch up those areas rather than blasting more cleaner everywhere.
Real World Example
We serviced a 3-year-old ductless head in a studio apartment that smelled like someone spilled soup in it. The filter looked clean because the tenant rinsed it monthly, but the blower wheel edges were glossy black and the first two rows of coil fins were lint glued together. The unit ran non-stop trying to hit 72 in a humid space. We cut power, bagged the head, brushed and rinsed the coil with a no-rinse cleaner, then hand-rotated and detailed the wheel with foam swabs. The drain line had a low spot behind the wall that collected slime, so we vacuumed from the outside termination and tightened the line with a new strap. We set the remote to run Dry mode after long cooling calls and added a mini UV-LED aimed at the blower hub. Two weeks later, the odor was gone, the fan hit speed without whining, and the electric bill dropped because the unit finally cycled off.
FAQ
Can I use bleach to clean the coil or pan?
Skip bleach. It can attack plastics and metals in the head and it is a respiratory irritant. Use coil-safe cleaners and mild options like diluted vinegar for the pan. Howard Environmental echoes the bleach warning in their ductless guidance.
What is the safest cleaner for evaporator coil cleaning?
A no-rinse, evaporator-side HVAC coil cleaner that is non-acidic and designed for indoor use. These are made to loosen grime and drain without heavy rinsing. BOLDR’s coil cleaning tips align with that approach.
How long should a deep clean take?
For a lightly soiled head, plan 45 to 90 minutes. Heavier biofilm on the blower wheel can turn it into a two-hour job because you need to work each vane and let cleaner dwell long enough to break the slime.
Does UV kill everything in the air?
No. UV add-ons for mini-splits primarily keep growth down on surfaces like the blower wheel and nearby plastic shrouds. They are a preventive helper, not an air purification system for the whole room.
What relative humidity should I target?
Aim for 45 to 50 percent most days, and stay between 40 and 60 percent. Above 60 percent, wet time on the coil and wheel climbs and biofilm wins.
Should I run the fan-only mode overnight to dry things?
Short fan runs can help after a clean or after long cooling. Running fan-only for hours in a humid room can just move moisture around and make things clammy. Dry mode is better because it actually dehumidifies.
Why does the smell come back a week after cleaning?
You probably cleaned the coil face and missed the blower wheel edges, or the drain line still has a slime pocket. Clean both and check line slope. If airflow is still weak, the blower may be loaded deeper than it looks.
Can I remove the blower wheel myself?
Some models let you drop the pan and slide the wheel out with basic tools. Others require more disassembly near wiring. If you are not comfortable marking orientation and reseating the wheel without wobble, call a pro.
Are foaming spray cleaners safe for coated fins?
Choose a product labeled safe for microchannel or epoxy-coated evaporators and follow dwell times. Aggressive acids or extended dwell can dull coatings and stain housings.
Pro Tips That Pay Off
Protect the board and wiring with plastic every time. Even careful rinses splash. Keep a few foam swabs in your kit for wheel edges and tight corners where brushes are clumsy. If you see lint glued to the first coil rows, check the filter fit. Air sneaking around the filter frame bypasses filtration and turns your coil into a dryer lint trap. For homes with cats and dogs, set a calendar reminder to check filters every two weeks in summer. If your unit offers a coil dry function, program it to run automatically after long cooling calls. For stubborn drain lines, vacuum from the outside first and then verify slope. A 10-minute line fix saves months of slime headaches.
Mini-split biofilm removal is mostly about respect for moisture and airflow. Keep relative humidity in the 45 to 50 percent zone, stick to a cleaning cadence you can actually follow, and use smart add-ons like UV-LED only where they help. Tackle evaporator coil cleaning and blower wheel cleaning the right way and your ductless head will stop smelling like a gym bag and start acting like the quiet performance machine you paid for. For additional reading and technique checks, see Howard Environmental, Engineer Fix, BOLDR’s coil guide, and the DiversiTech UV-LED documentation.