Solar can cut bills and raise home value. Many homeowners worry about water intrusion once a crew starts drilling roof attachments. That fear is fair. It is also preventable. Solar panel roof leaks almost always trace back to rushed roof assessments, skipped flashing, sealant only shortcuts, or sloppy conduit penetrations. With the right questions and a clear checklist you can avoid problems before they start. If a leak ever pops up you will know how to document it fast and who to call first.
This guide shares practical contractor level guidance from a restoration perspective. It focuses on solar panel flashing, sealants, cable routing, installer vetting, maintenance checks, early attic signs, warranty paths, and insurance steps. Use it to set expectations with your installer and protect your roof for the long term.
Do solar panels cause roof leaks
Short answer. No. Solar panels do not cause leaks by default. Poor mounting methods do. Roof leaks come from missing or misapplied flashing, incompatible sealants, penetrations placed in the wrong shingle course, or unflashed conduit and junction boxes. Roofing bodies and code sources agree on one theme. Treat every support as a pipe style penetration with proper metal flashing that sheds water in the correct order of shingle courses. The National Roofing Contractors Association recommends exactly that practice. See this guidance on NRCA backed waterproofing for PV supports.
How leaks happen
Water follows gravity until wind or capillary action pushes it sideways or upslope. Penetrations that interrupt shingle laps give water a path under the surface. Sealant only patches crack as mounts flex daily with thermal cycles. Tape backed products lose bond as oils in shingles migrate. Minor movement at a stand or lag screw pumps water into the roof deck. Wind driven rain reaches fastener holes if flashing is too narrow or sits in the wrong course. Unguarded cables rub on shingles. The jacket wears through. Moisture finds the easiest entry point.
Industry groups caution against shortcuts. The Florida Roofing Association summarizes it this way. Sealant only or butyl tape only is not a long term water barrier on PV mounts. Use metal flashing integrated under the second or third shingle course with correct overlaps. Review their explanation on why sealant only solutions fail. Solar trade outlets echo the same message. There is no single national standard for PV flashing. Follow your shingle manufacturer rules. Follow NRCA pipe flashing practice. Use sealants that match your roofing brand so the roof warranty stays intact. See flashing codes and roof warranty considerations.
How proper flashing prevents leaks
Think like water. Flashings must overlap in a water shedding order. The upper flange belongs under the upslope shingle course so water flows onto the flashing then back onto intact shingles. A flashing that sits above the shingle course will act as a funnel during wind events. Many shingle roofs do best with at least nine inch wide metal flashing that lands in the correct course and does not overhang the drip edge. See practical asphalt shingle flashing tips. Quality mounts also use an elevated water seal concept. The lag hole receives a controlled bead of compatible sealant. The flashing floats so it can move with the roof without tearing the seal. Learn more about this approach under elevated water seal flashing.
Bottom line for homeowners. Ask your installer how every stand is flashed in the shingle field. Ask for the exact mount model. Ask for an ICC ES or similar evaluation report that speaks to structural and water testing. See examples of ICC ES evaluated roof attachments.
Before you install
A quick roof check before solar protects your home and your wallet. If your roof is near mid life for its material you may want a re roof first. That avoids a removal and reinstall later which costs time and money and raises leak risk. Asphalt shingles often need evaluation near the ten to fifteen year mark. Energy consumer resources give that same guidance. Review this question with your roofer. Replace roof before going solar?
Roof age and condition
Look at granule loss, curling, soft decking, and past patchwork around vents. Suspect leaks in valleys or at skylights. If hail has hit your area recently, schedule a roof inspection. A clean deck gives the mounts solid bite into rafters or approved decking zones. That yields better waterproofing since fasteners will seat correctly. If the roof needs work, solve that now. Solar panels should not hide weak shingles or failing underlayment. Their shade can hide water patterns that would have tipped you off sooner.
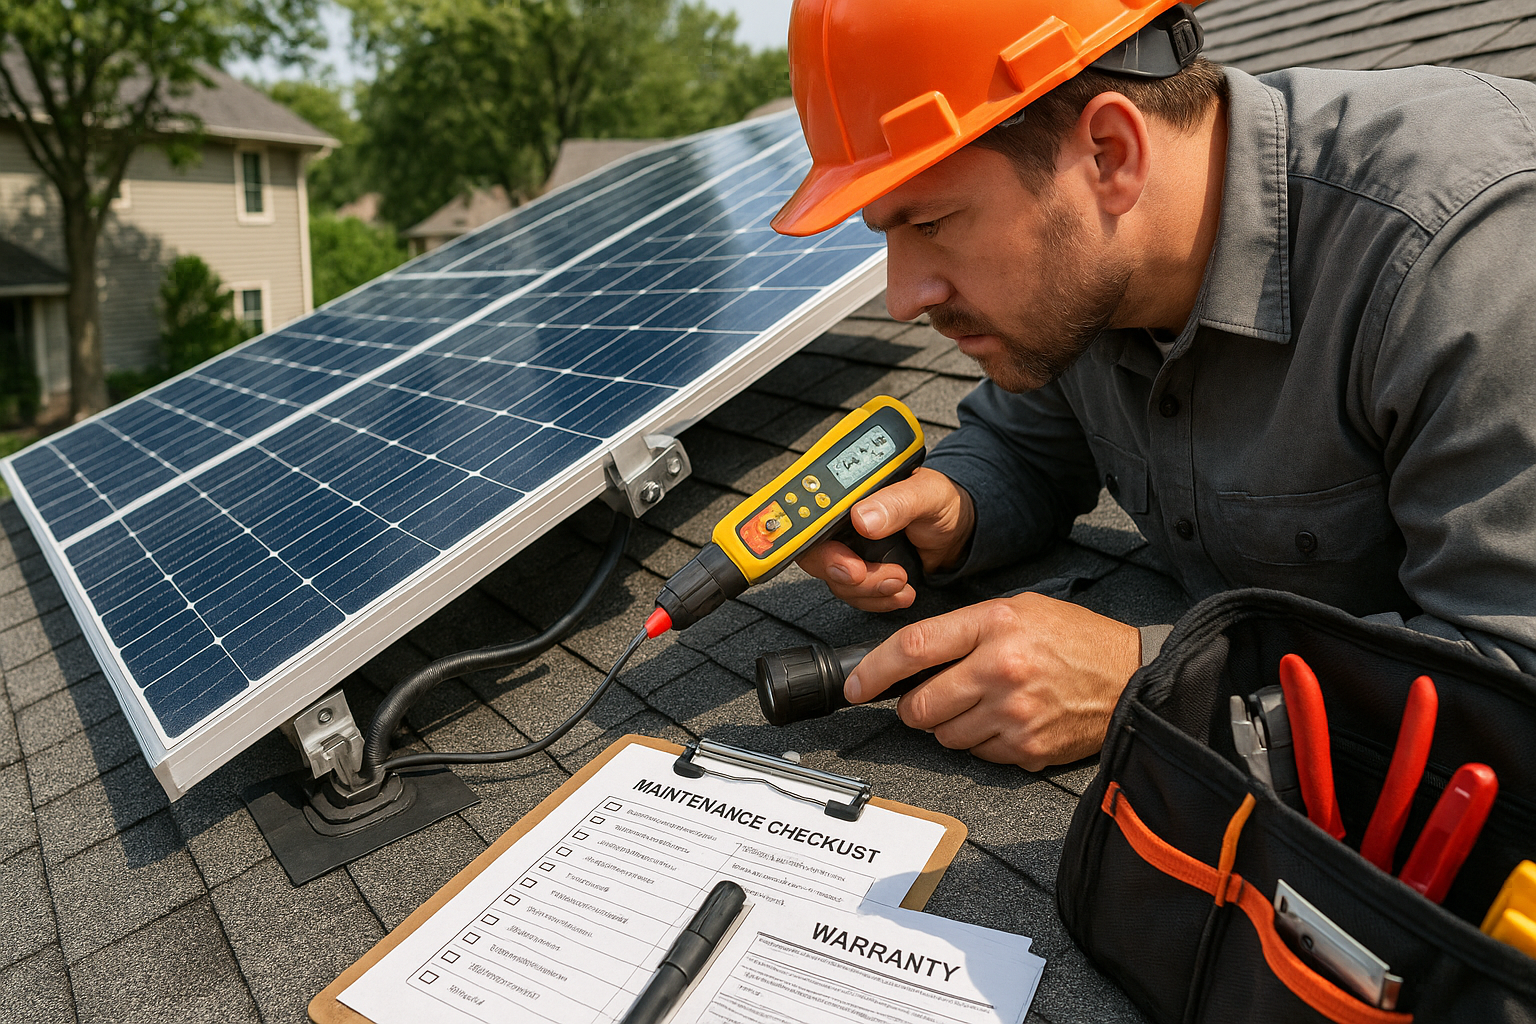
Questions for your installer
Solar contractors vary widely. Many do great work. Your questions set the bar. Use this as a script during proposals.
Ask for proof of NABCEP certification for the crew lead. Ask for the mount make and model. Request the ICC ES or ESR report for that mount. Confirm that the racking system carries a UL 2703 listing so bonding and grounding paths are defined. Learn more about UL 2703 listed mounting systems.
Ask how each stand will be flashed on your roof type. Shingles need metal flashings integrated under the correct courses. Tile needs deck level waterproofing plus a top tile level flashing. Metal standing seam may take clamp on attachments that avoid any holes at all. Ask which sealant they use at pilot holes. Confirm that the brand is compatible with your roofing manufacturer. Ask to see that approval in writing. Many mount makers publish guidance as well. IronRidge and Quick Mount documents are good references.
Ask how they will route and flash conduit and junction boxes. You want flashed goosenecks or listed pass through enclosures. SolaDeck units are a common option. See examples of flashed PV junction boxes. Ask for code aware cable routing details that follow NEC 690.31. You want supports at proper intervals, labeled circuits, and perpendicular roof penetrations. See NEC 690.31 cable routing on roofs.
Ask about workmanship coverage for roof leaks from penetrations. Many installers back their work for years. Tesla lists ten years on many panel systems for roof mounting leaks with separate terms for their solar roof. See examples of solar leak warranties. Request sample warranty documents before you sign.
Ask for photo documentation. Request clear photos of every penetration and every conduit or junction box. Keep those photos with your as built drawings for future roof work or claims. SEIA provides consumer guides with helpful question sets. The guide is a solid companion for homeowners. SEIA consumer guide.
Flashing and sealing best practices
Each roof type needs a specific method. What never changes is the goal. Keep water flowing on top of the roof system at every stage. Do not rely on sticky products alone. Do not place flashing in the wrong shingle course. Follow roofing body guidance and the roofing manufacturer instructions. That keeps you in line with building codes that call for manufacturer instructions as the standard of care. Good trade resources cover this in detail. See flashing codes and roof warranty considerations for context.
Asphalt shingles
Most residential solar goes on architectural shingles. Flashing a PV stand mirrors a pipe jack in concept. The goal is to shed water. NRCA language states that PV support stands should be flashed like pipe penetrations. The upper flange tucks under the higher shingle course with correct laps. Avoid exposed sealant as the main defense. Review the NRCA backed waterproofing for PV supports position.
Size matters. Avoid narrow flashings that dump water right at a shingle joint. Many manufacturers and trainers recommend nine inch or wider flashing for better coverage on typical shingle exposure. Placement matters. Do not overhang the drip edge. Keep nails out of the waterline of the flashing head where uplift and wind driven rain can create trouble. Solar Power World offers practical field notes in their asphalt shingle flashing tips.
Sealant choice plays a support role. Use a compatible sealant in the pilot hole and on select surfaces per the mount maker. Many mounts require a small bead that sits under the flashing collar or around the lag. Too much sealant can glue the flashing to the roof. Flashings need a little freedom to move as the roof expands and contracts. IronRidge describes this as an elevated water seal concept that places the primary water stop above the deck plane. Review their summary of elevated water seal flashing.
Tile roofs
Concrete and clay tile create unique geometry and movement. Tile breaks easily. A correct detail starts at the deck. Install a deck level flashing that ties into the underlayment with a three course method using compatible mastic and reinforcement. Then install a top flashing at the tile level that sheds water around the penetration. This double layer approach catches water that sneaks past the tile surface. Experts in tile solar work stress careful conduit management so movement does not break seals. See examples of tile roof conduit flashing. Where a conduit passes through a tile field use purpose made tile level flashings that match the tile profile.
Metal roofs
Standing seam metal roofing offers a unique opportunity. Reputable clamp systems attach to the seams with set screws. No roof penetrations at all. That removes the leak path at the attachment. It also keeps warranties cleaner for many metal roof brands. See examples of non penetrating metal roof solar mounts. Corrugated or through fastened panels still need sealed fasteners or specialized bases with gaskets, so talk through the exact profile with your installer.
Conduit and junction box penetrations
Cable pass throughs deserve the same care as mounts. On shingle or tile roofs, use flashed goosenecks or listed roof deck junction boxes designed for PV. SolaDeck produces a low profile metal enclosure with an integrated flashing that tucks under shingles. Their marketing claims leak free performance when installed correctly. The concept is sound. Water sheds over metal with correct laps. No ad hoc boxes with mastic blobs. See flashed PV junction boxes.
Quick Mount and other makers publish junction box flashing instructions for shingle and tile. These often mirror pipe flashings in the shingle field. The upper flange goes under the upslope course. The lower edge sits on top of the downslope course. Sealants get used sparingly at the pilot holes and around entries. Manuals also specify deck attachment and rafter targeting for structural integrity.
NEC cable routing basics that help roofs
Good wire management keeps water paths clear and protects conductors from abrasion. The National Electrical Code sets spacing for supports and labeling to guide future workers. Trade summaries highlight key points. Exposed PV wire ten gauge or smaller needs support at intervals not greater than twenty four inches. Circuit labels must mark Photovoltaic Power Source at defined points. See the summary of NEC 690.31 cable routing on roofs.
For concealed runs beneath roofs the code seeks clearances from the deck. Where circuits penetrate a roof, runs should travel perpendicular to the penetration. Keep DC conductors away from the underside of the deck except directly beneath the array footprint, and even there only within allowances. Those choices cut fire risk and make future roof work safer. They also reduce rub points that can become leak triggers as a worn jacket wicks water. EC industry sources give plain language guidance on these topics.
After installation maintenance
Solar arrays sit in the harshest weather. A quick homeowner routine after big storms catches small issues while they are still easy to fix. A simple flashlight visit in the attic reveals a lot. Check sheathing and insulation near every mount, vent, and junction box for stains or dampness. Musty odors show up fast in a tight attic. Our guide to preventing attic water damage walks through this process in more detail.
What to look for in the attic and on the roof
Fresh water stains around lag locations reveal the first sign of entry. Dark rings or a slightly glossy look on OSB around a stand deserve a closer look. So does insulation that clumps or mats down compared to the rest of the field. Indoors study ceilings below the array. Bubbling paint, curling tape lines, or a faint yellow halo signal moisture movement. For more context on patterns around penetrations see our deep dive on attic leak signs.
On the roof, scan for lifted shingles near mounts, poorly seated flashings, or sealant smears that look fresh. Those smears sometimes point to a rushed patch. Look for shiny copper wiring or scraped insulation under the array where wind moved a wire out of its clip. Do not walk on tile. Use binoculars or hire a pro for that roof type.
Debris, birds, and cable abrasion
Leaves and seeds can build a small dam at the downslope edge of an array. Water will back up and sneak under shingles below the panel edge. Keep gutters clear so that water exiting above the array gets a clean path off the roof. Our homeowner guide to roof leak prevention tips covers seasonal care. If your home has trees that overhang the roof, ask your installer about perimeter mesh or bird guards. Those devices block nesting under the array. They also keep sticks and acorns from collecting behind the rail. See common options for critter guards for solar.
Plan an annual professional inspection. A trained technician will check rail splices for movement, verify module clamp torque, look for corrosion in junction boxes, and scan wiring for rub points. Infrared scans can reveal hot spots in connections or modules. O and M groups publish strong guidance for this routine. See PV O and M best practices for a general overview.
If a leak happens
Act fast. Protect the interior. Document everything. Your installer likely provides a workmanship warranty for roof penetrations. Your homeowners policy may also cover water damage from sudden leaks. A clear set of photos, receipts, and notes will speed either path.
Warranties versus insurance
Most reputable installers provide a written roof leak warranty tied to their penetration work. Terms vary. Ten years is common with major brands on traditional panel systems. The warranty usually covers leak diagnosis and repair at the mount or flashing. It often requires that you notify the installer first. Homeowners insurance policies typically treat rooftop panels as part of the dwelling. Wind or hail exclusions for panels may apply in some markets. Review your policy limits and deductibles before you go solar. Progressive and other carriers outline typical terms for rooftop systems. See general Q and A on homeowners insurance for solar.
Step by step claim and who to call
First stop the water. Tarp the roof if safe. Move belongings away from the wet area. Take clear photos and short video clips of the roof, the attic, and the ceiling below. Save receipts for emergency dry out work.
Next call your installer. A leak near a penetration often falls under their workmanship coverage. Ask for a service visit, and request written findings with photos. If your installer confirms a roof or flashing failure unrelated to their work, call a licensed roofer. If water entered the living space, call a restoration firm to dry the area quickly. Drying within the first twenty four to forty eight hours reduces mold growth.
Then reach out to your insurer if damage is significant. Explain the event and the steps taken. The carrier will assign an adjuster. Provide your time stamped photos and any installer or roofer reports. Collect estimates for roof work and interior repairs. The normal process follows a familiar path. Adjuster visit, scope, estimates, settlement, and final sign off once work is complete. If hail or wind caused the leak at a panel location, both the array and the roof may be part of the claim. Keep all paperwork organized for future roof work or sale disclosures.
Call a pro in Austin
Live in Austin or nearby. Our team helps homeowners with leak detection, attic moisture assessments, and interior dry out after storms. We know what proper solar panel flashing looks like. We also know how to spot early signs in your attic before staining reaches the ceiling. If you suspect a leak after a new solar install, call us for a fast inspection. We will document findings for your installer and your insurer. We can also connect you with roofers who work well with PV systems.
FAQs
Do solar panels cause roof leaks
Not with correct flashing and cable pass throughs. Roof leaks usually trace back to skipped metal flashing, sealant only patches, or aging shingles that should have been replaced first. Roofing bodies call for pipe style metal flashings for PV supports with upper flanges tucked under the upslope shingle course. See the NRCA backed waterproofing for PV supports reminder and this overview of flashing codes and roof warranty considerations.
What type of flashing prevents solar roof leaks
Shingle roofs need metal flashings integrated into the correct shingle courses. The upper flange goes under the upslope course. Tile roofs need a double approach with underlayment three course work at the deck and a top tile level flashing. Standing seam metal can often use clamp on systems that avoid penetrations. Review asphalt shingle flashing tips, this tile method for tile roof conduit flashing, and a primer on non penetrating metal roof solar mounts.
What should I ask my installer to avoid leaks
Ask for the mount model and its ICC ES or ESR report. Confirm that racking carries a UL 2703 listing. Request drawings that show flashing details for your roof type. Ask how conduit and junction boxes will be flashed. Ask which sealant will be used and whether your roofing manufacturer approves it. Request a written roof penetration warranty and photo documentation of every hole in the roof. SEIA offers a simple consumer guide for these conversations. SEIA consumer guide.
How should PV wiring be routed to avoid problems
Support exposed conductors at code spacing, label circuits as Photovoltaic Power Source, route perpendicular at penetrations, and avoid concealed runs near the roof deck except directly beneath the array. That approach protects cables from abrasion and keeps future roof work safer. A trade summary of 690.31 covers these points. See NEC 690.31 cable routing on roofs.
Practical homeowner checklist before solar
Use these short checks during your solar proposal stage. They save headaches later.
Roof condition first. If your asphalt shingles are near ten to fifteen years old, bring in a roofer for a full evaluation. Consider a re roof before solar so panel life and roof life match. Consumer resources cover this topic in plain language at replace roof before going solar?
Hardware pedigree matters. Ask for ICC ES or ESR reports on roof mounts. Request the engineering sheet that shows rafter or deck attachment method for your zone. Ask for the UL 2703 listing for the racking brand. That listing confirms a tested bonding path from module frames to ground.
Flashing details in writing. For shingles ask for metal flashings integrated into the correct shingle courses with no sealant only methods. For tile insist on deck level three course waterproofing plus a formed top flashing. For standing seam metal push for clamp on attachments that avoid holes where possible.
Sealant compatibility. Ask your installer to name the sealant brand and spec. Request proof of compatibility with your roofing brand. Generic mastics can damage shingles over time.
Conduits and boxes. Require flashed goosenecks or listed deck level boxes like SolaDeck for all pass throughs. Ask for perpendicular penetrations and clean routing that follows NEC 690.31 spacing and labeling.
Documentation to keep. Ask for photos of every penetration and as built drawings. These assets help your roofer when you re roof in the future. They also support any warranty or insurance claim.
Early warning signs after solar is installed
Watch the first heavy rain after your install. A quick attic check can prevent ceiling stains or insulation damage. Look near mounts and near any roof junction boxes. If you see a drip trail, call your installer at once for a warranty visit. Our field guide to preventing attic water damage shows where to look and what to use for safe attic checks.
Debris control matters. Keep the roof surface and gutters clear so water cannot back up under shingles at the panel edge. Our quick list of roof leak prevention tips covers seasonal tasks. If birds take interest in your array, consider perimeter mesh to block nesting. It also keeps debris from forming a dam under the panel field. See common bird proofing approaches for reference.
Schedule an annual PV service. A technician will check hardware torque, re secure any loose wire clips, inspect junction boxes for moisture, and note any cracked tiles or lifted shingles near mounts. An infrared scan can pick up hot spots in electrical terminations before they fail. SunSpec and industry trades discuss O and M benefits in detail. See PV O and M best practices for a broad view.
Why sealant only methods cause callbacks
This point bears repeating. Solar racking heats up in the sun and cools at night. That cycle causes small daily movement at every attachment. Sealant only patches crack or peel under those cycles. Butyl backed stick on flashings lose grip as shingle oils move. Water finds any weak seal. Roofing groups recommend metal flashing that integrates with shingle courses. The metal creates a durable path for water to shed. Sealant serves as a backup for the lag hole and selected seams. See the Florida Roofing Association guidance on why sealant only solutions fail for a straight answer from the roofing side of the trade.
Cable routing choices that lower risk
Thoughtful routing reduces hazards and cuts future repair costs. Keep DC conductors away from rough surfaces. Use clips on module frames so wire does not rest on shingles. Support exposed cable at or under two foot intervals as the code requires. Label combiner boxes and conduits as Photovoltaic Power Source. Where runs go through the roof, travel perpendicular to the penetration and keep the concealed portion away from the deck except directly beneath the array. These choices do not just meet code. They make future roof work safer. They also reduce rub points that lead to jacket wear and leaks. For a clear article on these rules, see NEC changes overview for PV wiring.
Conduit layout tips by roof type
Shingle roofs do well with a ridge or high point pass through. Keep the box upslope of the array where possible. Use a listed flashing box or a gooseneck with a wide base. Tuck the upper flange under the upslope course. Seal the pilot holes as directed by the box maker. Keep the conduit strapped so it cannot rock and pump water at the base.
Tile roofs require a deck level waterproofing first. Use the three course method to tie the base flashing into the underlayment. Place a top tile level flashing to move surface water around the pipe or box. Strap the conduit to block sway which can break seals. See installer field examples of tile roof conduit flashing for the general shape and placement.
Metal standing seam allows conduits to run along seams with standoff clamps. Penetrations become fewer. If a pass through is needed use a boot flashing sized to the conduit with a wide base. Tighten clamps to spec to avoid seam damage.
Protect your roof warranty
Roof manufacturers often state that roof accessories must follow their published instructions. They also require compatible sealants. In short, a solar installer must treat your roof as a roof first. That means metal flashing with correct laps, approved sealants, and hardware that attaches to structure per engineering. It also means no over sealing that glues flashings to shingles. Water needs a clear path to shed. A brief primer from Solar Power World on manufacturer instructions and roof warranty language gives helpful context on this point. Read more on flashing codes and roof warranty considerations.
What we look for during leak inspections
As a restoration contractor, we start inside. We scan ceilings for shadows or hairline cracks. We pull attic access and look for fresh wood stain, bright nail tips with moisture beads, and matting in insulation. We trace stains upslope to mounts or pass throughs. Outside, we look for lifted shingles, skewed flashings, new sealant smears, or unplugged wire clips. We also check gutters that sit below the array for debris mounds that hold water. If a leak relates to a solar penetration we document it for your installer and coordinate a fix under their warranty when applicable.
Insurance talk in plain terms
Rooftop solar often falls under dwelling coverage. Many policies cover storm loss and sudden leaks. Some exclude panel damage from hail or wind or they set special deductibles. Ask your agent to explain your limits in writing before you sign a solar contract. Update your policy once the system is in place. That way your coverage matches the added value on the roof. Consumer resources such as EnergySage and carrier pages describe how solar affects premiums and claims. A simple review now saves headaches later.
Final thought for Austin homeowners
Solar pays off when roofs receive the same care as electrical work. Use the questions in this guide during your bids. Pick an installer who flashes every stand like a pipe jack. Insist on proper conduit flashing. Confirm cable routing that meets NEC 690.31. Keep a photo record of every hole. Check your attic after the first heavy storm. If something looks off, call us. We are ready to help with inspection, water mitigation, and coordination with your installer or insurer. We protect homes in Austin every day.