If your stucco or EIFS looks flawless but your baseboards smell like a locker room, your wall is probably crying on the inside. Traditional stucco and synthetic stucco look tough, yet they’re surprisingly needy when it comes to drainage. Water always finds a way in. The trick is giving it a way out before it rots framing, feeds mold, and devalues your house. This guide shows you how to spot hidden leaks, what proper weep screed installation really looks like, and how to retrofit head and sill flashings and a drainage-plane so you do not have to re-side the whole place.
Stucco vs EIFS: What You’re Actually Looking At
Let’s straighten out the basics. Traditional three-coat stucco is a cement-based plaster over lath with a weather-resistant barrier behind it. It can absorb a ton of water but it wants to drain and dry out. EIFS, sometimes called synthetic stucco, is foam insulation glued or mechanically fastened to the sheathing, then coated with base coat and mesh, then a thin finish coat. Old-school barrier EIFS tried to keep all water out at the surface. Spoiler: water always wins. Modern EIFS is typically a drainage EIFS that includes grooves, mats, or intentional gaps behind the foam to let water out.
The make-or-break detail for both systems is drainage. If water sneaks in around a window, at a roof-wall intersection, or through a bad sealant joint, it needs a path down and out. Without that path, moisture stacks up behind the finish, soaks the sheathing, and starts a quiet little bio-party you will not enjoy paying for.
Red Flags You’ve Got Hidden Moisture
You do not have to peel your walls open to catch leaks early. Start with a slow lap around the house right after a decent rain. Look and feel for small clues that add up to big trouble.
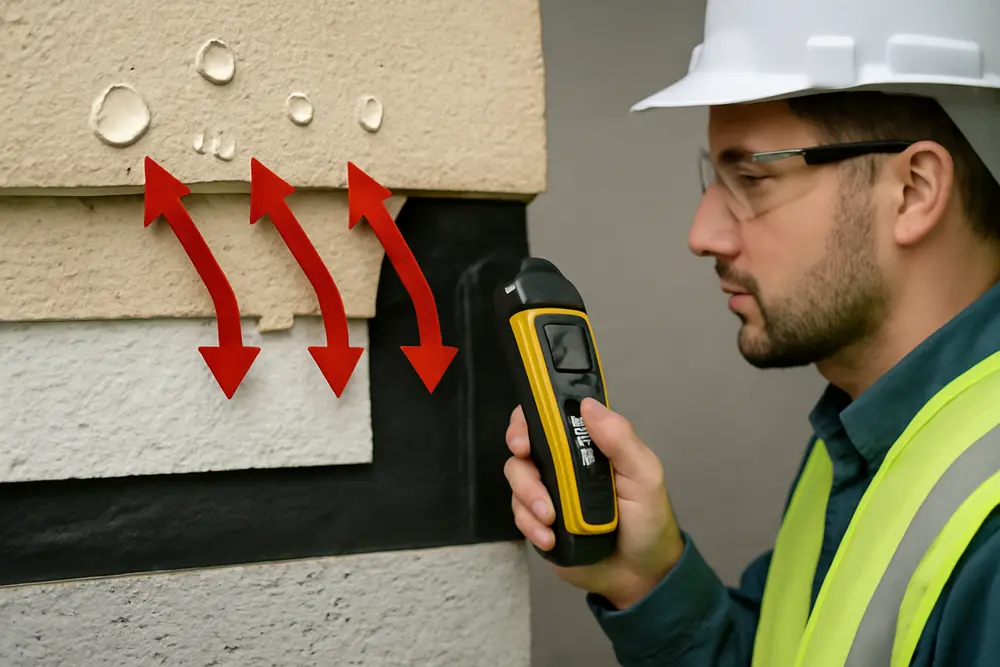
Watch for paint that peels or bubbles on trim near stucco, tan or brown drip stains beneath window heads, hairline cracks that are widening, swollen trim boards, loose kickout areas at the end of roof eaves, and stucco that feels soft or chalky where it should be dense. Sometimes the only giveaway is a musty odor near exterior walls or a persistent spike in utility bills because your insulation is wet and useless.
If you want to level up, grab a moisture meter. A pinless meter is good for screening large areas without leaving tracks. Probe-type meters are more surgical and can check sheathing moisture content through small holes behind trim. As a rule of thumb, readings above the mid-teens are a yellow flag and anything pushing past 20 percent is a red flag that deserves further investigation. Infrared cameras are great too right after a rain or during a humid day because wet areas show up cooler than dry ones. That cool patch under a window that never warms up in the afternoon sun is not a mood. It is a leak path.
Meet The Weep Screed: Your Wall’s Exit Strategy
A weep screed is a corrosion-resistant metal trim at the bottom of stucco or EIFS on wood-framed walls. It sets the thickness of the finish, terminates the cladding cleanly, and most importantly gives water that sneaks behind the system a way to drain out. No weep screed means trapped moisture hovering at the sill plate. That is rot central, with bonus mold and termite snacks.
Codes and manufacturer specs usually call for a weep screed with about a 3-1/2 inch vertical flange on wood framing, fastened at or just below the foundation plate line. You also need clearance to grade so the water can weep freely. Think roughly 4 inches above soil and 2 inches above paved surfaces. If your stucco disappears into mulch or patio pavers, that bottom edge is not weeping. It is bathing.
EIFS needs the same concept even if it looks different. Drainage EIFS systems require a defined exit at the bottom and at horizontal breaks. If you add a rainscreen mat or create an air space behind the finish, you may need a deeper ground screed to match the added thickness. The right profile keeps the gap open while letting water out and bugs less in.
How Weep Screed Installation Should Happen
Whether you are installing new stucco or retrofitting, the weep screed is not a decorative afterthought. Done right, it ties into the whole drainage strategy.
Here is the gist of a clean installation or retrofit:
Set height and clearance. Plan the bottom termination so it lands at or below the sill plate line and maintains the minimum ground and paving clearances. Do not let landscaping creep up later and choke it.
Integrate the weather-resistant barrier. The WRB laps over the vertical flange of the weep screed so any water on the WRB drains into the screed channel and out. If you are retrofitting, pull the lower courses of finish, replace compromised WRB, and overlap properly. Tape is not a miracle if laps face the wrong way.
Lath with a gap. Metal lath should stop short of the drainage openings. You want a clear path. In EIFS, the foam and base coat stop above the drainage holes as per the system detail. Do not fill the perforations with base coat or stucco because that turns an exit into a clog.
Mind the thickness. A rainscreen mat or furring adds thickness. Match the screed depth so you are not pinching the drainage space or creating a weird ledge that invites cracking.
Keep it visible and clean. No paint filling the holes. No caulk smeared across the outlet. If you cannot see daylight through the drainage openings at the base, neither can the water.
Where Flashings Fail And How To Fix Them
Most leaks do not start mid-wall. They start at transitions and openings. Windows and doors need head flashing that sheds water over the face of the cladding, not behind it, and sills that kick water out and away from the wall. Roof-to-wall joints need step flashing and a kickout at the eave to punt roof runoff into the gutter instead of into your stucco.
Here is what solid retrofit work looks like:
Head flashing above windows and doors that extends beyond the jambs and tucks behind the WRB. The finish should be cut and patched so the flashing leg sits proud of the wall surface, not buried. Add end dams at the flashing ends so water does not run off the sides and back in.
Sill pans or back dams under windows to prevent water from migrating to the interior. A formed sill pan, liquid-applied flashing, or a sloped metal pan all beat hoping a bead of caulk will survive five summers and one pressure wash.
Kickout flashing where the roof eave meets the wall. If you see a typical step flashing that just dies into stucco with no kick, you have a water path. A proper kickout throws water into the gutter. If your wall is stained under that spot, that is your smoking gun.
Meter boxes, hose bibs, light fixtures, and vents need proper mounting blocks and gaskets. Penetrations that were just caulked against the finish are frequent leaks. Add a backer, integrate flashing with the WRB, then re-seal with a compatible sealant. Caulk alone is a temporary truce with water.
Drainage-Plane Retrofits That Actually Work
If you have recurring leaks or high moisture readings across a wide area, patching sealant is whack-a-mole territory. You need to create a reliable drainage-plane behind the cladding. That means controlled tear-back and rebuild, but not necessarily full re-siding.
The process usually goes like this: carefully remove a band of finish along the base to install or expose the weep screed. Open up around bad transitions, like windows and roof joints. Replace any rotted sheathing or framing. Install a continuous WRB with shingle-style laps over flashings and the screed flange. If you are working with EIFS, convert to a drainage EIFS approach with a grooved foam or drainage mat. In stucco, consider a drainable lath system or a rainscreen mat to create a capillary break. Reinstall finish layers and tie everything back into the weep screed and head and sill flashings so water has a guided path out.
The goal is simple: water that gets in at the top or middle should ride the WRB or drainage gap all the way to the weep screed. No dead ends. No reverse laps. No wishful thinking.
When Repairs Are Enough vs Full Re-Siding
Nobody wakes up excited to strip an entire facade. The good news is you often do not have to. Targeted repairs make sense when moisture readings are localized, the sheathing is still structurally sound, and you can trace the problem to a clear culprit like missing kickout flashing, a buried screed, or cracked sealant around a few openings. In those cases, fix the weak links, restore the drainage-plane in those zones, and monitor over a few weather cycles.
Full re-siding comes into play when rot is widespread, insulation is saturated in multiple bays, the WRB is swiss cheese, or the original cladding assembly was a barrier EIFS with no drainage and chronic leaks. If the substrate is compromised over large areas, rebuilding sections while leaving islands of questionable material is throwing good money after bad. A proper inspection with strategic test cuts will tell you which side of that line you are on.
Maintenance That Keeps Walls Dry
Moisture control is not a one-and-done. Your exterior needs a little seasonal attention. Start with the obvious: do not bury the weep screed with mulch or soil. Keep it visible and at code clearances. If you see paint caked over the screed perforations, scrape it clean. Twice a year, clear debris at the base of walls and check for insect nests, stucco crumbs, or anything else blocking exit points.
Walk the house in spring and fall. Look for cracked or missing sealant at joints and trim. Use a sealant that plays nice with stucco or EIFS. Slap-dash latex from the bargain bin will not cut it. Clean out gutters and confirm kickout flashings are doing their job. Overflows that dump against walls are silent assassins.
Keep sprinklers from blasting the wall. Wetting cycles accelerate hairline crack growth and force water through tiny paths you cannot see. Re-aim heads so they water the lawn, not your finish coat.
DIY Checks You Can Safely Do
I love a homeowner with a flashlight and a healthy suspicion of water. You can handle the basic patrols: look for stains under window heads, run your hand along suspect areas after rain, check the base of walls for clear weep holes, and spot buried screeds behind landscape build-up. A simple pinless moisture meter is a solid investment if you are curious and careful. Use painter’s tape to mark readings and repeat after the next storm to see if a pattern shows up.
What you should not do is drill random holes through EIFS or stucco without a plan, smear generic caulk over failed joints without removing old bead and prepping the surfaces, or carve out sections near electrical penetrations. If you are seeing high moisture readings in multiple places, stained drywall inside, or crumbly sheathing at test cuts, it is time to call a pro who knows how to open and rebuild details without making new leak paths.
Common Retrofit Scenarios That Save The Day
Every house is different, but here are fixes that routinely turn a soggy wall into a well-drained one without replacing everything:
Exposing a buried weep screed. We remove 6 to 12 inches of finish at the base, install or repair the weep screed, replace the WRB with proper laps, then patch and texture. It is like un-kinking a garden hose the wall did not know it had.
Adding real head flashing at windows. We cut above the head, slip in a proper flashing that laps behind WRB and extends beyond the jambs with end dams, then tie the finish back in. Stains below the head usually stop after the next storm. Novel concept.
Installing kickout flashing at roof ends. If your stucco is stained under the last shingle, this is a no-brainer. Install a formed kickout that throws water into the gutter and repair the wall below if it has been soaking for years.
Upgrading to a drainable assembly in a problem zone. If one wall gets hammered by wind-driven rain, we often retrofit a rainscreen mat behind new stucco in that section and use a deeper ground screed to maintain the drainage gap. The rest of the house can stay as-is if it is behaving.
Quick Reference: EIFS vs Traditional Stucco
| Feature | Traditional Stucco | EIFS (Synthetic Stucco) |
|---|---|---|
| Typical Layers | WRB, lath, scratch, brown, finish | WRB, foam, base coat with mesh, finish |
| Drainage Strategy | WRB behind stucco, weep screed at base | Drainage EIFS with grooves or mat, defined bottom exit |
| Common Failure | Missing or buried weep screed, bad flashings | Barrier EIFS with no drainage, bad flashings |
| Go-To Retrofit | Weep screed install, head and sill flashings, rainscreen mat | Convert to drainage EIFS details, add bottom drainage, kickouts |
What Tools And Materials Actually Help?
You do not need a truck full of gimmicks. Here is the short list that makes a difference: a reliable pinless moisture meter, a bright headlamp for attic and crawl checks, a 4-foot level for spotting out-of-plane bulges, a high-quality polyurethane or silicone sealant labeled for stucco or EIFS, proper metal flashings with end dams, self-adhered flashing membranes that are compatible with your WRB, and the correct weep screed profile for your wall thickness. For rainscreen retrofits, use a recognized drainage mat or grooved foam per the system specs. Do not kludge random mesh and hope it drains.
How Long Do These Retrofits Last?
If the details are correct, these are not band-aids. A proper weep screed should last as long as the cladding if it is corrosion-resistant and kept clear. Flashings are durable when they are the right gauge, properly lapped, and not buried under stucco or sealant. Sealants are the maintenance item. Many last 10 years if joint geometry is right and UV exposure is moderate. Check them on a schedule and renew before they fail instead of after.
Cost Ranges You Can Use To Plan
Every market is different, but targeted repairs around a few windows or a short base section are far cheaper than a tear-off. Expect a small retrofit weep screed and patch to run in the hundreds to low thousands depending on access and finish matching. Flashing retrofits at a window or a roof-wall kickout are in the same ballpark each. A full drainage-plane retrofit on one elevation lands higher because it involves selective demo, substrate repair, WRB replacement, and full finish rework. That said, stopping hidden rot early is the bargain compared to replacing sheathing and framing across half the house.
FAQ: Homeowners Ask, We Answer
Can I just caulk the cracks and call it good?
Caulk is a supporting actor, not the hero. If water is getting behind the cladding through bad flashings or a blocked weep screed, caulk might hide a symptom while the wall keeps rotting. Use caulk for minor joint maintenance, not as a substitute for drainage.
Is EIFS always a problem?
No. Drainage EIFS done right works well and is energy efficient. The disasters you hear about came from barrier EIFS with no drainage and sloppy details. If your EIFS is older and acting up, adding a defined drainage path and fixing flashings can rescue it.
Do I really need a weep screed?
Yes, on wood-framed walls with stucco or EIFS, a weep screed or ground screed is standard practice and typically required by code. It is the exit door for trapped moisture. No exit, big problems.
How high should the weep screed be off the ground?
Typical guidance is about 4 inches above soil and 2 inches above paved areas. The goal is to keep the drainage openings clear of splashback and debris so water can actually weep out.
What if my patio was poured after the stucco and now covers the bottom?
That is a classic trap. The fix is to cut back the finish, expose or install a new screed at the correct elevation, and add a proper gap to the hardscape. Yes, it is a bit of work. No, you cannot wish water through concrete.
Can I test for moisture without wrecking the wall?
Yes. Start with a pinless meter and infrared after a rain. If readings are high, a pro can do minimally invasive probes behind trim or at existing joints. Strategic test cuts beat blind demolition every time.
If You Suspect EIFS Moisture Intrusion
Do not wait for interior drywall stains to send the invite. Walk the base of your walls and find the weep screed. If you cannot see it, that is your first mission. Check the last shingle at the eaves for a proper kickout. Look above window heads for flashing that actually extends out and sheds water. If things look sketchy or your meter lights up like a Christmas tree, schedule a targeted inspection. The sooner you give water a controlled exit, the sooner your walls stop acting like sponges in trench coats.